We all know that currently Windows 11/10 feature updates are released via annually. As an IT admin, you can specify which version you would like your client’s device(s) to move to and/or stay on until they reach end of service or you reconfigure the policy. To accomplish this, you need to select the target Feature Update version in Windows 11. This will help you to stay on same Windows version. How to do this, we’ll see in this article.

With Windows 10 Version 1803, Microsoft add a new setting to allow you to set a target feature update version for your Windows 10. In Version 2004, they added the Group Policy setting for IT Pros to deploy the configuration on client’s devices. This policy is best option for those clients who wants to stay on a particular version. Also, for the clients who want to skip a version and upgrade to desired or latest version, this policy is the perfect solution.
According to Microsoft, when you specify a target version, if the specified version is older than your current version or you set an invalid value, the device will not receive any feature updates unless you update the policy. When you specify target version policy, feature update deferrals will not be in effect. Specifying the current version as target version will make you stay on current version.
So let us see how to select target Feature Update version in Windows 10.
Page Contents
Select The Target Feature Update Version In Windows 11/10
1. Open GPO Editor by running gpedit.msc in Windows client edition and by using gpmc.msc command in Windows Server.
2. Next, open the GPO Editor window, navigate here:
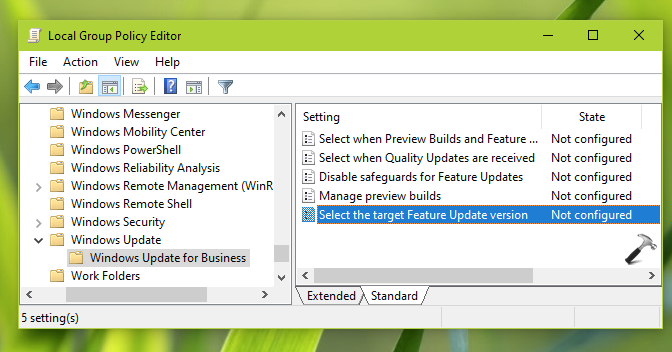
Computer Configuration > Administrative Templates > Windows Components > Windows Update > Windows Update for Business
Note: You should have Policies folder after Computer Configuration, if you’re on Windows Server.

3. Now in the right pane of Windows Update for Business folder, locate Select the target Feature Update version and double click on it to modify the status:

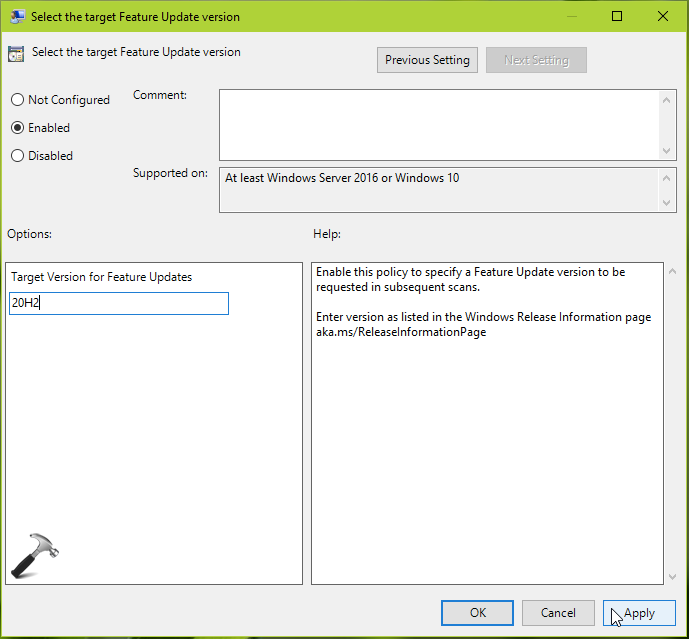
4. Now Enable the policy setting and under Options, specify the target version for feature updates (for example, 23H2). Note that you must enter exact version name that is mentioned on Windows release information page at aka.ms/ReleaseInformationPage. Then click Apply followed by OK.
5. Close the GPO editor and update the GP engine to make changes effective.
Video guide
Here’s the video showing how you can set target version in Windows 10 and block feature updates:
That’s it!
Originally written on Nov 10, 2020. Updated for Windows 11.
![KapilArya.com is a Windows troubleshooting & how to tutorials blog from Kapil Arya [Microsoft MVP (Windows IT Pro)]. KapilArya.com](https://images.kapilarya.com/Logo1.svg)


6 Comments
Add your comment
Hi, I am not able to see the “Select the target Feature Update version” under the Windows Update for business folder.
^^ Make sure you’ve Windows 10 V1803 or later.
Thanks Kapil, what Server version does this apply to?
^^ Server 2016 or later, as mentioned in policy page.
Running Win 10 Enterprise, Version 21H2. I do not see “Select the target Feature Update version” in gpedit, either. Suggestions?
^^ Refer other options provided here: docs.microsoft.com/en-us/windows/deployment/update/waas-wufb-group-policy.