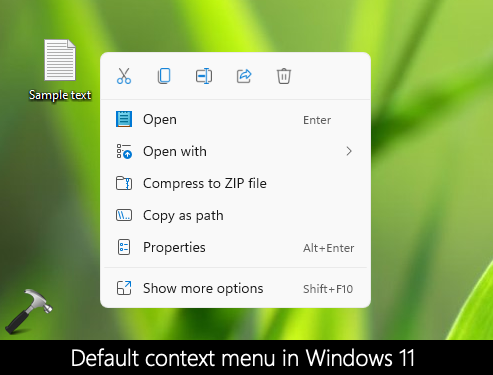
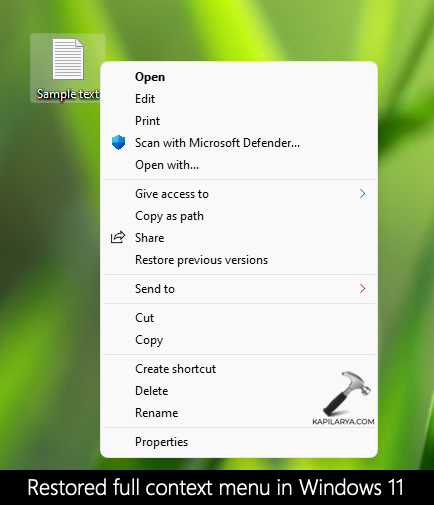
One of the crucial change you will find between Windows 10 and Windows 11 is the right click context menu. Although there are many user interface changes between these operating systems, but right click context menu change is visible very soon when you start using Windows 11. With Windows 11, the right click context menu uses the acrylic material. This makes the context menu look very captivating with modern design. With the new right click context menu, as of now, only few options are displayed. To show full context menu, you either need to press Shift+F10 or select Show more options. In this guide, we’ll see how to restore full right click context menu in Windows 11.

As you can see in the screenshot above, we have the default and compact context menu in Windows 11. Although, the most usable options are already displayed in this compact menu. But if you need an option that is not included, you have to press Shift+F10. When you do so, you will get the full context menu, which you have already used in Windows 10 and earlier OSes.
In case if you want to show full context menu by default, this guide will show you how you can do that. A simple registry manipulation can help you to achieve this.
Page Contents
Restore full right click context menu in Windows 11
Method 1 – Restore full context menu in Windows 11 using registry
 Registry Disclaimer: It is recommended to create a System Restore point first, if you’re not familiar with registry manipulation.
1. Run regedit command to open Registry Editor.
2. In left pane of Registry Editor window, navigate to:
HKEY_CURRENT_USER\Software\Classes\CLSID
3. Under CLSID, create a new registry sub-key and name it {86ca1aa0-34aa-4e8b-a509-50c905bae2a2}. Then under {86ca1aa0-34aa-4e8b-a509-50c905bae2a2}, create registry sub-key and name it as InprocServer32. In the right pane of InprocServer32, make sure (Default) registry string (REG_SZ) exists without any Value data.

4. Close Registry Editor. Restart Windows/File Explorer to apply changes. You’ll then find that full context menu is now shown by default.

You can checkout the live illustration of this method with this video:
IT administrators can deploy above registry manipulation using this guide.
Method 2 – Restore full context menu in Windows 11 using Command Prompt
If you don’t want to manually edit registry, you can apply this Command Prompt based method which is quick and convenient.
1. Open administrative Command Prompt.
2. Paste following command and press Enter key:
reg.exe add "HKCU\Software\Classes\CLSID\{86ca1aa0-34aa-4e8b-a509-50c905bae2a2}\InprocServer32" /f /ve

3. Once you see ‘The operation completed successfully’, you can close Command Prompt.
4. You can then restart Windows/File Explorer to apply changes.
That’s it!
Read next: Show or hide Chat icon on taskbar in Windows 11.
![KapilArya.com is a Windows troubleshooting & how to tutorials blog from Kapil Arya [Microsoft MVP (Windows IT Pro)]. KapilArya.com](https://images.kapilarya.com/Logo1.svg)


15 Comments
Add your comment
nope :'(
Hi!, I finally made it, the key was opening the (Default) registry string, and then close it, so the value changed from unassigned to blank.
^^ Yes, (Default) should be blank.
Didn’t work, even after changing Data from (value not set) to blank (nothing). Looks just like the screenshot, but didn’t work.
Method2 Worked for me
^^ Glad to help!
Thanks!!!!!
HERO! Thank you!
How about Microsoft just giving us an easy way to show all options as before. That seems so obvious.
^^ For that, you need to stick to Windows 10.
It worked!
thanks
^^ Glad to help 😎
I did this using Method 1, it didn’t work, so I deleted the registry entry. Now my computer is running more noisily and freezing randomly? How can I restore it to how it was before? Brand new PC, should be running silently and smoothly.
^^ You can use System Restore.
How about Microsoft just give the option to set the right-ctrl menu the way the user wants it instead of forcing something useless on users? The change was totally unnecessary.
“his makes the context menu look very captivating with modern design.” “Although, the most usable options are already displayed in this compact menu.” Nope, not even close!