Long time back in year 2015, we shared you following guide to install Remote Server Administration Tools (RSAT) tools in Windows 10:
Install Remote Server Administration Tools (RSAT) In Windows 10
In Windows 10 version prior to V1809, you can use above linked guide to install RSAT tools. However with Windows 10 V1809 or later, Microsoft removed the capability to install RSAT as add-on. Instead, the Redmond software-giant designated the RSAT tools as optional features in V1809 or later. So in this nutshell, now RSAT tools are features on demand – if you need them do install them.
In this article, we’ll see how you can install RSAT tools on your Windows 10 Version 1809 or later.
Page Contents
How To Install RSAT Tools On Windows 10 V1809 Or Later
Method 1 – Using Settings App
1. Right click Start Button or press  + X keys and select Settings.
2. In the Settings app, navigate to Apps & features > Optional features.
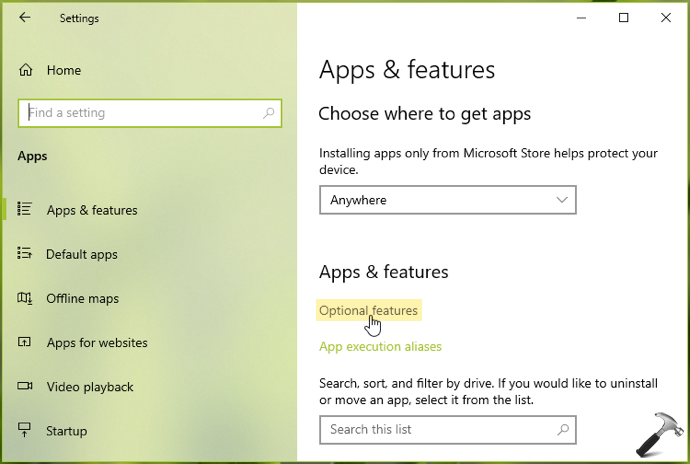
3. Under Apps & features, in corresponding right pane, click on Optional features.
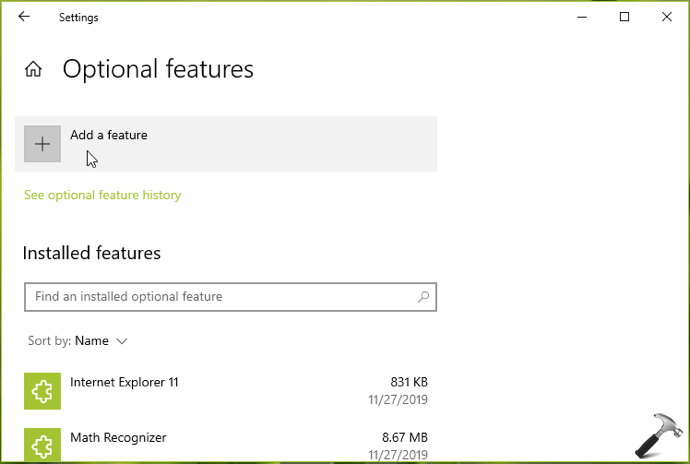
4. Inside Options features, click on Add a feature button.
5. This will open Add an optional feature window, and you’ve to search for ‘rsat’ here. The result will include all RSAT tools, so you can manually select the features you want and hit Install button.
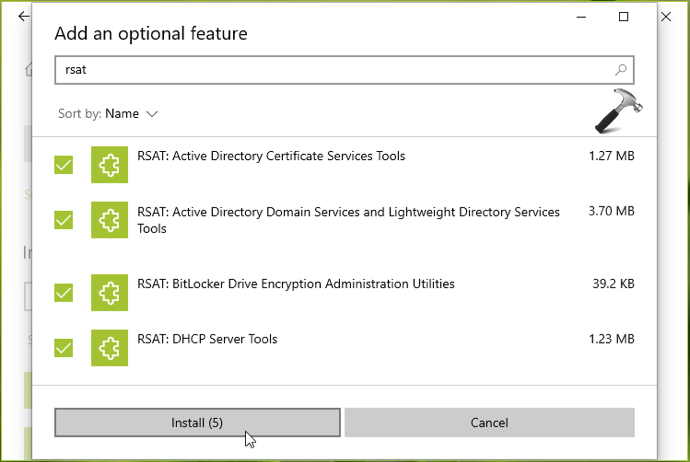
In the few moments, you selected RSAT features will be installed.
Check illustration of above mentioned steps in this video:
Method 2 – Using Windows PowerShell
1. Open administrative Windows PowerShell.
2. In the PowerShell window, type following cmdlet to confirm if RSAT tools is not installed on your system:
Get-WindowsCapability -Name RSAT* -Online
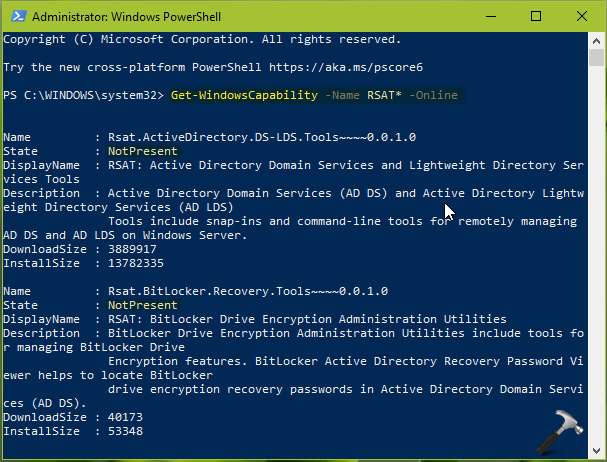
3. This will populate the list of RSAT features and against State, if you see NotPresent, this means the feature is not yet installed on your system. Another benefit of this list is that it mentions RSAT feature name which you can use with Add-WindowsCapacity cmdlet.
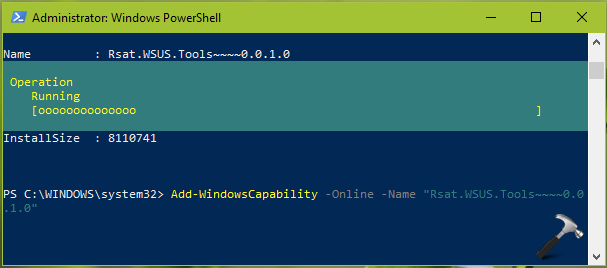
4. To install a RSAT feature selectively, you’ve can use this general cmdlet:
Add-WindowsCapability –online –Name "<RSAT Feature Name>"
You need to substitute correct RSAT feature name, for example Add-WindowsCapability -Online -Name "Rsat.WSUS.Tools~~~~0.0.1.0". You will need to stay connected to web to get the feature downloaded and installed.
 UPDATE: If you’re on Windows 10 20H2 and above steps didn’t worked, try this suggestion (in comments below).
That’s it!
![KapilArya.com is a Windows troubleshooting & how to tutorials blog from Kapil Arya [Microsoft MVP (Windows IT Pro)]. KapilArya.com](https://images.kapilarya.com/Logo1.svg)




40 Comments
Add your comment
Running the command i will let you know the result
Does this still work on a 20H2 Windows 10 build?
^^ Haven’t tested with 20H2 but it should work.
searching for rsat on 20H2 Windows 10 build does not work :(
^^ Try Method 2 and see if it works.
Just tried Method 2, trying to add ‘Rsat.Dns.Tools~~~~0.0.1.0″ got error “add-WindowsCapability failed. Error code = 0x800f0954”
“FullyQualifiedErrorID: Microsoft.Dism.Commands.AddWindowsCapabilityCommand”
Is it too much to expect that the admin tools we rely on to do our jobs will work on our computers?
^^ Try registry based FIX 2 here: https://www.kapilarya.com/fix-net-framework-3-5-dism-error-0x800f0954-in-windows-10.
For Windows 10 20H2, follow below steps:
Run PowerShell as Administrator
Add-WindowsCapability -Name Rsat.ActiveDirectory.DS-LDS.Tools~~~~0.0.1.0 -Online .
^^ Thanks Amit!
it works for me (win 10 pro 20h2)
^^ Glad to help 😊
“For Windows 10 20H2, follow below steps:
Run PowerShell as Administrator
Add-WindowsCapability -Name Rsat.ActiveDirectory.DS-LDS.Tools~~~~0.0.1.0 -Online .”
It returned me error 0x80240438
^^ Try these PowerShell commands, see if it works:
$UseWUServer = Get-ItemProperty -Path “HKLM:\SOFTWARE\Policies\Microsoft\Windows\WindowsUpdate\AU” -Name “UseWUServer” | Select-Object -ExpandProperty UseWUServer
Set-ItemProperty -Path “HKLM:\SOFTWARE\Policies\Microsoft\Windows\WindowsUpdate\AU” -Name “UseWUServer” -Value 0
Restart-Service “Windows Update”
Get-WindowsCapability -Name “RSAT*” -Online | Add-WindowsCapability –Online
Set-ItemProperty -Path “HKLM:\SOFTWARE\Policies\Microsoft\Windows\WindowsUpdate\AU” -Name “UseWUServer” -Value $UseWUServer
Restart-Service “Windows Update”
Muchas gracias :)
^^ Glad to help!
the Windows of 20h2 works.
^^ Glad to help!
It works for me (win 10 pro 20h2)!!! Thank you very much!
^^ Glad to help Pablo!
Does the script need to change for Windows 10 Pro 21h1?
^^ Will investigate and revert back to you.
Since Windows 10 1809 I believe, WSUS does not contain all the on demand feature files, so if your using ConfigMgr for example, this becomes a problem when trying to install these on demand features. I recommend implementing this Group Policy to avoid this being an issue:
Computer Configuration -> Administrative Templates -> System
Specify settings for optional component installation and component repair
Check the box to “Download repair content and optional features directly from Windows Update instead of Windows Server Update Services (WSUS)”
@Kapil Arya – Brilliant, works as expected!
^^ Glad it helped!
thank you ! you are the BEST !
^^ Glad to help!
Powershell command for Win 10 20H2 also worked with Win 10 21H2. Thank you!!!
^^ Glad it worked 😎
Kapil Arya – Thank you very much works :)
^^ Glad to help Gregorius!
Excellent post!
Thank you so much!
^^ Glad you find it helpful 😎
It helped. Thanks!
^^ Glad to help 😊
thank you @Kapil Arya
^^ Glad to help!
Hi
it worked on build 21h2, but it presented error 0x800f0954 when I enabled RSAT in powershell. I
Hi Amit, thanks a lot for your help
Awesome! Thanks for your assistance, you da’ man!
^^ Glad to help 😎