Earlier, we’ve shared you the guide to set Metered connection in Windows 10. Setting the connection as metered is often recommended when you want to reduce your network data consumption bill. Microsoft has designed Metered connection feature in such a way that users don’t need to bother about unnecessary data usage. Some features such as automatic Windows Update, Windows Spotlight, etc. may not work when you set your connection metered.
But for some users, setting the connection metered is not only the solution to avoid higher data consumption. That’s why, Microsoft has provided the data limit settings. You can configure data limits and reduce the unnecessary data consumption without changing your data plan. Additionally, you can also restrict Windows features and Store apps from slowly eating up your data in background. Here’s how you can achieve this.
How To Set Data Limit For Network Connection In Windows 10
1. Right click Start Button or press  + X keys and select Settings.
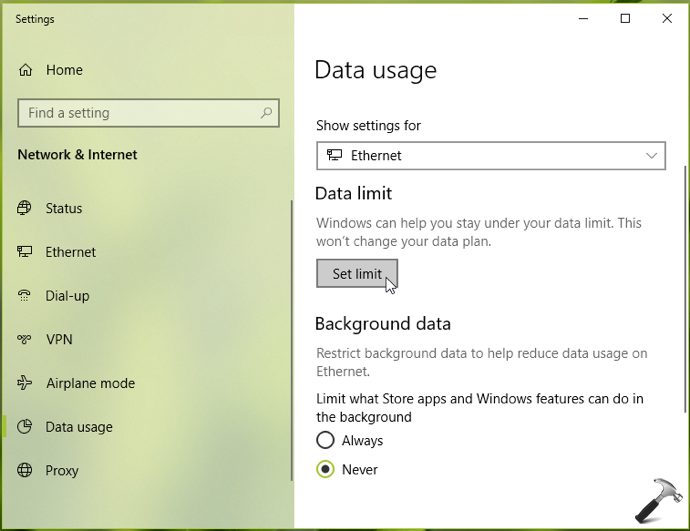
2. In the Settings app, navigate to Network & Internet > Data usage.
3. Now in right pane of Data usage, under Data limit, click on Set limit.

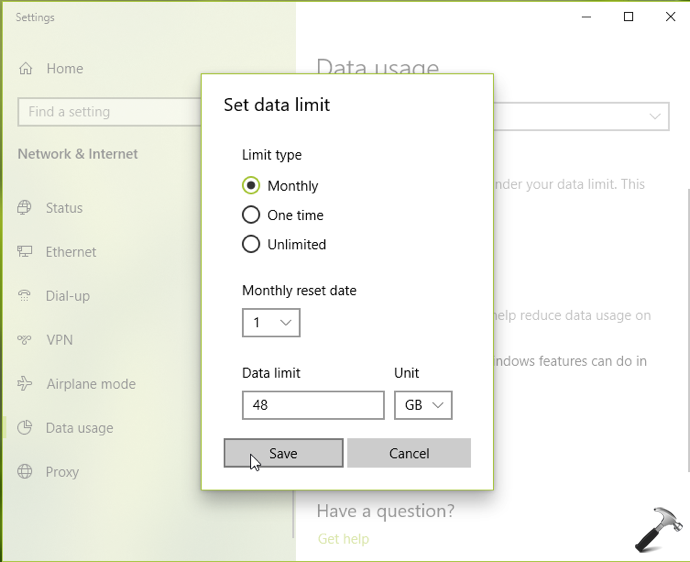
4. Now in the fly-out window, you can choose the Limit type as Monthly, One time, Unlimited.
- If you choose Monthly, you can then set monthly reset date and how much data you want to use per month.
- If you choose One time, you can select the days in which data expires.
- If you choose Unlimited, you can then set monthly reset date without limits.
Once you’re done with your selection, click Save.

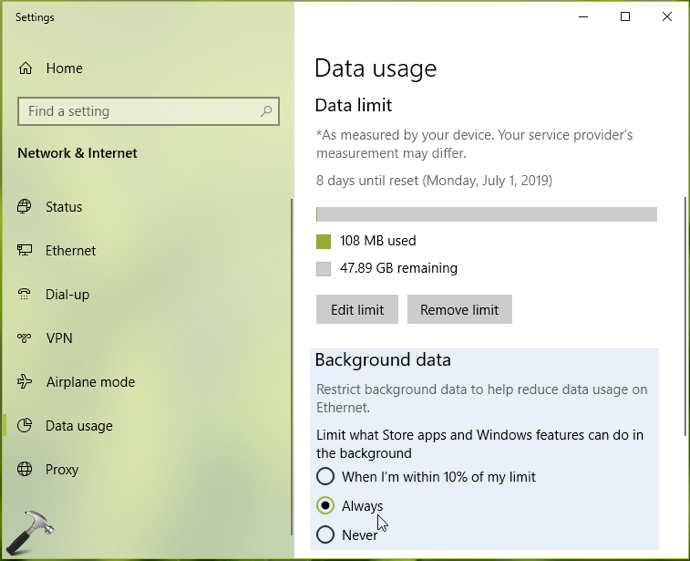
5. To further reduce data usage on your network connection, under Background data, choose When I’m within 10% of my limit or Always option.

All of these settings you configured above will be saved and applied immediately. You can close Settings app and return to Desktop if you like.
So this is how you can set data limit and reduce data usage in Windows 10.
That’s it!
![KapilArya.com is a Windows troubleshooting & how to tutorials blog from Kapil Arya [Microsoft MVP (Windows IT Pro)]. KapilArya.com](https://images.kapilarya.com/Logo1.svg)


Leave a Reply