Microsoft promotes its own services as well as allows third-party vendors to advertise products and services within Windows 11, which can be pretty annoying and an invasion of privacy (especially when it comes to targeted ads). If you are frustrated by these promotions, follow this 9-step guide to remove ads in Windows 11 for good.
Page Contents
How to Remove Ads in Windows 11
Step 1: Disable Ads From the Start Menu
1. Open Windows settings and go to the “Personalization” tab.

2. Then, click the “Start” option on the right.

3. Turn off the “Show recommendations for tips, shortcuts, new apps, and more” and “Show account-related notifications” toggle switches.

4. Once you disable those options, Microsoft will stop suggesting apps and showing account notifications.
Disable First and Third-Party App Promotions
Microsoft may try to promote various first and third-party apps including Twitter, Photoshop Express, Instagram, Grammarly, etc. The best way to stop these promotions is to uninstall the apps themselves.
1. Open the Start menu and locate the app you want to remove from the Pinned section.
2. Then, right-click the app and select “Uninstall“.

3. Remove all the apps that you feel unnecessary.
Step 2: Turn off Search Highlights
1. Open Settings and head to “Privacy & security“.
2. Then, select “Search permissions“.

3. On the next page, toggle off the “Show search highlights” option.

Step 3: Remove Ads from File Explorer
1. Launch the File Explorer.
2. Click the three dots button in the toolbar and choose “Options“.

3. In the Folder Options dialog box, switch to the “View” tab. Then, scroll down the Advanced settings and uncheck the “Show sync provider notifications“.

4. Then, click “Apply” and “OK“.

Step 4: Disable the Lock Screen Ads
1. Open Settings and go to “Personalization” > “Lock screen“.
2. If the Picture or Slideshow option is selected under the “Personalize your lock screen” section, uncheck the “Get fun facts, tips, tricks, and more on your lock screen” option.

Step 5: Disable Personalized Ads
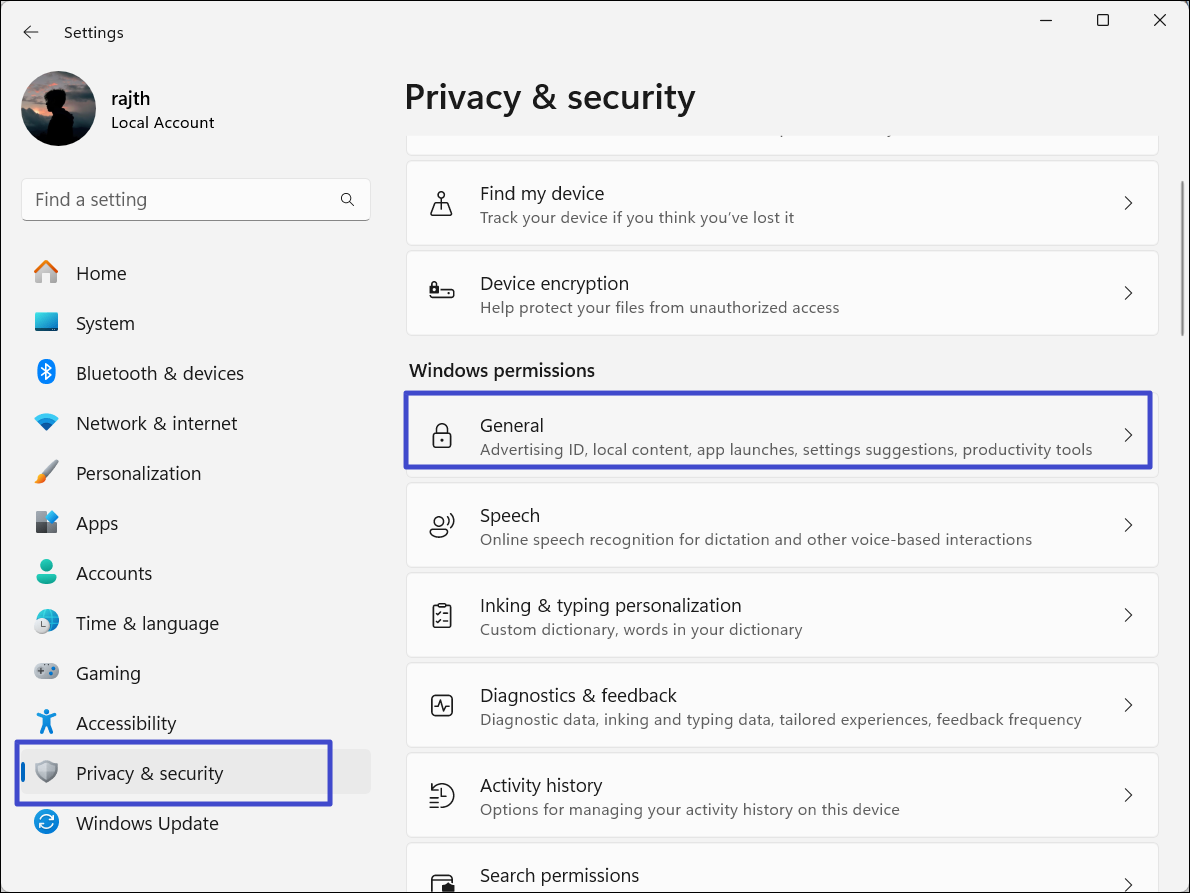
1. Launch Settings and head to “Privacy & security” > “General“.

2. Under the General settings, turn off the “Let apps show me personalized ads using my advertising ID” and “Show me suggested content in the Settings app” toggles.

3. Next, click “Personalization” and select “Device usage“.

4. Now, turn off all the options to stop targeted ads and recommendations from Windows 11.

Step 6: Turn Off Ads from Microsoft Edge
1. Launch Microsoft Edge from the Start menu.
2. Click the gear icon at the bottom right corner and select “Go to all Sidebar settings“.

3. Then, turn off the toggles for the “Always show sidebar” and “Allow sidebar apps to show notifications” options.

4. Next, open a new tab by clicking the “+” button in the title bar.
5. Then, click the gear icon (Page Settings) at the top right corner of the page.

6. Choose “Off” from the Quick links drop-down and turn off the “Content” option.

Step 7: Disable Notification Ads from Windows 11
1. In Windows Settings, go to “System” > “Notifications”.

2. Scroll down to the bottom of the page and click on “Additional settings“.

3. Now, clear all three following options under Additional settings:
- “Show the Windows welcome experience after updates and when signed in to show what’s new and suggested”.
- “Suggest ways to get the most out of Windows and finish setting up the device”.
- “Get tips and suggestions when using Windows”.

Step 8: Disable the News Feed from the Widgets
1. Press Windows + W or click the weather icon in the taskbar to open Widgets.
2. Click the gear icon (Settings) at the top right corner.

3. Scroll down and click the “Show or hide feeds” settings.

4. Disable the “My Feed” toggle and click “Turn off” in the confirmation box.

Step 9: Disable the Home Page in the Settings app
1. Press Windows + R, type “regedit“, and click “OK“.

2. In the Registry Editor, copy-paste the following path in the address bar and press Enter:
Computer\HKEY_LOCAL_MACHINE\SOFTWARE\Microsoft\Windows\CurrentVersion\Policies\Explorer

3. Right-click the “Explorer” key in the left sidebar and select “New” > “String Value“.

4. Rename the newly created value to “SettingsPageVisibility“.

5. Double the SettingsPageVisibility and set the value data to “hide:home“. Then, click “OK“.

6. Finally, restart your PC to apply the changes.
Video guide
For better assistance, you can checkout this video guide:
That’s it.
![KapilArya.com is a Windows troubleshooting & how to tutorials blog from Kapil Arya [Microsoft MVP (Windows IT Pro)]. KapilArya.com](https://images.kapilarya.com/Logo1.svg)


![[Latest Windows 10 Update] What’s new in KB5055612? [Latest Windows 10 Update] What’s new in KB5055612?](https://www.kapilarya.com/assets/Windows10-Update.png)


Leave a Reply