In Windows, a file that stores compressed files in a file library is known as a cabinet file. It has a .cab extension and if you’re using Windows for a long time, you might have seen such type of file already. Microsoft says, “the cabinet format is an efficient way to package multiple files because compression is performed across file boundaries, which significantly improves the compression ratio. Large files can be split between two or more cabinet files. There can be no more than 15 files in any one cabinet file that spans to the next cabinet file.” In this article, we will learn how you can install CAB files in Windows 10.
Earlier, we shared the article to install updates manually from Update Catalog. When you download updates from Update Catalog, sometimes update files may be provided as .cab file, instead of .msu file which you can easily install with Windows Update Standalone Installer (WUSA). However, the .cab file may not be install with WUSA. To install, you can use DISM command-line tool.
Here are the two methods, which you can apply to install .cab files in Windows 10.
Page Contents
How to install CAB files in Windows 10
Method 1 – Using Command Prompt
1. Open Command Prompt as administrator.
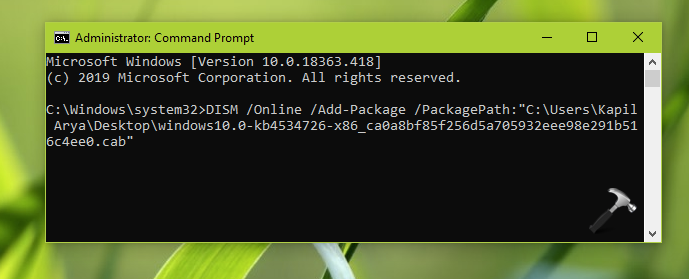
2. In the Command Prompt, type following command after substituting the exact path of .cab file:
DISM /Online /Add-Package /PackagePath:"<TYPE-CAB-FILE-PATH-HERE>"

Press Enter key to execute the command.
3. Let the command complete. You might be asked whether you want to restart computer to finish the update, provide your consent by typing Y for yes, or N for no. If you type Y, your system will be rebooted, else you can close Command Prompt.
Method 2 – Using Context Menu
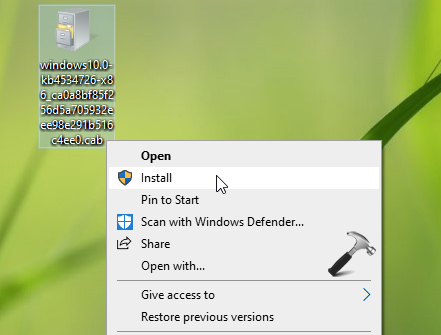
If you have so many .cab files to install, running command for each of these files maybe inconvenient. In such a case, you can add Install option to right-click context menu for .cab files. When the option is added, you can simply right click on the .cab file and select Install.
Follow these steps:
1. Open Notepad and paste following code:
Windows Registry Editor Version 5.00

[-HKEY_CLASSES_ROOT\CABFolder\Shell\RunAs]

[HKEY_CLASSES_ROOT\CABFolder\Shell\RunAs]
@="Install"
"HasLUAShield"=""

[HKEY_CLASSES_ROOT\CABFolder\Shell\RunAs\Command]
@="cmd /k DISM /Online /Add-Package /PackagePath:\"%1\""
2. Save this file with whatever name you like, just make sure you save this file with .reg extension so that it becomes a registry file. Also, choose All files as Save as type.
3. Now double click on the saved registry file from previous step and click Yes in the confirmation prompt. In few moments, you will get a confirmation that registry entries were added successfully.
4. You can now simply right click on the .cab file and select Install. Click Yes in the UAC the confirmation prompt. The installation of update will be finished in few moments.

That’s it!
Read next: What Is Enablement Package For Windows 10 And How It Works?
![KapilArya.com is a Windows troubleshooting & how to tutorials blog from Kapil Arya [Microsoft MVP (Windows IT Pro)]. KapilArya.com](https://images.kapilarya.com/Logo1.svg)


Leave a Reply