Though Microsoft Office apps usually covers all those features a customer may need. However to add supplemental features, you can install an add-in for your Microsoft Office apps. An add-in may include custom commands or feature to make your work easier.
In this guide, we’ll take a practical walk-through for managing add-ins. First we’ll see how you can install an add-in from Office Store or third-party vendor and then we’ll see how to remove pre-installed add-ins, if required.
Page Contents
How To Install Add-ins In Microsoft Office
Load Add-ins From Microsoft Office Store
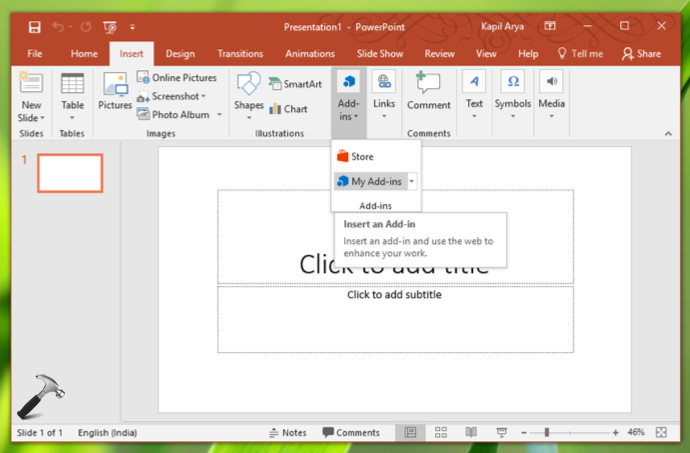
1. Open any Microsoft Office application, for example, PowerPoint. Switch to Insert tab and click Add-ins > My Add-ins.

2. If you’re visiting add-ins page for first time, you wouldn’t have any add-in by default. So click on Office Store.

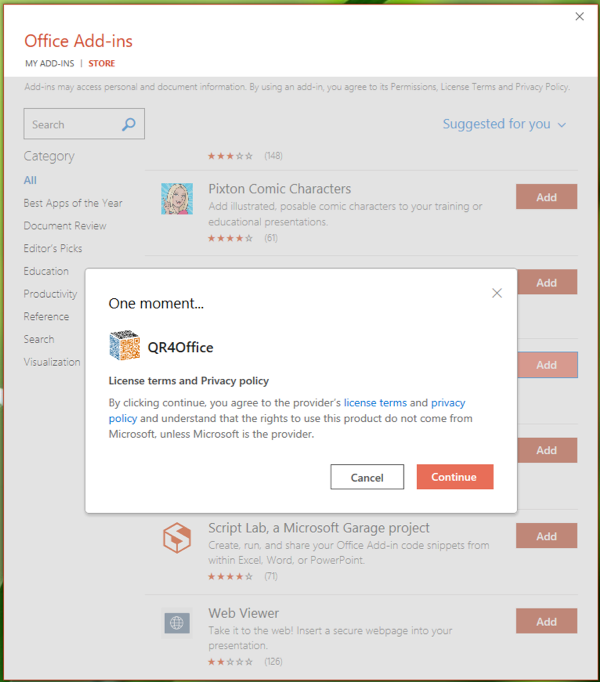
3. On the Office add-in page, browse for the type of add-in you want. They’re also available by different category. Once you found an add-in of your choice, click on Add button next to it.

4. Click on Continue under license terms and Privacy policy notification.

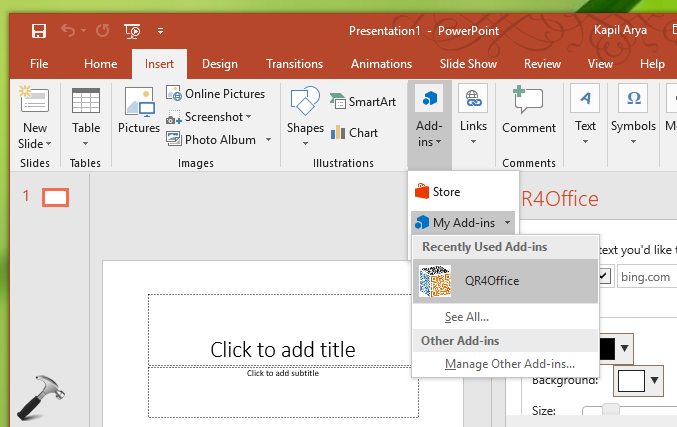
5. In few seconds, the add-in should be installed to your Microsoft Office application. You can instantaneously use it from Insert tab > Add-ins > My Add-ins.

Load Add-ins From Third-Party Vendor
1. Open Microsoft Office application, such as PowerPoint.
2. Click File > Options.
3. Under Options, switch to Add-ins.
4. Under Add-ins, scroll down to locate Manage. For this list, select PowerPoint Add-ins and click Go.
5. Then click Add new, and browse for the add-in file and click OK.
6. You may see a security notice then. If you’re pretty sure that add-in is sourced from trusted vendor, click Enable Macros.
Remove Add-ins From Microsoft Apps
Simply open a Microsoft Office app from which you want to remove add-in. Switch to Insert tab > Add-ins > My Add-ins. Under My Add-ins, click on ··· next to add-in. In the context menu, click Remove.

That’s it!
![KapilArya.com is a Windows troubleshooting & how to tutorials blog from Kapil Arya [Microsoft MVP (Windows IT Pro)]. KapilArya.com](https://images.kapilarya.com/Logo1.svg)


![[Latest Windows 10 Update] What’s new in KB5055612? [Latest Windows 10 Update] What’s new in KB5055612?](https://www.kapilarya.com/assets/Windows10-Update.png)


Leave a Reply