Whenever you are facing a significant issue that affects performance of your Windows 11, you might need to restore your system to some earlier point in time, when ‘all is well’. To accomplish this, you can use System Restore recovery feature on your Windows 11. System Restore is not a new thing for many of us and I am sure you might have been used it in your previous Windows operating system. If you need instructions to create restore point for Windows 11 specifically, this post is for you. In this guide, we’ll see how to create a System Restore point in Windows 11.
System Restore is often called as ‘last known good configuration’. For example, if your system was working perfectly, but then you made a change like installed some software and after that your system is not working like earlier, System Restore is the perfect option to resolve this common problem.
A system restore point can be created manually or automatically. For a restore point to create, you must have System Protection turned on. When System Protection is enabled, Windows will create restore points automatically at crucial system changes. Like when you installed any software/app/driver, or a Windows Update, Windows will automatically create a restore point for you.
Here’s how you can manually create a System Restore point in your Windows 11.
How to create a System Restore point in Windows 11
1. Press  + R and type
 sysdm.cpl in Run. Click OK or press Enter key.

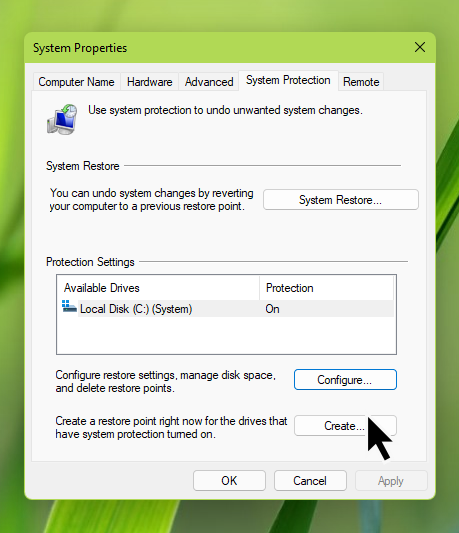
2. In System Properties window, under System Protection tab, click on Configure button.

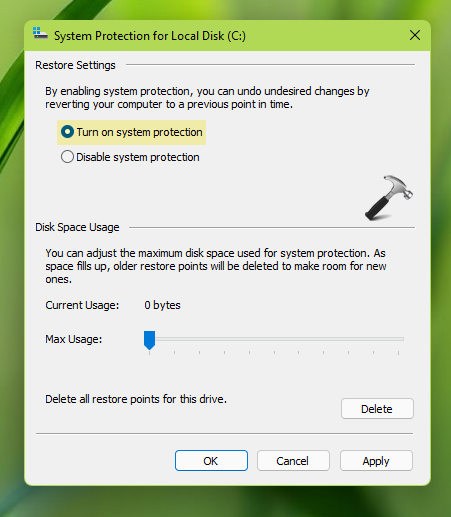
3. Next, in System Protection window, select Turn on system protection. Click Apply.

4. Now back in System Properties, click on Create button.

5. Now type a new name for the restore point to identify it while restoring your system. Click Create.

6. You’ll then see that System Restore point is being created now.

In few moments, you’ll receive a confirmation that The restore point was created successfully.

That’s it!
Read next: How to restore your Windows 11 to an earlier date.
![KapilArya.com is a Windows troubleshooting & how to tutorials blog from Kapil Arya [Microsoft MVP (Windows IT Pro)]. KapilArya.com](https://images.kapilarya.com/Logo1.svg)


Leave a Reply