In Windows 11 operating system, Remote Desktop feature allows you to connect with other devices. The Remote Desktop helps you to remotely control your device using another device. We have already how to enable Remote Desktop in Windows 11 in this guide. Now in this article, you will read how to change Remote Desktop port in Windows 11.
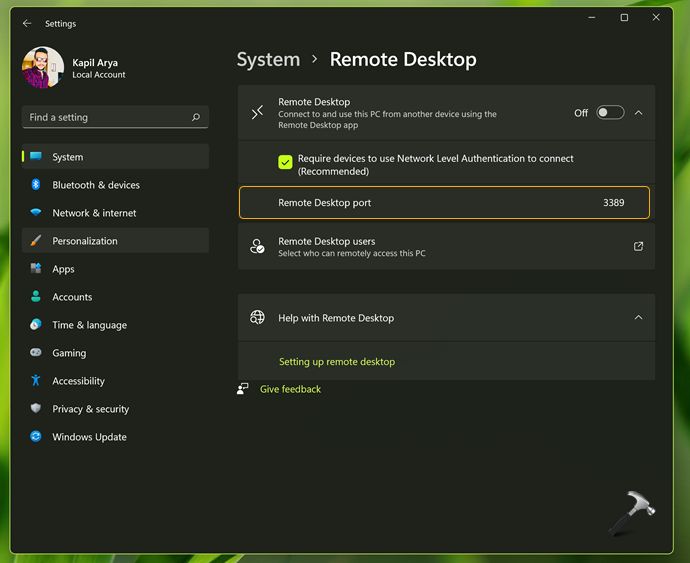
So when you are working with Remote Desktop, everything works with the help of a specially designed port to which your system connects. The Remote Desktop client by default listens to the listening port 3389. You can always check the currently listening port for remote desktop by going to Remote Desktop settings.
As you can see in the screenshot below, the default listening port for Remote Desktop is shown here. However, it is not possible to change the default listening port directly from here.

 Note: You can also check current Remote Desktop port by using following command in Windows PowerShell:
Get-ItemProperty -Path 'HKLM:\SYSTEM\CurrentControlSet\Control\Terminal Server\WinStations\RDP-Tcp' -name "PortNumber"
For that, you will need to edit registry configuration on your system. This process is mentioned below.
How to change Remote Desktop port in Windows 11
 Registry Disclaimer: It is recommended to create a System Restore point first, if you’re not familiar with registry manipulation.
1. Run regedit command to open Registry Editor.
2. In left pane of Registry Editor window, navigate to:
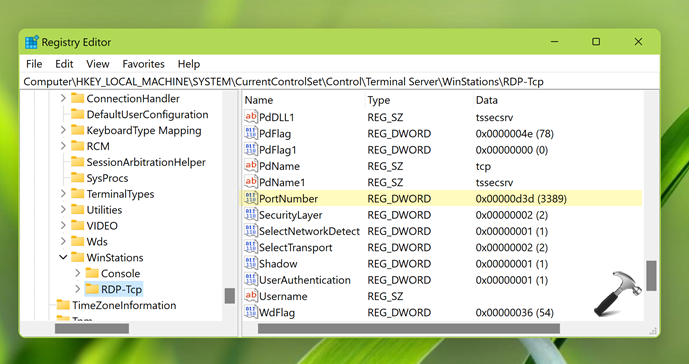
HKEY_LOCAL_MACHINE\System\CurrentControlSet\Control\Terminal Server\WinStations\RDP-Tcp
3. In the right pane of RDP-Tcp, locate the registry DWORD named PortNumber. By default, this registry DWORD is set to Decimal data 3389. You can double click on this DWORD in order to modify its Value data.

4. Finally, in the edit DWORD value, select the Decimal base and then type in the desired port number as Value data. Click OK to save it.

5. Close Registry Editor, and restart your system to make changes effective.
Read this next: Fixing Remote Desktop Connection Issues In Windows.
![KapilArya.com is a Windows troubleshooting & how to tutorials blog from Kapil Arya [Microsoft MVP (Windows IT Pro)]. KapilArya.com](https://images.kapilarya.com/Logo1.svg)


![[Latest Windows 11 Update] What’s new in KB5058411? [Latest Windows 11 Update] What’s new in KB5058411?](https://www.kapilarya.com/assets/Windows11-Update.png)
![[Latest Windows 10 Update] What’s new in KB5058379? [Latest Windows 10 Update] What’s new in KB5058379?](https://www.kapilarya.com/assets/Windows10-Update.png)


Leave a Reply