Dots per Inch (DPI) usually refers measure of dot density within span of 1 inch for image/video/print media. In Windows operating systems, DPI scaling levels are usually used to increase/decrease size of text, apps and other items.
You may need to change DPI scaling in Windows 10, if your system display is full HD (FHD) or above, and text/app size becomes small. This is because as the screen resolution increases, items on screen gets lowered in terms of size/display. Under this condition, you may need to increase DPI scaling level so that you don’t have reading or content viewing issues.
Here are the methods to configure DPI scaling level:
Page Contents
How To Change DPI Scaling Level In Windows 10
Method 1 – Via Settings App
FYI: These steps are illustrated on Windows 10 V1803.
1. Right click Start Button or press  + X keys and select Settings.
2. In the Settings app, navigate to System > Display.
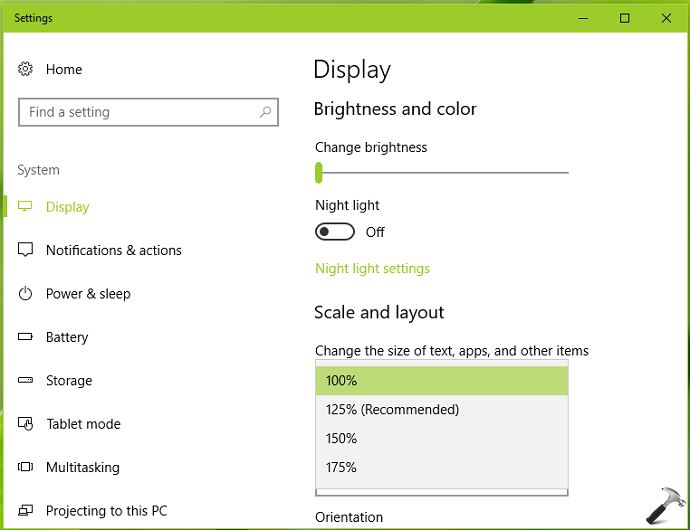
3. Moving on, on the right pane of Display, under Scale and layout, use the drop down against Change the size of text, apps, and other items to change DPI scaling level. By default, it is set to 100% or Recommended level which Windows decides itself. You can change the scaling percentage as per your requirement. You’ll immediately see the changes accordingly.

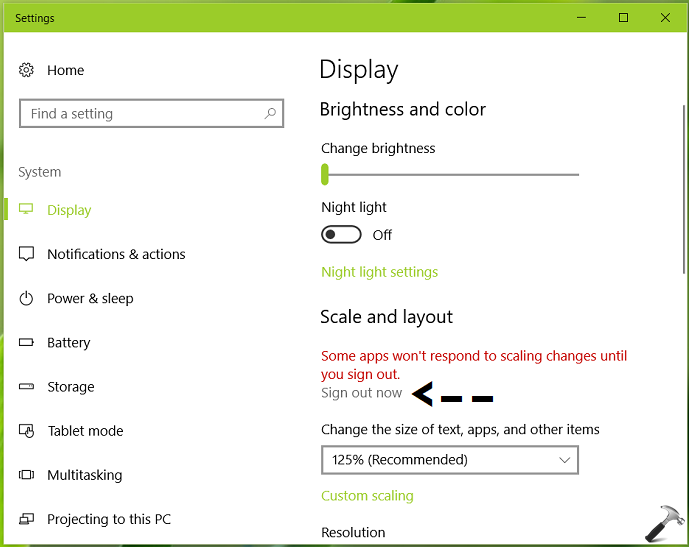
4. Once you’re done setting DPI scaling level as per your requirement, click on Sign out now link appeared there.

In this way, log-out and then sign-in back to your account and now everything will be adjusted as per your selected DPI scaling level.
FYI: In Windows 10 V1709 or later, you’ve Custom scaling option to set DPI scaling level anything between 100-500%.

Method 2 – Via Registry
Registry Disclaimer: The further steps will involve registry manipulation. Making mistakes while manipulating registry could affect your system adversely. So be careful while editing registry entries and create a System Restore point first.
1. Press  + R and put regedit in Run dialog box to open Registry Editor (if you’re not familiar with Registry Editor, then click here). Click OK.

2. In left pane of Registry Editor window, navigate to following registry key:
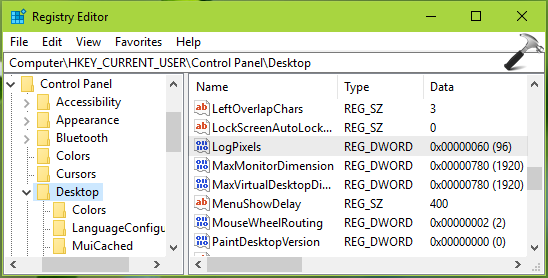
HKEY_CURRENT_USER\Control Panel\Desktop

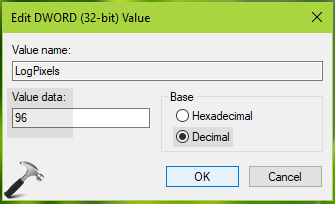
3. Now in the right pane of Desktop registry key, you might see LogPixels named registry DWORD (REG_DWORD) which is set to 96, by default. This registry DWORD controls the DPI scaling level in Windows 10. So double click on this registry DWORD to modify its Value data:

4. Set the Value data on Decimal base from below mentioned data (referenced from Microsoft), as per your requirement to have DPI scaling of your choice:
| Value data (Decimal) | DPI Scaling (in %) |
|---|---|
| 96 | 100 |
| 120 | 125 |
| 144 | 150 |
| 192 | 200 |
Once you’re done, click OK. Close Registry Editor and reboot to make changes effective.
After restart, your system will have DPI scaling level you opted in registry.
That’s it!
![KapilArya.com is a Windows troubleshooting & how to tutorials blog from Kapil Arya [Microsoft MVP (Windows IT Pro)]. KapilArya.com](https://images.kapilarya.com/Logo1.svg)


Leave a Reply