By default, Windows 10 comes with Segoe UI as primary font installed. This font is present in every element whether its Settings app, or Desktop and Start Menu etc. Most of the apps are showing this font. The font looks pleasant as well.
However, Windows is the operating system have lots of customization scope in it. Thus if you’re the user looking for customizing the default font, you’re already reading the correct article. Because in this post, we’ll share you the registry manipulation that will help you to replace default font with custom font of your choice.
So without wasting your time anymore, here is the how-to part. Make sure you create a System Restore point before you proceed.
How To Change Default Font In Windows 10
1. Right click Start Button or press  + X keys and select Settings.
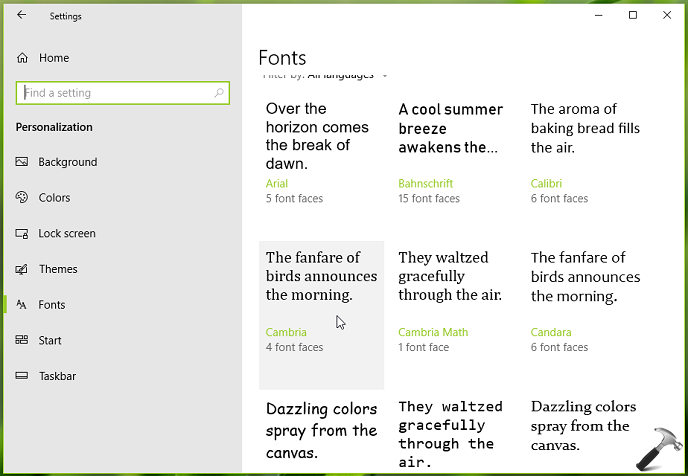
2. In the Settings app, navigate to Personalization > Fonts.
3. Under Fonts, you’ll find all the fonts installed on your system. Identify the custom font you want to apply to note down its exact name. In this example, we choose our custom font as Cambria. Close/minimize Settings app.

Registry Disclaimer: The further steps will involve registry manipulation. Making mistakes while manipulating registry could affect your system adversely. So be careful while editing registry entries and create a System Restore point first.
4. Press  + R and put regedit in Run dialog box to open Registry Editor (if you’re not familiar with Registry Editor, then click here). Click OK.

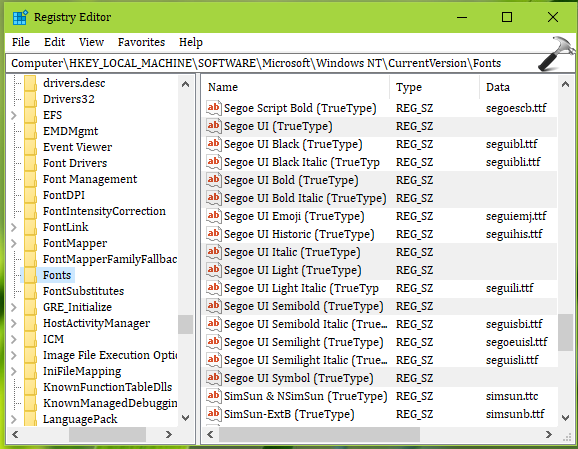
5. In left pane of Registry Editor window, navigate to following registry key:
HKEY_LOCAL_MACHINE\SOFTWARE\Microsoft\Windows NT\CurrentVersion\Fonts

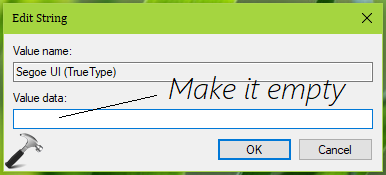
6. In the right pane of Fonts registry key, double click on the following registry strings (REG_SZ) and clear their Value data or make them empty:
- Segoe UI (TrueType)
- Segoe UI Bold (TrueType)
- Segoe UI Bold Italic (TrueType)
- Segoe UI Italic (TrueType)
- Segoe UI Light (TrueType)
- Segoe UI Semibold (TrueType)
- Segoe UI Symbol (TrueType)

7. Next, go to following registry key:
HKEY_LOCAL_MACHINE\SOFTWARE\Microsoft\Windows NT\CurrentVersion\FontSubstitutes

8. In the right pane of FontSubstitutes registry key, replace Segoe UI registry string’s Value data with your custom font name. So in this example, we’ll replace it with Cambria.
Now close Registry Editor and reboot the machine. After restarting your system, you’ll find that default font has been replaced with your custom font (see screenshot below).

In case if you later want to restore default font, simply use System Restore to go back or merge this registry file.
That’s it!
![KapilArya.com is a Windows troubleshooting & how to tutorials blog from Kapil Arya [Microsoft MVP (Windows IT Pro)]. KapilArya.com](https://images.kapilarya.com/Logo1.svg)


5 Comments
Add your comment
Hi Kapil, Is it possible the set the default font for a particular application to use? I have one application that produces tabular data as screen output but the default font is proportional so the column heading and data don’t line up. I would like this application to use Courier New (a fixed-pitch font) as the default but I don’t want this default to affect Windows 10 or other applications. Can this be done?
^^ John, sorry but this is not possible with Windows atm.
Can not empty the data and input the Cambria in the data string column, it pop out a error that we can not edit
^^ Take ownership of FontSubstitutes registry key: https://www.kapilarya.com/how-to-manually-take-ownership-of-registry-key-in-windows-10.
Hello Kapil! I used a registry merge (as outlined here: windowscentral.com/how-change-default-system-font-windows-10 ) to achieve the same result, however it didn’t change the font in the Windows 10 system apps like Settings or the taskbar calendar (worked fine in older apps like Explorer). Do you know if it’s possible to change the font in those applications as well? As much as I’d prefer another font to Segoe, the inconstency is even worse for me… 😓