In order to identify your computer on network, it is labelled with unique name. This is also called ‘computer name‘ and in Windows 10, you’ll see it generated randomly in DESKTOP-XXXXXXX format. In absence of computer name, it will be really hard to identify the system on network, where a lot of computers are connected.
As the computer name is generated randomly, you can always customize it with name you want. In this article, we’ll show you the ways to rename your computer. You’re only allowed to use numbers (0 to 9), alphabets in uppercase or lowercase (A to Z) and hypen (-). Always remember, you can’t use any special character while renaming a computer.
So without wasting time anymore, here’s how to rename your computer with Windows.
Page Contents
How To Change Computer Name In Windows 10/8/7
Method 1 – Via Settings App In Windows 10
1. Right click Start Button or press  + X keys and select Settings.
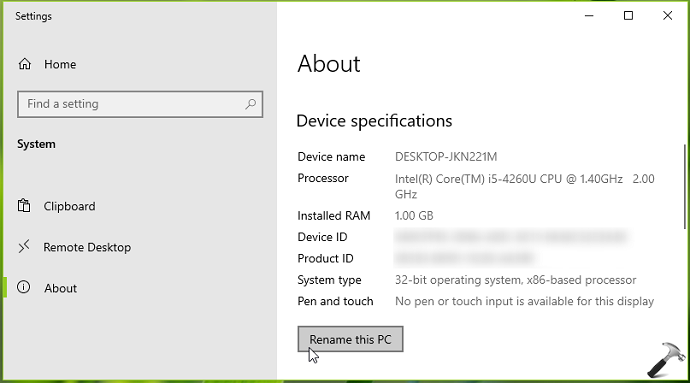
2. In the Settings app, navigate to System > About.
3. Now in right pane of About, under Device specifications, click on Rename this PC button.
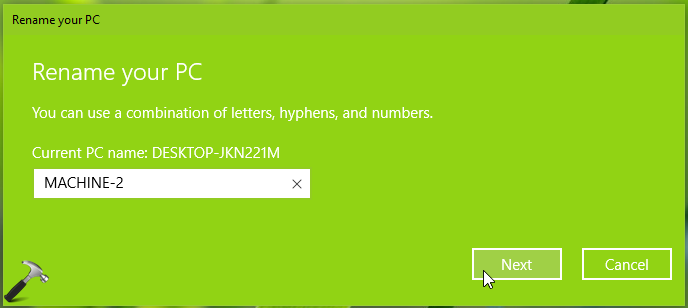
4. Moving on, under Rename your PC, type the desired computer name you want and click Next.
5. Then you’ll be asked to restart your system so that new computer name can be applied in system-wide settings. Click Restart now.

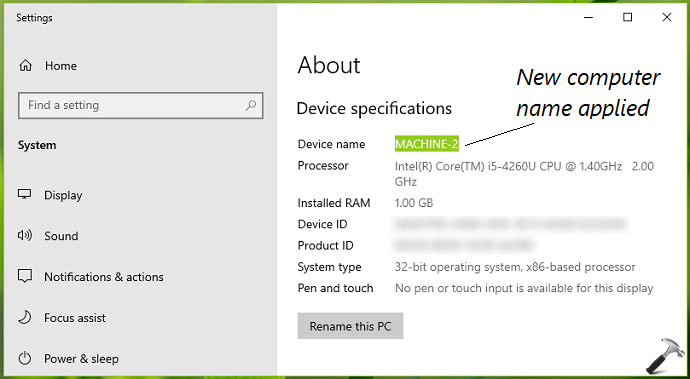
After restart, the system have new name applied.
Method 2 – Via System Properties In Windows 10/8.1/8/7
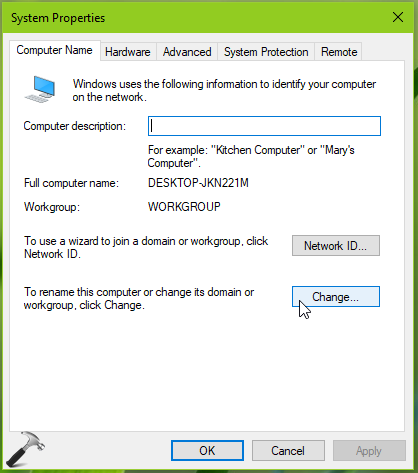
1. Press  + R and type
 SYSDM.CPL in Run. Click OK or press Enter key.

2. In System Properties window, on Computer Name tab, click Change button against ‘To rename this computer or change its domain or workgroup, click Change’ option.
3. Now in Computer Name/Domain Changes, type the desired computer name. Click OK.
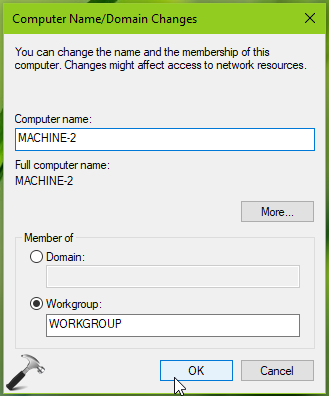
4. Now you’ll get a message to save and restart your system. Click OK on that message.

5. Then immediately next message appears (shown in below screenshot), click on Restart now on that message to reboot your system.

Once your system restarts, it will be using the new name.
That’s it!
![KapilArya.com is a Windows troubleshooting & how to tutorials blog from Kapil Arya [Microsoft MVP (Windows IT Pro)]. KapilArya.com](https://images.kapilarya.com/Logo1.svg)


Leave a Reply