If you own a Mac device and want to transfer files on your Windows 10 machine, this article is for you. There are many third-party tools already available to do this. But in this guide, we’ll show you how to easily transfer files using networking on both the devices and without using any third-party app.
Well, to transfer files between Mac and Windows 10, you first need to connect them to same network connection/access point. Once both the devices are on same network, follow below mentioned steps to move files from Mac OS to Windows 10.
FAQ: How Do I Transfer Files From Mac To Windows 10/8/7?
1. On your Mac device, on top-left corner, click Apple logo and then click System Preferences.

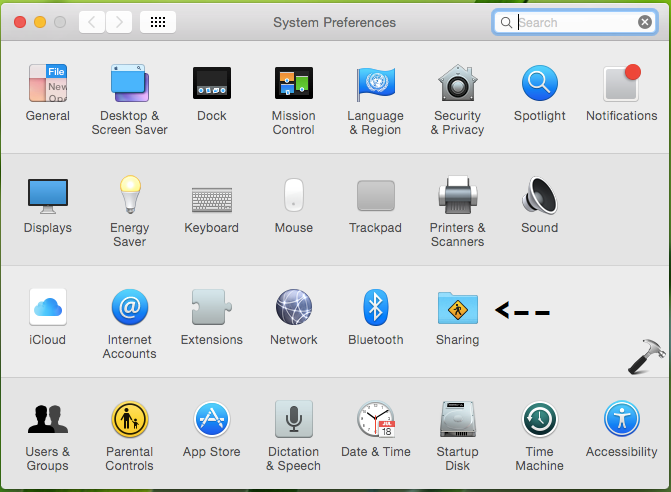
2. Next, in System Preferences, click on Sharing icon.

3. Now under Sharing, check the File Share option to enable it. When File Sharing is On, you’ll get smb://<IP> type address, for example, smb://192.168.1.103. Note down this IP address, as it will required in upcoming steps.

4. Keep your Mac on and then turn on Windows 10 machine. Press  + X keys, and in Run dialog box, type \\<IP Address shown on Mac>, for example \\192.168.1.103. Click OK or press Enter key.

5. Then you’ll get Windows Security prompt as shown below. In this prompt, you need to type user name and password of your Mac device. If you want to frequently transfer files from Mac to Windows 10, make sure you check Remember my credentials option here. Click OK.

6. Once Windows correctly verifies the credentials, you’ll be able to see folders your shared on Mac device in the File Explorer. You can now open these folders and easily transfer your files to your Windows 10 with drag and drop ability or just use copy-paste shortcuts. Note that you need to configure visibility of the folders/files and their permissions originally on your Mac device.

NOTE: If you receive ‘These files might be harmful to your computer‘ warning while transferring files, check this fix to disable it.

Hope you find the guide useful!
![KapilArya.com is a Windows troubleshooting & how to tutorials blog from Kapil Arya [Microsoft MVP (Windows IT Pro)]. KapilArya.com](https://images.kapilarya.com/Logo1.svg)


Leave a Reply