Many of you might be already aware of guest account. We earlier shared the guide to enable guest account in Windows 10. In earlier versions of Windows 10, one can easily enable guest account and use it. However, with newer versions, the Guest account is not working as expected. When you enable, the Guest account not showing up in the login screen. We will see what you can do to bypass this.
To reproduce the issue, we tried these steps:
- Went to LUSRMGR snap-in and opened Users folder.
- In Users folder, double clicked on Guest to open its Properties.
- In the property sheet, we unchecked Account is disabled option and clicked OK.
After these steps, the Guest account entry is now visible for switching in Start Menu as shown in this screenshot:

However, when we clicked that entry, the Guest account was not shown in login screen. We then logged into another permanent account and checked at Settings > Accounts > Family and other users and Guest account was not listed there. Then we checked it at Control Panel > All Control Panel Items > User Accounts > Manage Accounts, and Guest account missing there as well.
Guest account not showing up in Windows 10
After doing some research, we found that Guest account is now deprecated. But there is no official post from Microsoft which specifically confirm the status of guest account feature in Windows 10. Also, this documentation, which enlists all features Microsoft removed in Windows 10 doesn’t mentions anything about guest account.
So how to fix this problem? Well, the recommended workaround is to create a new local user account and put that new user into Guests group. Note that, Guests user group is still part of Windows 10.
Here are the steps you need to perform:
- Press
 + X keys to open Run, type
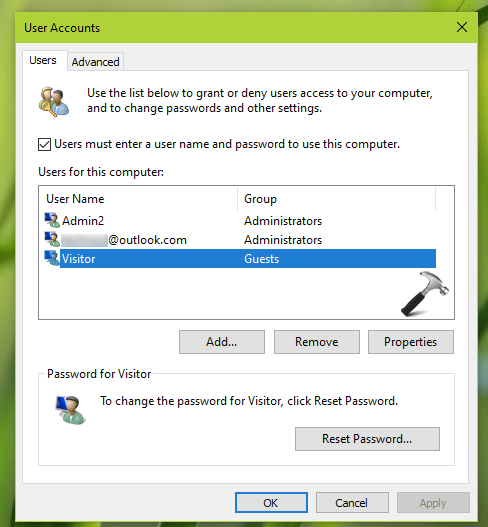
 netplwizand click OK. - Check Users must enter a user name and password to use this computer option. Click Add.
- Select Sign in without Microsoft account (not recommended) link and then select Local account.
- Type local account name such as Visitor. Note that you cannot use ‘Guest’ as user account name here because it is a reserved word.
- Now highlight the Visitor entry and click Properties. Under Group Membership, select Others and then select Guest group. Click Apply, OK.
Finally, you should have the Visitor as your guest account and have limited functionality as it is part of Guest group.

That’s it!
![KapilArya.com is a Windows troubleshooting & how to tutorials blog from Kapil Arya [Microsoft MVP (Windows IT Pro)]. KapilArya.com](https://images.kapilarya.com/Logo1.svg)


 + X keys to open Run, type


Leave a Reply