Windows Update error 0x800F0223 is a common issue that Windows users encounter when attempting to update their Windows 11 operating system. This error code indicates a failure in the installation or download process of Windows updates, preventing users from accessing the latest features, security patches, and bug fixes. Resolving this error is crucial to ensure the smooth functioning and security of your Windows system. In this guide, we will provide step-by-step instructions to help you fix this issue and successfully update your Windows operating system.
Page Contents
Fix: Windows Update error 0x800F0223
Fix 1: Run Windows Update Troubleshooter
1. Open Settings by pressing Win + I keys.
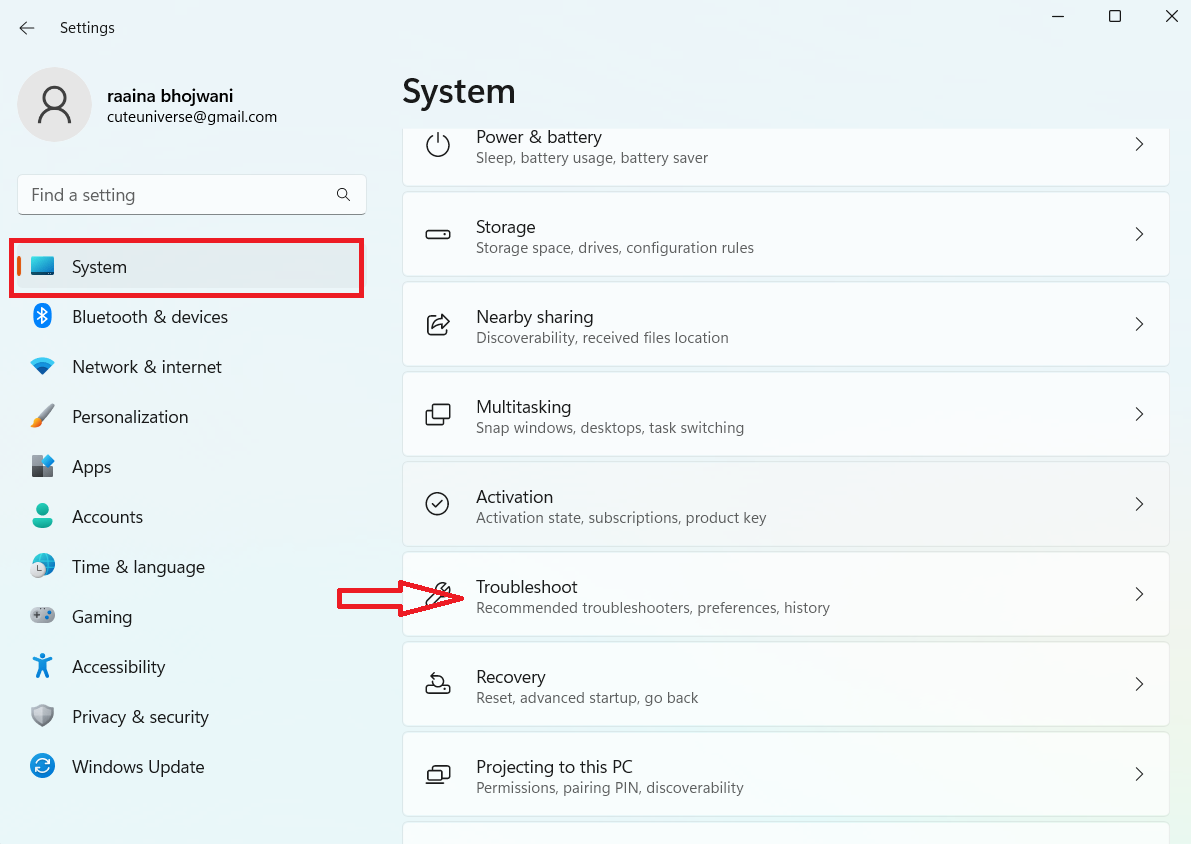
2. Now click on System > Troubleshoot.
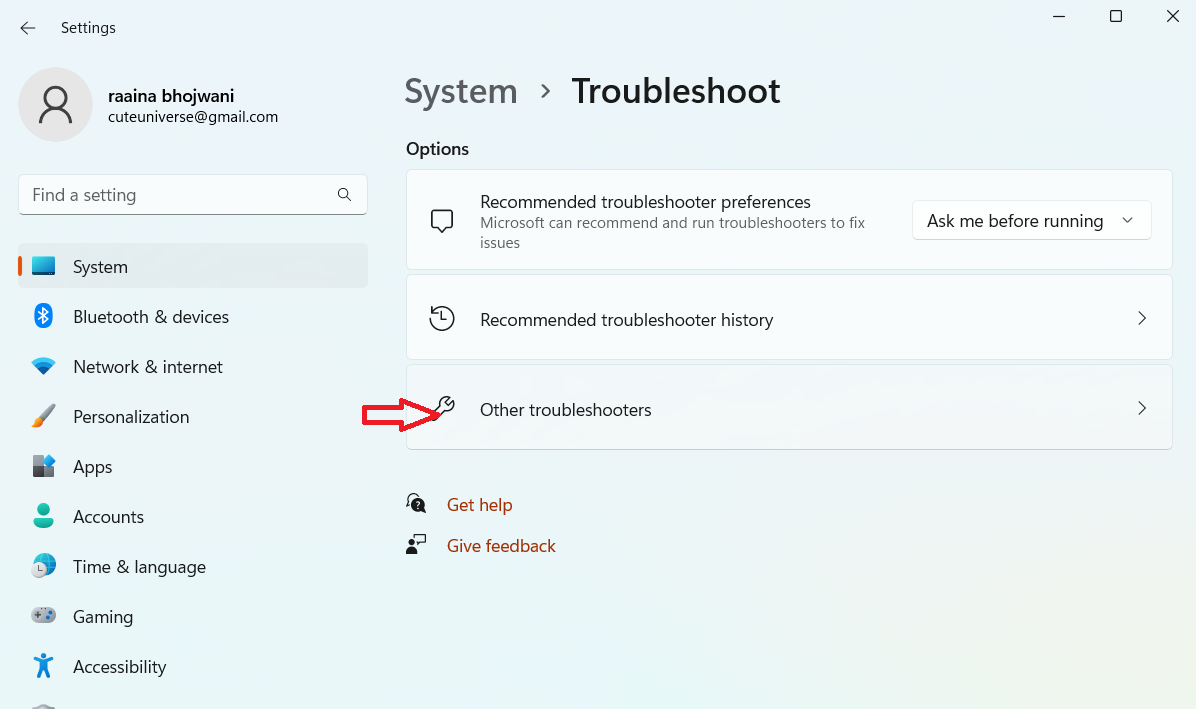
3. Next click on Other troubleshooters.
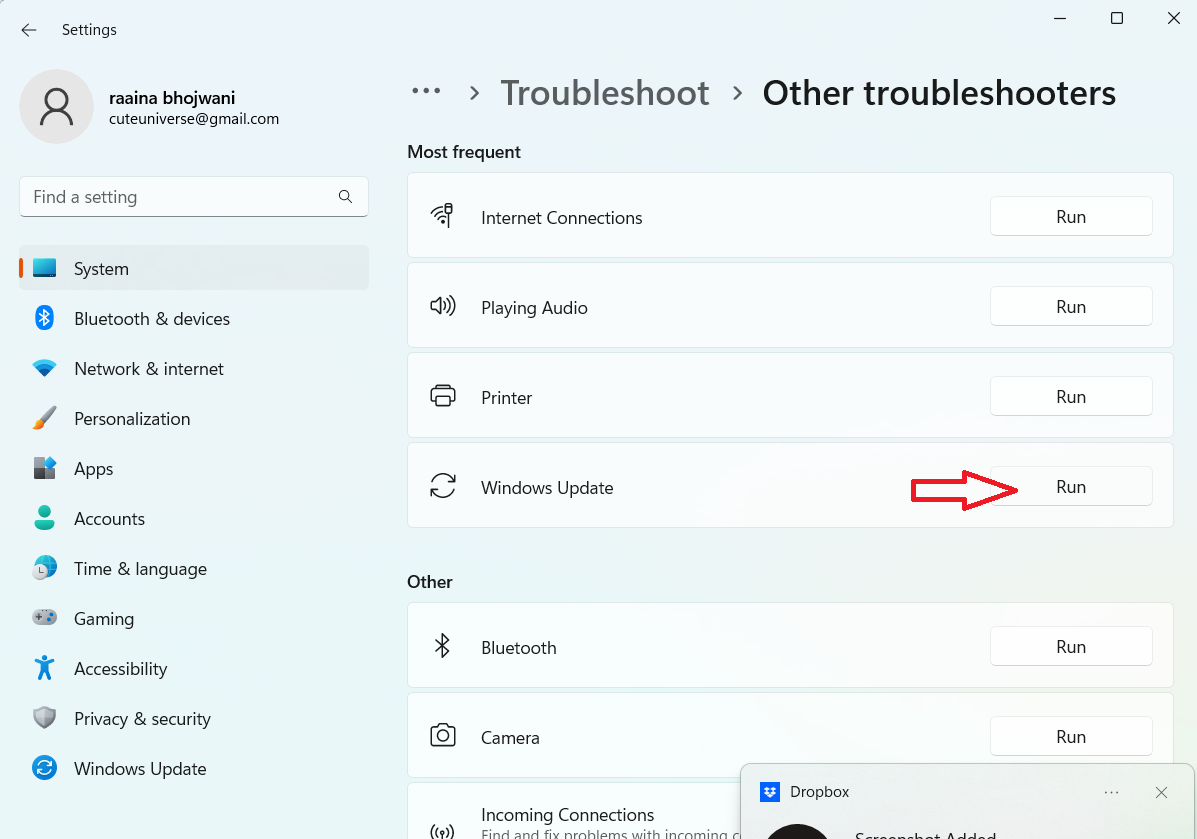
4. Now click on Run.
Fix 2: Change Internet connection to fix Windows Update error 0x800F0223
While changing your internet connection may not directly resolve the error, it’s still worth ensuring that you have a stable and reliable internet connection. You can try connecting to a different network or restarting your router/modem.
Fix 3: Reset Windows Update Components
Step 1: Stop Windows Update Services
Execute the following commands in Command Prompt:
net stop bits
net stop wuauserv
net stop appidsvc
net stop cryptsvc
Step 2: Delete the 9mgr*.dat files
Next, type the below command in Command Prompt and press Enter:
Del "%ALLUSERSPROFILE%\Application Data\Microsoft\Network\Downloader\qmgr*.dat"
Step 3: Flush the SoftwareDistribution and catroot2 folders.
Now Rename the SoftwareDistribution and catroot2 folders by executing the below commands in Command Prompt:
Ren %systemroot%\SoftwareDistribution SoftwareDistribution.bak
Ren %systemroot%\system32\catroot2 catroot2.bak
Step 4: Reset the BITS service and the Windows Update service to the default security descriptor.
Type the below commands in Command Prompt and press Enter after each command:
sc.exe sdset bits D:(A;;CCLCSWRPWPDTLOCRRC;;;SY)(A;;CCDCLCSWRPWPDTLOCRSDRCWDWO;;;BA)(A;;CCLCSWLOCRRC;;;AU)(A;;CCLCSWRPWPDTLOCRRC;;;PU)
sc.exe sdset wuauserv D:(A;;CCLCSWRPWPDTLOCRRC;;;SY)(A;;CCDCLCSWRPWPDTLOCRSDRCWDWO;;;BA)(A;;CCLCSWLOCRRC;;;AU)(A;;CCLCSWRPWPDTLOCRRC;;;PU)
cd /d %windir%\system32
Step 5: Re-register the BITS files and the Windows Update related DLL files
Type the below commands in Command Prompt and press Enter after each command:
regsvr32.exe atl.dll

regsvr32.exe urlmon.dll

regsvr32.exe mshtml.dll

regsvr32.exe shdocvw.dll

regsvr32.exe browseui.dll

regsvr32.exe jscript.dll

regsvr32.exe vbscript.dll

regsvr32.exe scrrun.dll

regsvr32.exe msxml.dll

regsvr32.exe msxml3.dll

regsvr32.exe msxml6.dll

regsvr32.exe actxprxy.dll

regsvr32.exe softpub.dll

regsvr32.exe wintrust.dll

regsvr32.exe dssenh.dll

regsvr32.exe rsaenh.dll

regsvr32.exe gpkcsp.dll

regsvr32.exe sccbase.dll

regsvr32.exe slbcsp.dll

regsvr32.exe cryptdlg.dll

regsvr32.exe oleaut32.dll

regsvr32.exe ole32.dll

regsvr32.exe shell32.dll

regsvr32.exe initpki.dll

regsvr32.exe wuapi.dll

regsvr32.exe wuaueng.dll

regsvr32.exe wuaueng1.dll

regsvr32.exe wucltui.dll

regsvr32.exe wups.dll

regsvr32.exe wups2.dll

regsvr32.exe wuweb.dll

regsvr32.exe qmgr.dll

regsvr32.exe qmgrprxy.dll

regsvr32.exe wucltux.dll

regsvr32.exe muweb.dll

regsvr32.exe wuwebv.dll

regsvr32.exe wudriver.dll
Step 6: Delete incorrect Registry values
Open Registry Editor and navigate to the below path:
HKEY_LOCAL_MACHINE\COMPONENTS
Right-click on COMPONENTS. Delete the following if you can see it on the right side:
- PendingXmlIdentifier
- NextQueueEntryIndex
- AdvancedInstallersNeedResolving
Restart your computer.
Step 7: Reset Winsock
Type the following command in Command Prompt and press Enter:
netsh winsock reset
Step 8: Restart Windows Update Services
Lastly, type the below commands in Command Prompt and press Enter after each command:
net start bits

net start wuauserv

net start appidsvc

net start cryptsvc
Fix 4: Clear Space using Disk Cleanup Tool
1. Open Disk Cleanup by searching it in the Search box.

2. Check the boxes of files/folders you want to delete.

3. Click OK and follow the onscreen instructions.
Fix 5: Install Updates in Clean Boot Mode
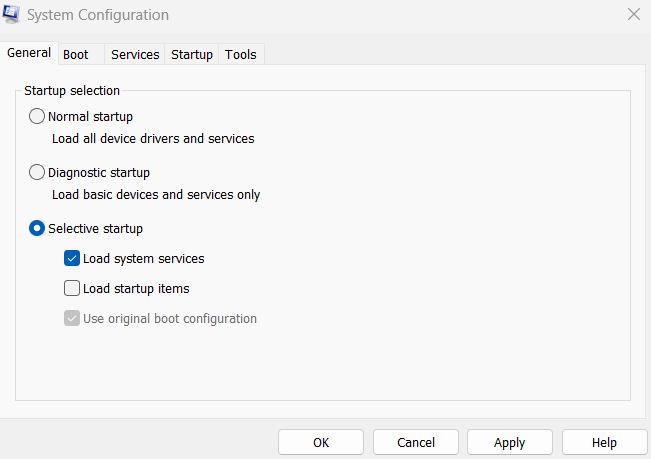
1. Open System Configuration by typing MSConfig in the search bar.
2. Click on Selective startup. Check on Load system services and Use the original boot configuration.
3. Now click on the Services tab.
4. Check the Hide all Microsoft services checkbox and click on Disable all > Apply > OK.

Fix 6: Make sure Windows Update and Background Intelligent Transfer Service are running
- Press the Win + R keys to open Run.
- Then type services.msc and click OK.
- Right-click on Background Intelligent Transfer Service and Windows Update Service and choose Restart/Start.

That’s it!
![KapilArya.com is a Windows troubleshooting & how to tutorials blog from Kapil Arya [Microsoft MVP (Windows IT Pro)]. KapilArya.com](https://images.kapilarya.com/Logo1.svg)


![[Latest Windows 10 Update] What’s new in KB5055612? [Latest Windows 10 Update] What’s new in KB5055612?](https://www.kapilarya.com/assets/Windows10-Update.png)




Leave a Reply