Windows Security is your home to manage the tools that protect your device and your data: Virus & threat protection – Monitor threats to your device, run scans, and get updates to help detect the latest threats. Windows Security often gets grayed out and becomes inaccessible. When this happens, you’re unable to use the tool, and can put your device at risk. In this article, we will show you how to Fix Windows Security is Greyed Out in Windows 11.
Page Contents
Fix: Windows Security is Greyed Out in Windows 11
Here we have some of the options which can be applied when your Windows Security Window is greyed out.
Option 1: Fix Windows Security Greyed out using Local Group Policy Editor
1. Press the Windows key + R. Type gpedit.msc and click OK.
2. Navigate the following path:
Computer Configuration\Administrative Template\Microsoft Defender Antivirus
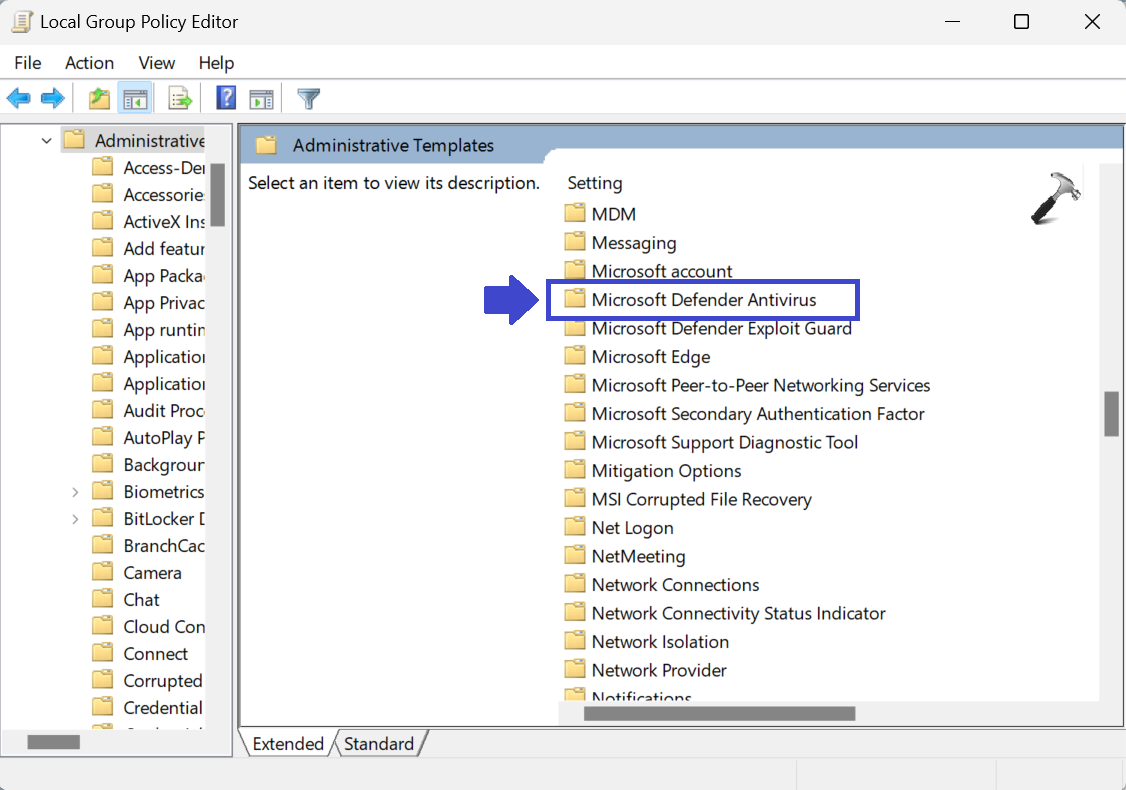
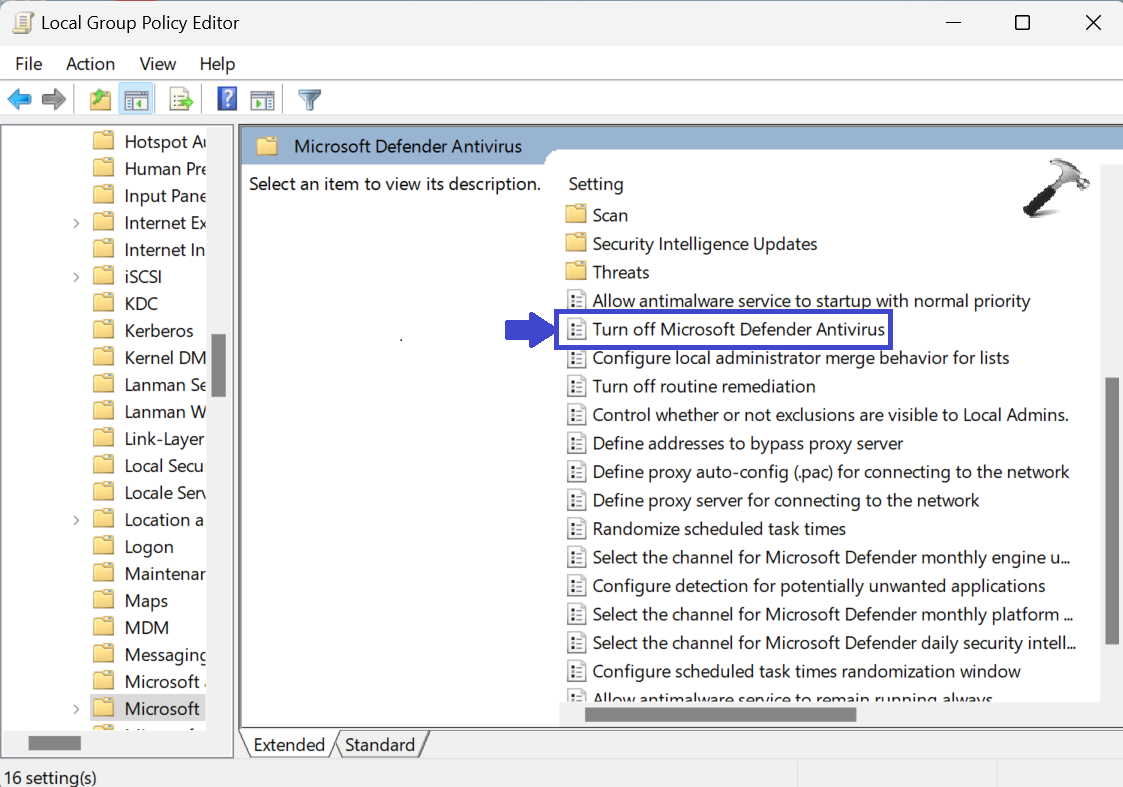
3. Double-click on “Turn off Microsoft Defender Antivirus”.
4. Now, select Disabled and click on OK followed by Apply.
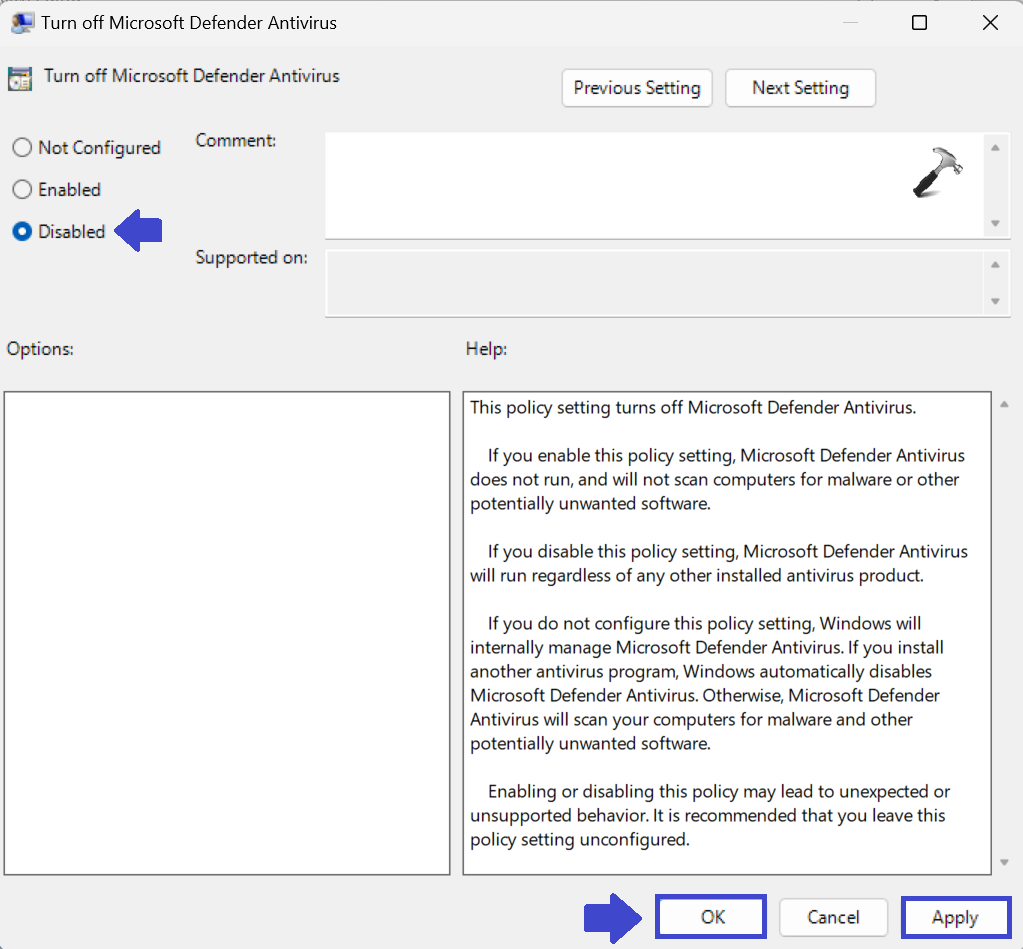
5. Close the Local Group Policy Editor Window and restart the computer to apply the settings.
Option 2: Fix Windows Security Greyed Out by uninstalling the antivirus
1. Press the Windows key + R. Type appwiz.cpl and click OK.
2. Look for the antivirus software from the list.
3. Right-click on Antivirus software and click on “Uninstall” to uninstall the software from your computer.
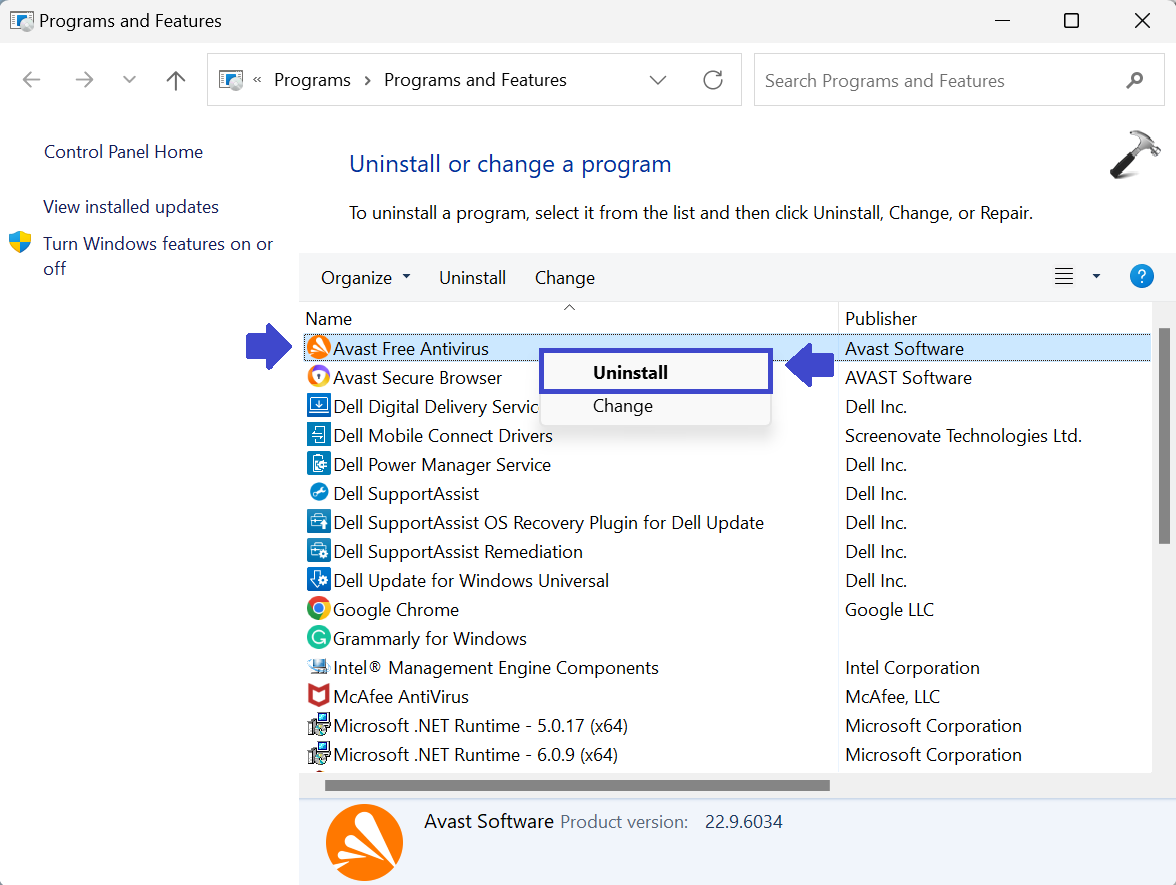
4. Close the Window and restart your computer.
Option 3: With Windows Security
1. Open Command Prompt and tap on “Run as administrator”.
2. Now, copy the below Command and paste it into Command Prompt. Hit Enter.
REG DELETE “HKLM\SOFTWARE\Policies\Microsoft\Windows Defender” /v DisableAntiSpyware

3. Close the Command Prompt and restart your computer.
After restarting the computer, check if Windows Security appears greyed or not. If yes then try the next option.
Option 4: Fix Windows Security with System Update
1. Open Settings App and click on “Windows Update”.
2. Click on “Check for updates” to check for the latest updates.
If your computer has already downloaded and installed the updates, you just need to restart the computer. (See the below image)
3. Now, Windows will download all the updates and install them on the computer.

4. Restart your computer.
Option 5: Fix Windows Security with RPC Service
1. Press the Windows key + R. Type services.msc and click OK.
2. In the right pane, double-click on “Remote Procedure Call (RPC)”.

3. Prompt box will appear. Now, set the Startup type to Automatic mode.
4. Check the status of the service. If it is running then it’s good. But if it is stopped, then tap on “Start” to start the RPC service.

5. Click OK followed by Apply.
6. Go back to the Service list. Now, right-click on the “Windows Management Instrumentation” service.
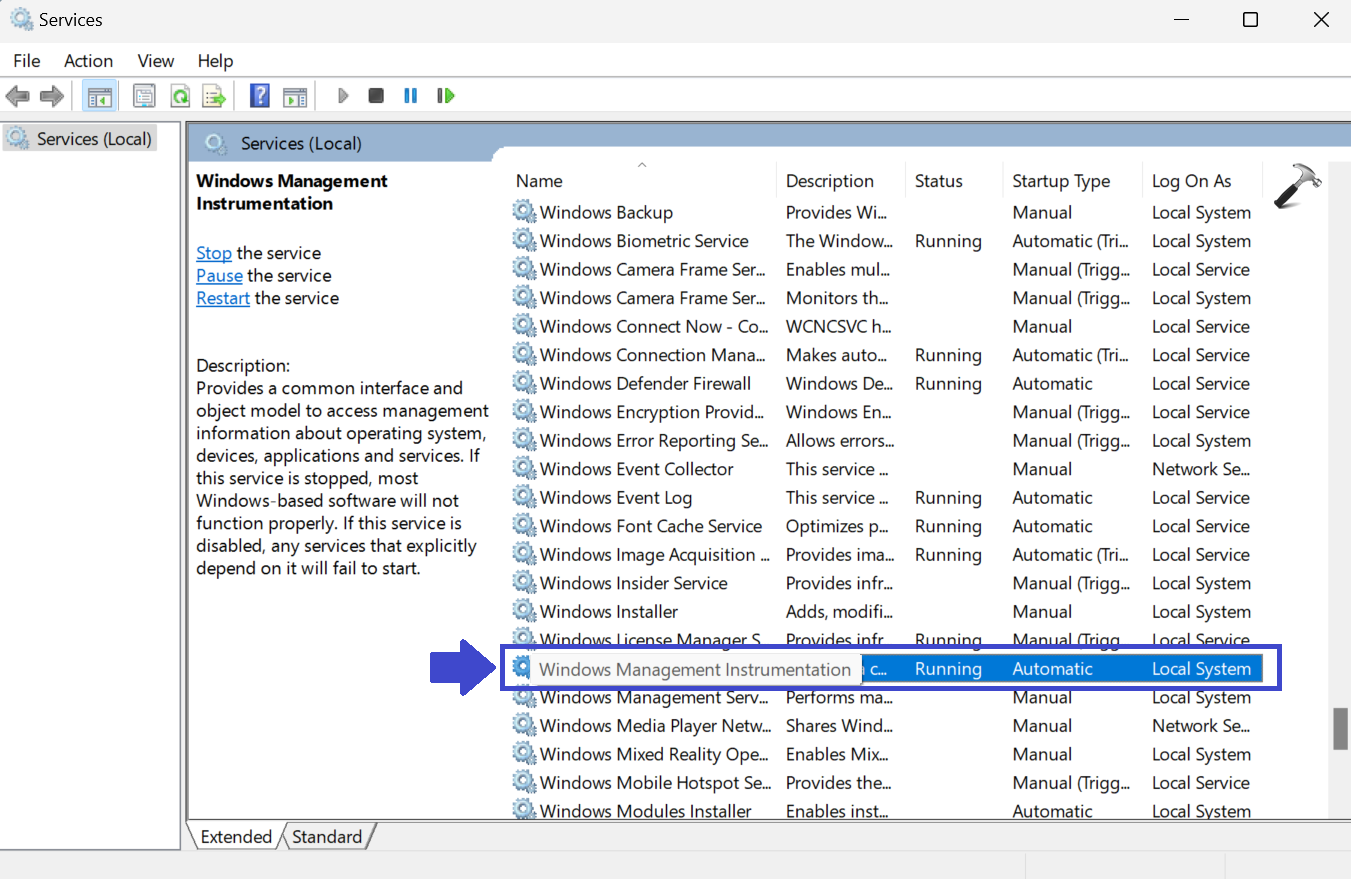
7. Set the Startup type to Automatic and tap on “Start” to resume the WMI Service.
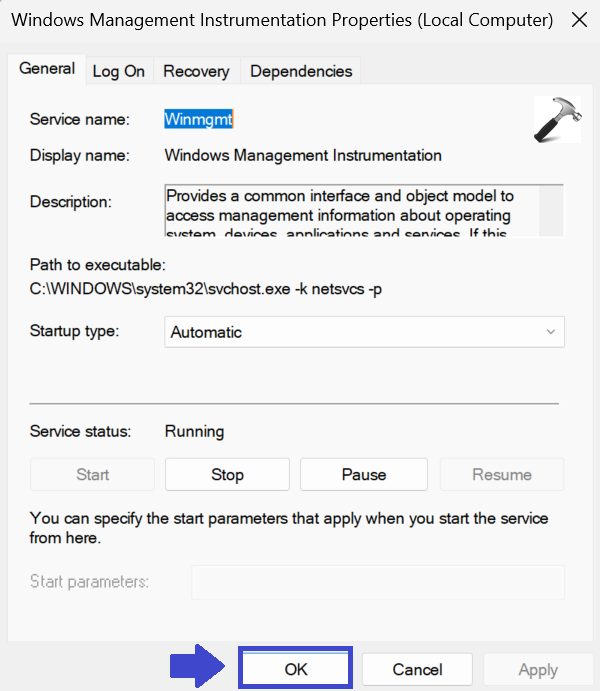
8. Click OK followed by Apply.
9. Close the Window and restart the computer to apply the settings.
Option 6: Fix Windows Security by restarting Windows Security Service
1. Press the Windows key + R. Type Services.msc and click OK.
2. In the right pane, right-click on “Windows Security Service”.
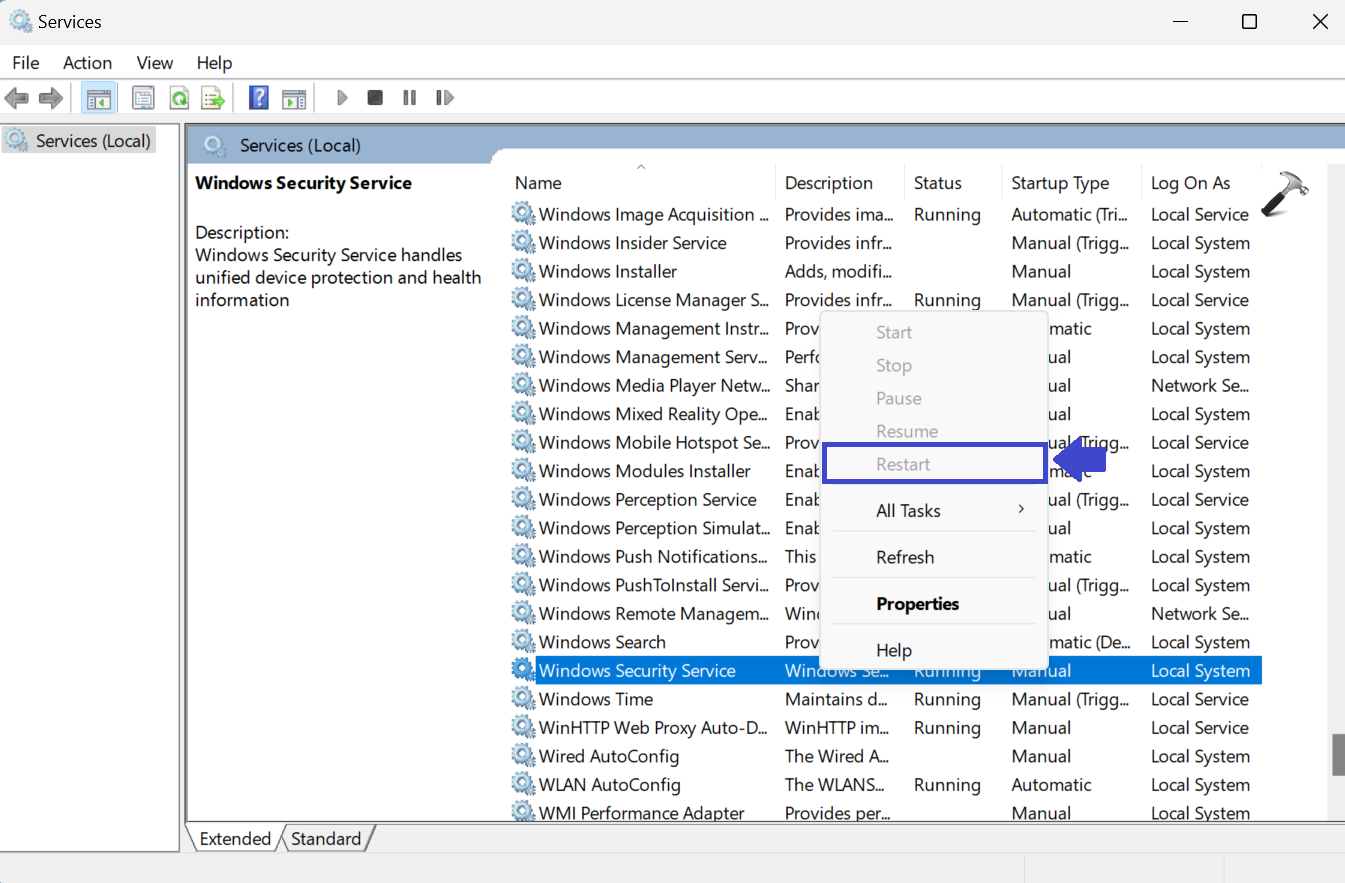
3. Tap on “Restart” to start the service.
4. Close the Service Window.
Option 7: SFC and DISM Scan
It is used to scan the corrupt files in the system.
System File Checker (SFC) – Checks for missing important files of your Windows operating system and restores them from the cache.
Deployment Image Servicing and Management (DISM) – Directly deals with faulty Windows images and repairs them by downloading actual replacement files from Windows’ online servers.
1. Open Command Prompt and select “Run as administrator”.
2. For the SFC scan, copy and paste the below command and hit Enter.
sfc /scannow

Windows will check the corrupt system files and will fix that.
3. For DISM scan, copy and paste the below command and hit Enter.
DISM.exe /Online /Cleanup-image /Restorehealth

4. Once the scan is complete, close the Command Prompt.
5. Restart the computer.
That’s It!
![KapilArya.com is a Windows troubleshooting & how to tutorials blog from Kapil Arya [Microsoft MVP (Windows IT Pro)]. KapilArya.com](https://images.kapilarya.com/Logo1.svg)


Leave a Reply