We all know that Microsoft released Windows 10 V1903 or May 2019 Update last month. After updating to V1903, some users found that Virtual Private Network (VPN) no longer works. Worth to mention here that VPN provides secure pathway to connect web and your company’s network. Learn how to setup VPN connection in Windows, in this guide.
If you’re also one of those who faced this issue after upgrading to V1903, don’t worry, you’re not alone. Many users have been affected and I am seeing they’re regularly posting to community forums and looking forward to a working solution. In this article, we’ll try to resolve this issue with solutions already worked. Before you try below mentioned solutions, I recommend to try suggestions provided in our earlier fix mentioned here. In case if you still face the issue, check below mentioned fixes.
Page Contents
FIX: VPN Not Working In Windows 10 V1903
FIX 1 – Via VPN Settings
1. Right click Start Button or press  + X keys and select Settings.
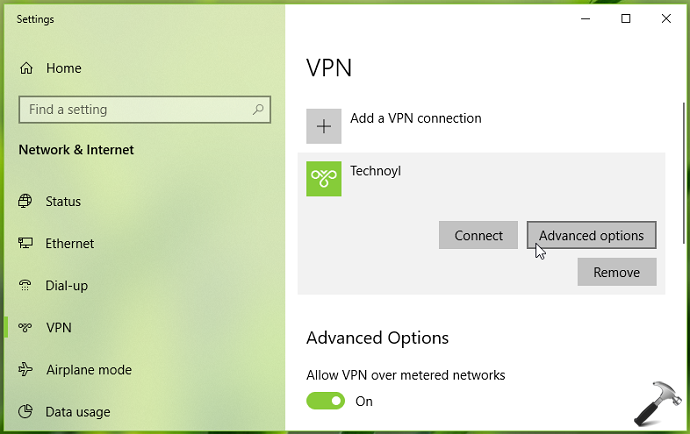
2. In the Settings app, navigate to Network & Internet > VPN.
3. Now in right pane of VPN, under VPN, select your VPN connection and click Advanced options.
4. Next, under VPN proxy settings, set the option to Automatically detect settings. Click Apply then.
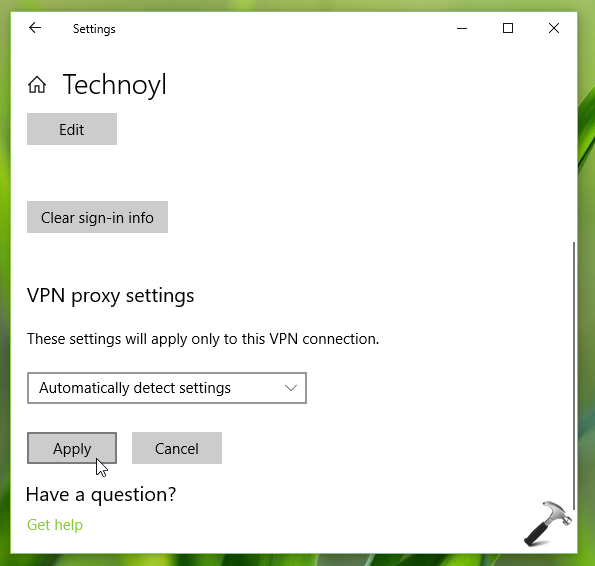
Close Settings app and see if this resolves the issue.
If problem still occurs, refer to FIX 2 mentioned below.
FIX 2 – Via Device Manager
1. Press  + R and type
 devmgmt.msc in the Run, hit Enter key to open Device Manager snap-in.

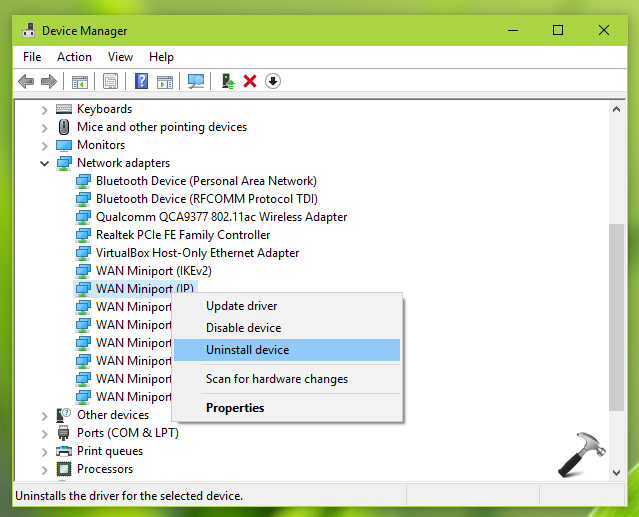
2. In the Device Manager window, expand Network adapters. Then right click on WAN Miniport (IP) named device/driver and select Uninstall device.
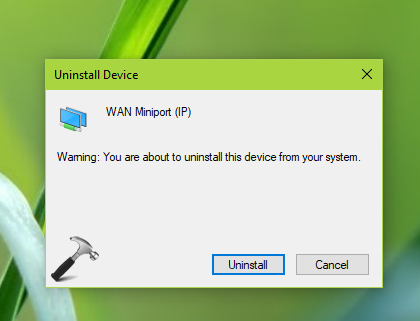
3. In the Uninstall Device window, confirm the action by clicking on Uninstall.
4. Repeat steps 2 and 3 and uninstall WAN Miniport (IPv6) and WAN Miniport (PPTP) in the similar way.
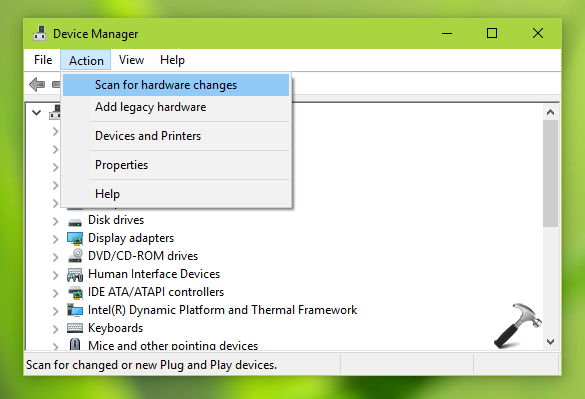
5. Finally, click Action > Scan for hardware changes. The uninstalled devices/drivers should be back now but the problem should also be resolved. If not, you can just reboot your device and issue will no longer present.
FIX 3 – Via Windows Update (Added on 25 Oct, 2019)
Some users have confirmed this issue is finally addressed by Windows Update KB4522355 (build 18362.449) released on 24 October 2019. Please install KB4522355 via Windows Update or manually using this guide, and issue will be fixed.
Hope this helps!
![KapilArya.com is a Windows troubleshooting & how to tutorials blog from Kapil Arya [Microsoft MVP (Windows IT Pro)]. KapilArya.com](https://images.kapilarya.com/Logo1.svg)


![[Latest Windows 10 Update] What’s new in KB5055612? [Latest Windows 10 Update] What’s new in KB5055612?](https://www.kapilarya.com/assets/Windows10-Update.png)


Leave a Reply