

The BitLocker Waiting for Activation state on Windows 11 Volume prevents drive encryption and data security. The problem typically develops from incorrect settings, disabled TPM, or uninitialized drives.
Don’t worry! This guide presents seven proven solutions that will help you activate BitLocker while fixing the issue.
Page Contents
What is “Volume with BitLocker Waiting for Activation” on Windows 11?
Windows 11 displays the “Volume with BitLocker waiting for activation” error when BitLocker encryption remains incomplete on a drive thus exposing it to potential security risks. The error occurs when encryption stops during the process, when security configurations are inadequate, or when the drive needs proper initialization.

Your data stays unencrypted and at risk, until BitLocker completes its activation process. Your drive requires complete BitLocker activation through proper enabling to achieve security.
What Causes BitLocker Waiting for Activation Issue?
The following section explores the typical causes of this error before presenting solutions:-
- The TPM (Trusted Platform Module) feature remains disabled inside the BIOS configuration.
- The BitLocker service operates improperly.
- The activation of BitLocker encounters problems because of incorrect Group Policy settings.
- The drive exists without proper initialization or incorrect formatting.
- System file corruption leads to BitLocker failure.
The following seven methods will help you resolve this problem.
Fix Volume with BitLocker waiting for activation on Windows 11
Fix 1: Enable TPM and Secure Boot in BIOS
Encryption through BitLocker requires the presence of a TPM (Trusted Platform Module). You must enable TPM through BIOS because it remains disabled.
1. After restarting your computer you must press the BIOS key (F2, F10, F12, or Del) before the operating system starts up. Proceed to the Security section or Advanced Settings.
2. Check that TPM (Trusted Platform Module) appears as Enabled under the system settings. Secure Boot should be enabled in the Boot section.
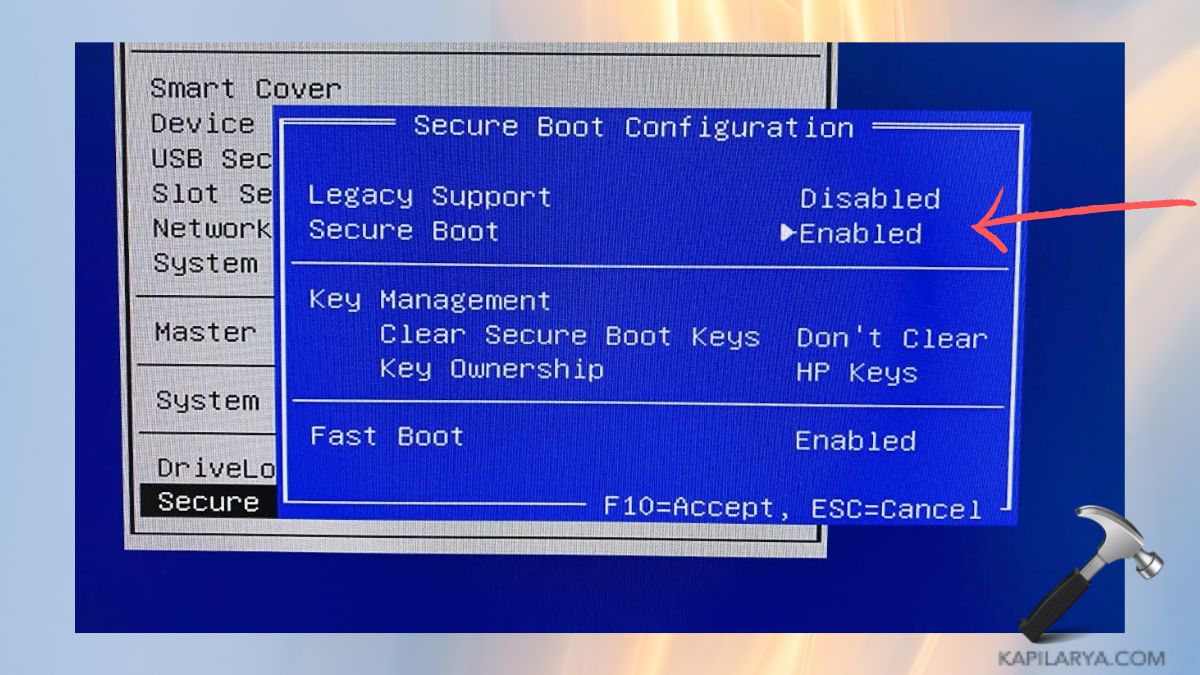
3. Save your modifications before your PC restarts. Try activating BitLocker again.
The problem should be resolved by enabling TPM.
Fix 2: Start the BitLocker Drive Encryption Service
The BitLocker service needs to be running in order for encryption to start. The service restart process solves the problem.
1. Open the Services application through the Windows 11 search console.

2. You will locate BitLocker Drive Encryption Service by scrolling down. Right-click it and select Properties.

3. Set Startup type to “Automatic”. Follow these steps: Start > Apply > OK. If “Start” is greyed out, press “Stop” and then again hit “Start”.

After restarting your computer check whether BitLocker becomes active.
Fix 3: Use Group Policy to Fix BitLocker Activation Issue
BitLocker activation may get stuck because of the wrong Group Policy settings. The incorrect Group Policy settings can be modified to solve this problem.
1. Launch the Run dialog by pressing Win + R then copy-paste the following command followed by hitting Enter.
gpedit.msc

2. The required Group Policy setting can be found under this path-
Computer Configuration > Administrative Templates > Windows Components > BitLocker Drive Encryption > Operating System Drives
3. Double-click the “Require additional authentication at startup” option from the list. Choose the Enabled option while ensuring that Allow BitLocker without a compatible TPM is activated.

4. Use the “Apply” button then select “OK” followed by restarting your PC. You should attempt another BitLocker activation after your system restarts.
Fix 4: Initialize and Format the Drive Properly
The failure of BitLocker activation occurs when the drive lacks proper initialization.
1. Open the Win + X menu and choose Disk Management from the options.

2. Find the drive that needs activation. Right-click the drive then select “Initialize Disk” from the menu.

3. Select GPT (GUID Partition Table) through the dialog box. Select the unallocated space then right-click to choose New Simple Volume from the options.

4. Use NTFS as the drive format and choose a drive letter during the assignment process. Try enabling BitLocker again.
Fix 5: Reset BitLocker Settings Using Command Prompt
The process of resetting BitLocker settings might resolve the waiting for activation issue.
1. Open Terminal (Admin) through the Win + X key combination.

2. Enter the command followed by pressing the Enter key.
manage-bde -off C:
Use the actual drive letter instead of “C:” in this command.

3. You can reactivate BitLocker through the Control Panel after the decryption process finishes. The reset of BitLocker settings through this process might resolve the problem.
Fix 6: Update Windows to Fix BitLocker Bugs
Microsoft distributes regular updates that address issues associated with BitLocker functionality.
1. Open the Settings by pressing the combination of keys Win + I.
2. Go to Windows Update. Perform a check for new updates followed by their automatic installation.
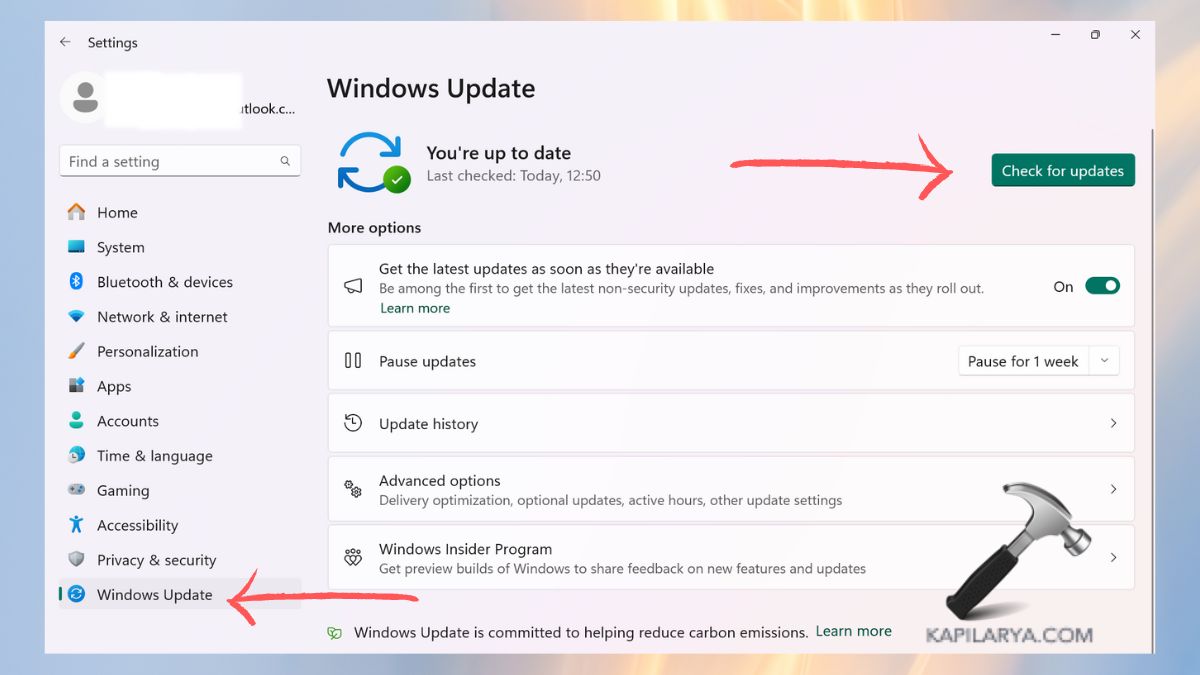
Check if BitLocker activation functions by restarting your PC. Numerous BitLocker-related bugs can be fixed by performing Windows updates.
Fix 7: Perform a System File Check (SFC & DISM Commands)
System files in a corrupt state create problems for BitLocker encryption. The combination of SFC and DISM scans provides a solution to fix system file issues.
1. You can access Command Prompt (Admin) through a search on the console menu.

2. Enter the command and press the Enter key.
sfc /scannow
The scanning process should be allowed to finish.

3. Next, run these two commands one by one.
DISM /Online /Cleanup-Image /ScanHealth
DISM /Online /Cleanup-Image /RestoreHealth

4. Reboot your PC then attempt to enable BitLocker once more. Running these commands will resolve BitLocker problems that stem from system file corruption.
Frequently Asked Questions (FAQs)
#1 Why is BitLocker saying “Waiting for activation” in Windows 11?
The system fails to activate BitLocker because TPM is disabled. That is because BitLocker settings are incorrect due to drive formatting problems or if system updates are missing.
#2 Can I use BitLocker without TPM on Windows 11?
Yes! The Group Policy Editor (gpedit.msc) enables BitLocker activation without TPM by allowing BitLocker to function without TPM compatibility.
#3 Will formatting the drive fix the BitLocker waiting for activation issue?
The problem can be solved by properly formatting the drive when it fails to initialize correctly so BitLocker activation becomes possible.
That’s it!


Leave a Reply