

Are you facing problems with the volume control not working in Windows 11 PC? This error is quite annoying and more so when you want to listen to your favorite song or when in a crucial video meeting. Nevertheless, this is one of the most common issues affecting many computer users, and there are various ways of addressing it.
Page Contents
Causes of Volume Control Not Working in Windows 11
1. Windows Updates: Sometimes, a brand-new update in Windows can be the cause of issues with the volume control, including new bugs or incompatibilities. But if the problem began anytime after an update of the application, then this is likely the cause.
2. Outdated or Corrupted Audio Drivers: It is an unfortunate occurrence when the volume control is abnormally high or low, and the most common cause is the drivers being either outdated or corrupted.
3. Audio Services Not Running: Sound in Windows is handled through several audio services. If these services are any bit choppy, then volume control hits the brick wall right around the corner.
4. Hardware Issues: At other times, the problem could be associated with the hardware, for instance, you have a problem with the volume keys on your keyboard or a defective audio cable.
5. Software Conflicts: Conflicts of the different software applications, specifically those that have something to do with the audio can also be a reason for the Volume Control not to work again.
In this today’s article, you will know how you can easily solve the volume control problem in Windows 11. So, go ahead and follow the troubleshooting steps in this article now.
Fix: Volume control not working in Windows 11
Fix 1: Restart Windows Explorer
The volume control function is accessible through the Windows File Explorer method, and often resetting this can help refresh the user interface and fix any issues that may be affecting the control. Here are the steps:
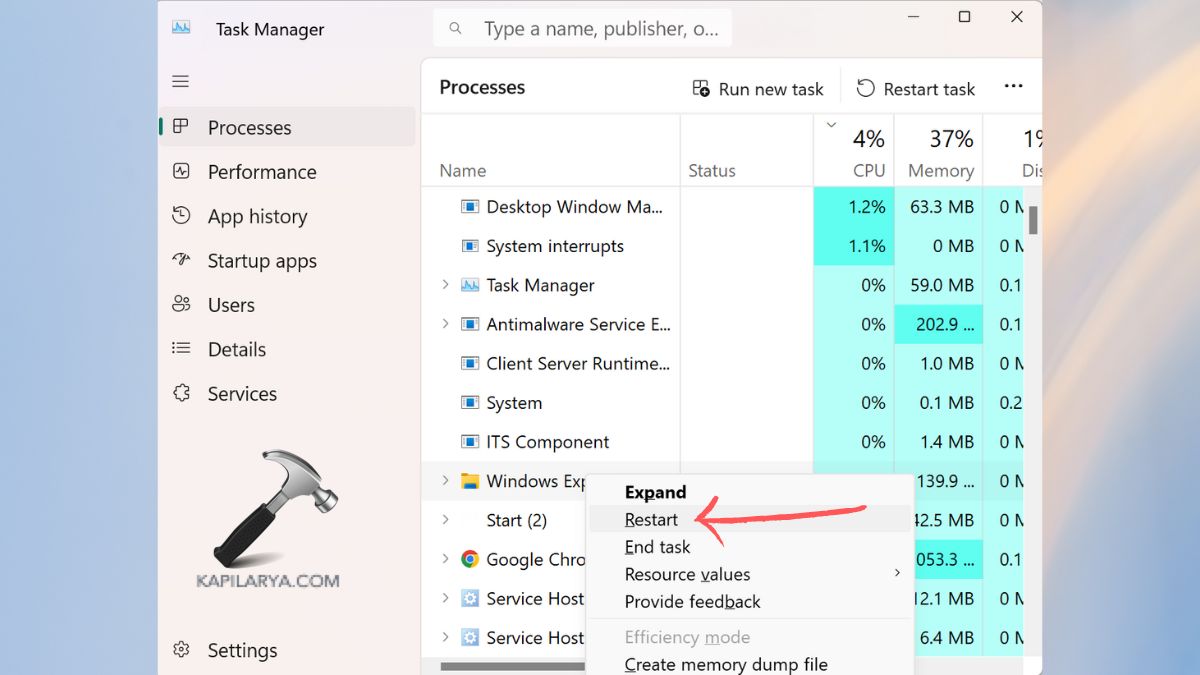
1. Open the Task Manager app.

2. In the Processes section, locate the Windows Explorer option and right-click it. Tap “Restart”.
Fix 2: Update the Windows 11 Operating System
Ensuring your Windows 11 operating system is updated is important from time to time because it helps address issues with the system such as strange volume control. Booting with the newly installed OS might just solve the problem you are having with your volume control.
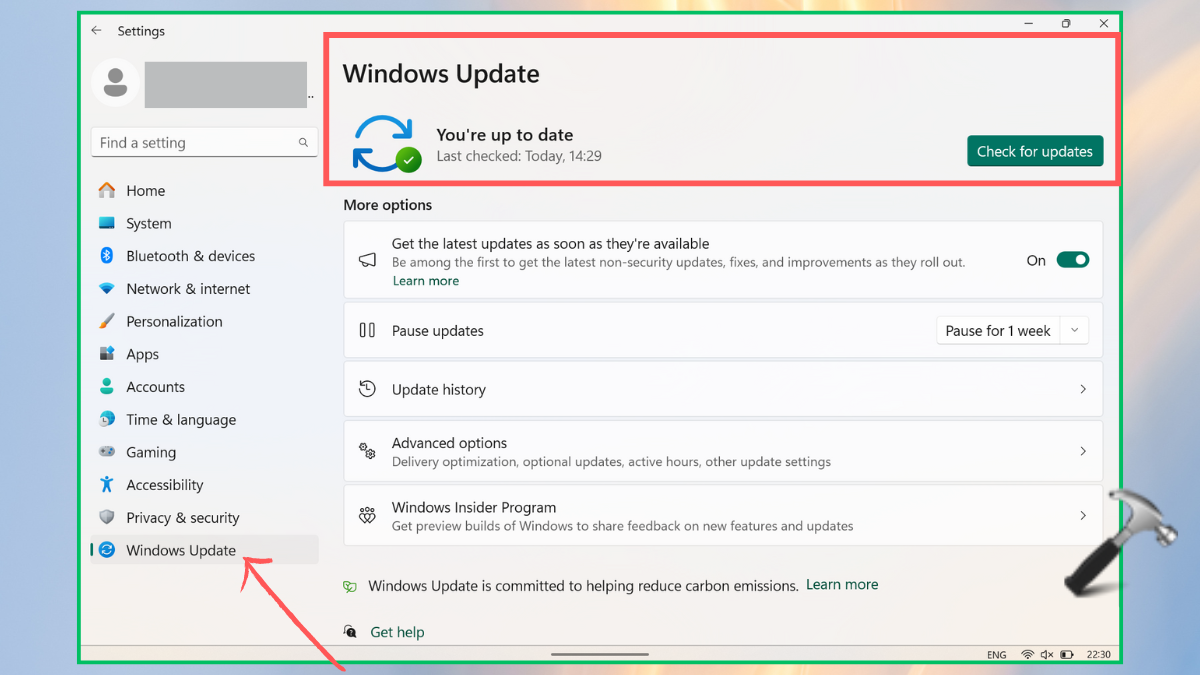
1. Go to Windows Settings > Windows Update > Check for Updates.
2. If any update is found, click on “Download and Install”. Afterwards, restart the PC.
Fix 3: Restart the Computer
Sometimes, a PC restart can help remove any minor issues of volume control that may be influencing the system. After the booting of your computer, you can test the volume control and confirm if the issue has been resolved. You can try to increase or decrease the volume using the slider in the taskbar or the buttons on the keyboard.
Note: Any opened documents or files must be saved first in order not to lose any data when the computer is about to be restarted.
Fix 4: Disable and Re-enable Audio Device
If after these processes you still can’t use the volume control in Windows 11, you can disable and enable your audio device to prevent having some problems with the device. This method updates the device driver and may free up any short-term problems that may be affecting the audio system. For that, follow the below steps:
1. Open the “Device Manager” app from the Windows search bar.

2. Find the “Sound, video and game controllers” and expand it. Right-click your PC’s audio device and select “Disable device”.

3. Now, right-click on it again and tap “Enable device”.
Fix 5: Run the Audio Troubleshooter
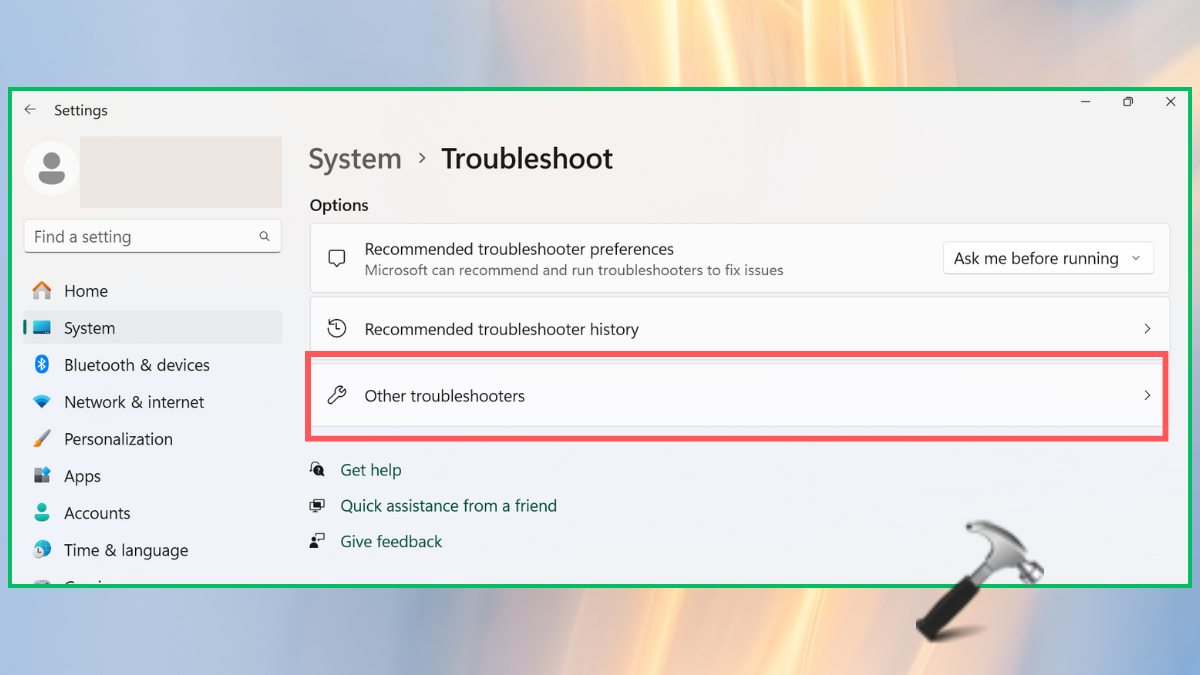
1. Open Windows Settings app > System > Troubleshoot.
2. Select “Other Troubleshooters” option.
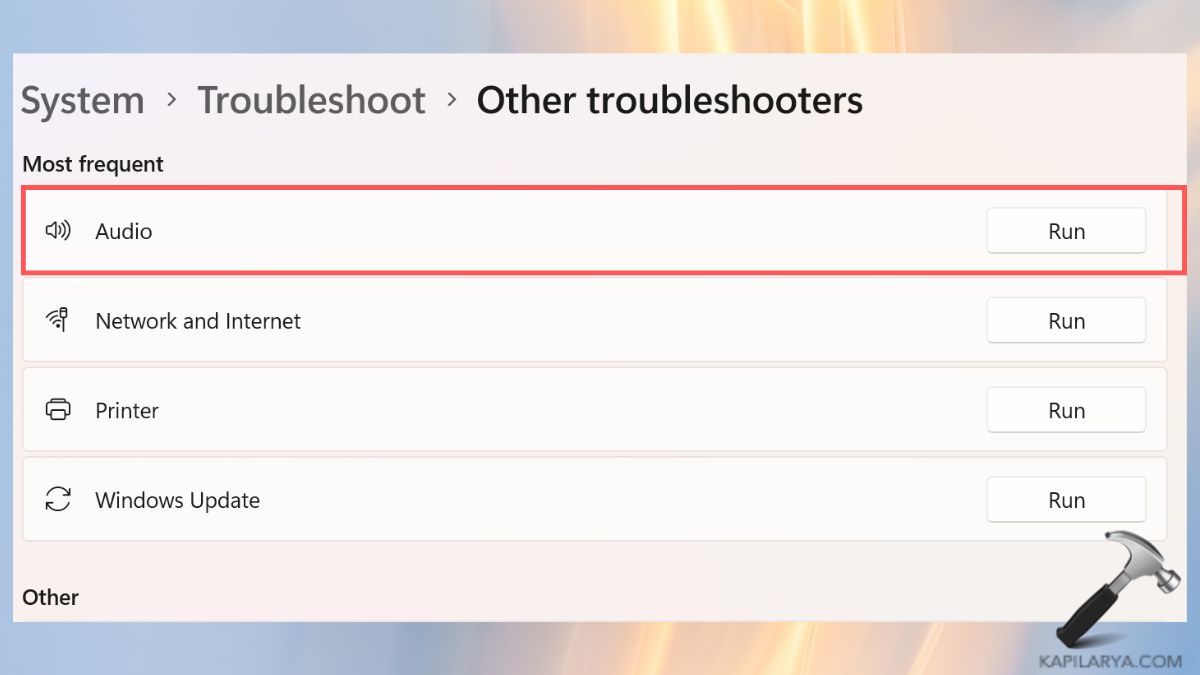
3. Tap “Run” for Audio.
If the fix mentioned above has not helped in solving the problem, there are other below mentioned ways to solve the issue.
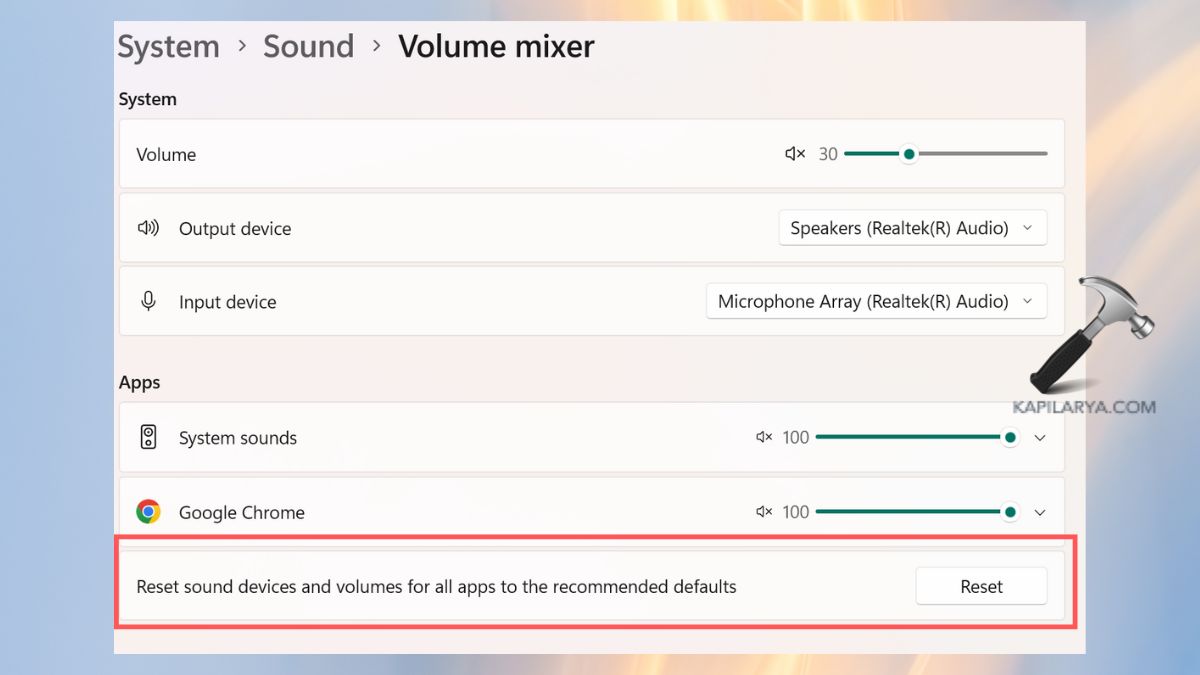
Fix 6: Reset Audio Settings to Default Values
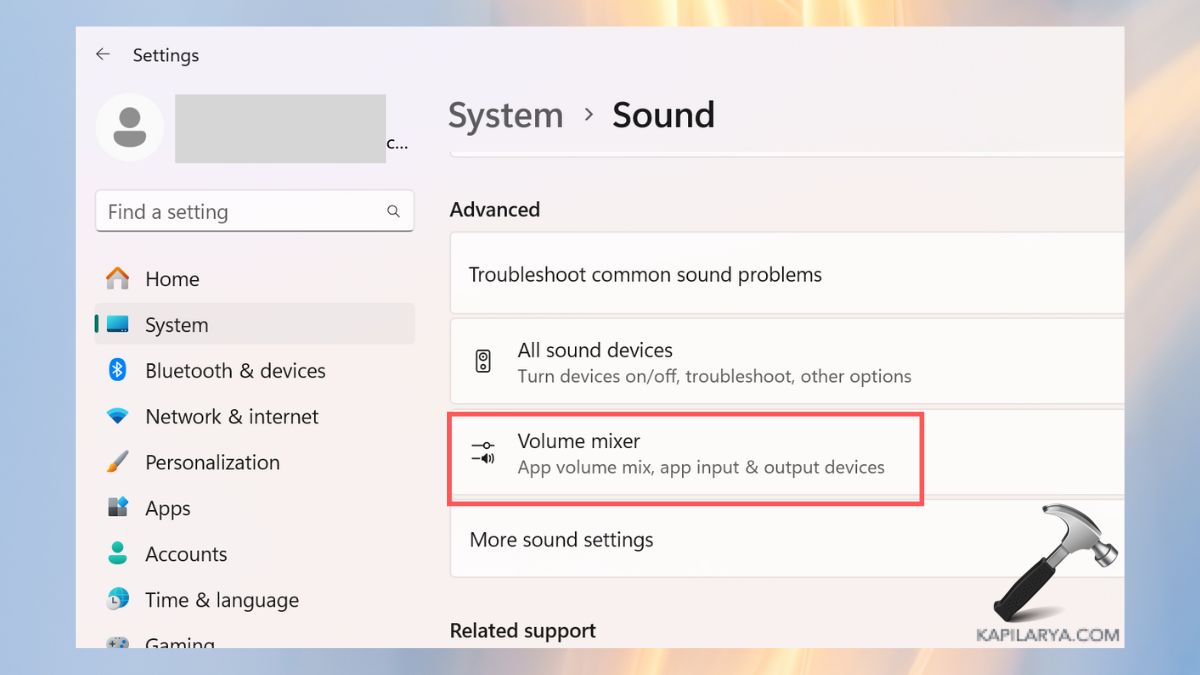
1. Open the Windows Settings > System > Sound.

2. In the “Advanced” section, tap “Volume Mixer”.
3. Click on the “Reset” button to reset the audio settings to default values.
Fix 7: Reinstall your Audio Device
1. Again open the Device Manager and expand “Sound, video and game controllers” option as given in Fix 4.
2. Right-click on the system’s audio device and tap “Uninstall device”.
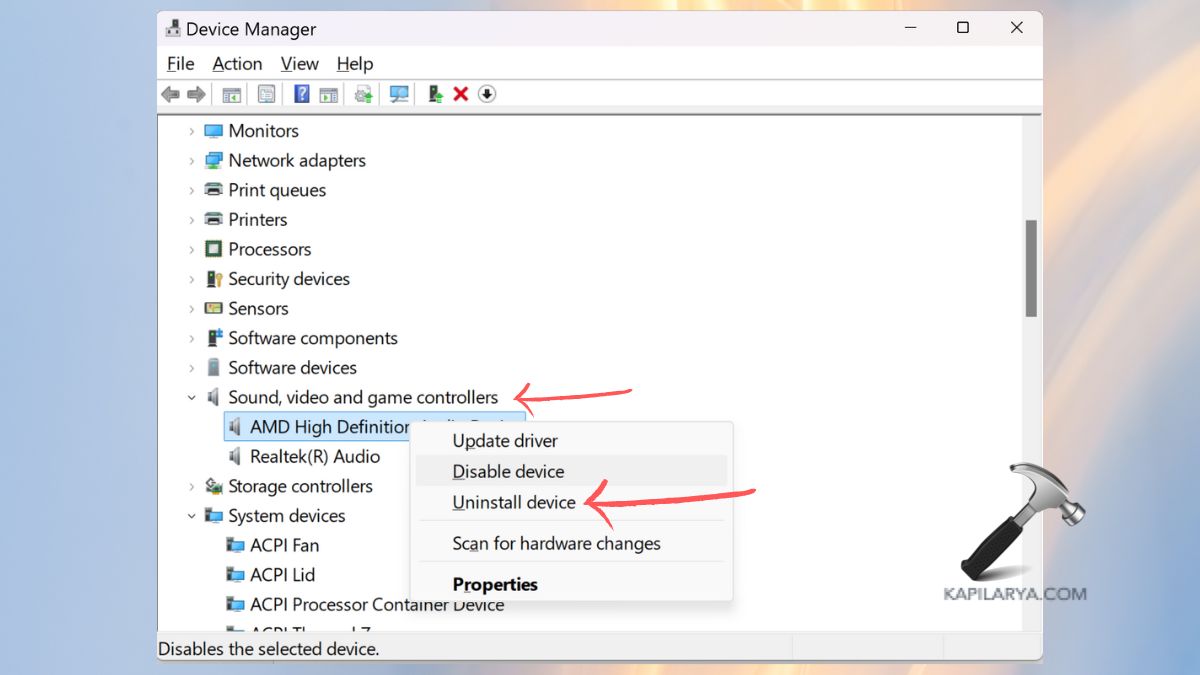
3. Now, restart the PC and that will automatically reinstall the audio device.
Fix 8: Run a Malware Scan
To resolve the problem that deals with volume control, it is advisable to run a malware scan so as to know if there is any malicious software that can be affecting your system. For this, you can use Windows Defender built-in Windows 11 OS.
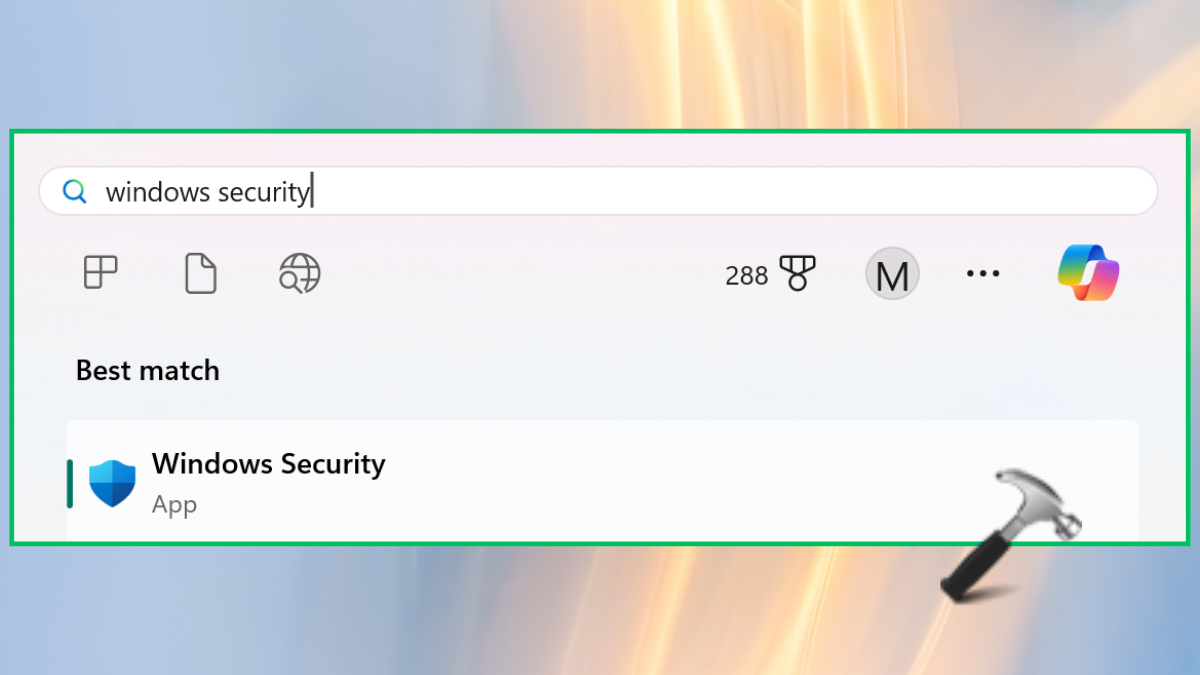
1. Open Windows Security app from the Windows search bar.
2. Go to Virus threat & protection from the left panel and tap the “Quick scan” button.

3. If there are any threats, use the options displayed on the screen to delete or isolate them.
4. After getting rid of the detected malware, reboot your computer to make sure that all the changes have been implemented.
Finally, test whether or not the volume control is functioning as it should. If you experience any error while performing any of these solutions, leave a comment below so we can help you out.
That’s it!


Leave a Reply