If you’re looking forward to use third-party virtualization software on your system and it is not working, this article may interest you. Usually, we will use virtualization software to test any operating system without affecting the original operating system on the machine. Virtualization software will create favourable environment for the operating system we want to test and we can use it like it is installed on the physical machine. Some well known virtualization software in market are VirtualBox, VMware Workstation etc. However, if third-party virtualization software not working on Windows, we’ll see how you can fix it in this post.
So Microsoft has identified this issue and they have also released a workaround or fix for this. This problem can occur on systems having Hyper-V enabled. In Windows, Hyper-V specifically provides hardware virtualization and it is a built-in feature. Hyper-V works with hypervisor, which requires a physical processor with specific features. The hypervisor manages the interactions between the hardware and the virtual machines. This hypervisor-controlled access to the hardware gives virtual machines the isolated environment in which they run.
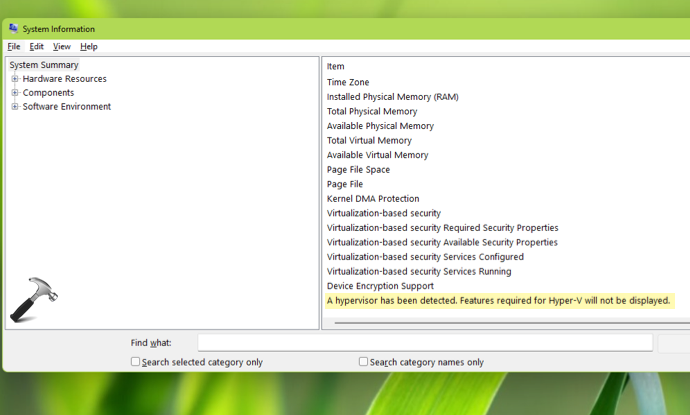
When you access System Summary by running msinfo32.exe command, you’ll find A hypervisor has been detected. Features required for Hyper-V will not be displayed mentioned, if you’ve Hyper-V enabled.

Now this may cause issue for other virtualization software and they might not work. Here is how to fix it.
Fix: Virtualization software not working on Windows
This problem basically occurs due to hardware virtualization extensions, available on most of the modern processors. This includes Intel VT-x and AMD-V technologies. There is a restriction that only one virtualization software can use this hardware at a time. So if Hyper-V is using that hardware, it is quite obvious that other virtualization software may not use that component at same time. And thus other virtualization software fails to work as expected.
To resolve this problem, follow these steps:
1. Search for Turn Windows features on or off and open it.
2. In Turn Windows features on or off window, locate Hyper-V > Hyper-V Platform > Hyper-V Hypervisor and uncheck that option.

3. Click OK to apply changes.
After that, you will find that now your third-party virtualization software is working without any problem.
You can also refer this official Microsoft documentation for more information on this.
That’s it!
Read next: How to create Windows 11 Virtual Machine using Hyper-V.
![KapilArya.com is a Windows troubleshooting & how to tutorials blog from Kapil Arya [Microsoft MVP (Windows IT Pro)]. KapilArya.com](https://images.kapilarya.com/Logo1.svg)


4 Comments
Add your comment
Hi! Unfortunately your suggestions do not work on a Microsoft Surface Pro+.
Do you have a chance to test it with a Microsoft Surface Pro+? It’s impossible to uninstall Hyper-V.
Hyper-V is deactivated, and msinfo32.exe still shows “Hypervisor detected”.
See also here:
stackoverflow.com/questions/70911043/hypervisor-detected-unable-to-uninstall-hyper-v-on-windows-11-windows-surface
The topic is here now:superuser.com/questions/1702207/hypervisor-detected-unable-to-uninstall-hyper-v-on-windows-11-windows-surface#1702207
Hi buddy
But on my laptop, the Hyper v option is not available in (turn on or off window’s features ) But in system info
same option appearing in last which you share in the screenshot
Buddy, I really need your precious solution
My Microsoft account version is (2202.1402.2.0)
My processor is
AMD Ryzen 3 2200U with Radeon Vega Mobile Gfx, 2500 Mhz, 2 Core(s), 4 Logical
Version 10.0.22557 Build 22557
OS Name Microsoft Windows 11 Home
System Model Inspiron 3585
BIOS Version/Date Dell Inc. 1.4.0, 29/05/2019
Thanks
Hey, Im not a tech or anything, but my opinion to you not being able to see the button could be that you have Home edition of windows 11 and not the Enterprise or Pro version. I know this is a requirement for Windows 10 for VT to work. Best to you.