Settings is one of the most essential applications in Windows 11 since it is the launchpad into controlling the system. If this app does not work properly, it may cause many issues. Sometimes users face this issue. There could be many reasons behind this happening. Not to worry. We are presenting various ways you can fix the Settings app not working in Windows 11.
Page Contents
Fix: Settings app not working in Windows 11
Fix 1: Re-enable Settings app through Registry Editor
To do this, follow the steps below:
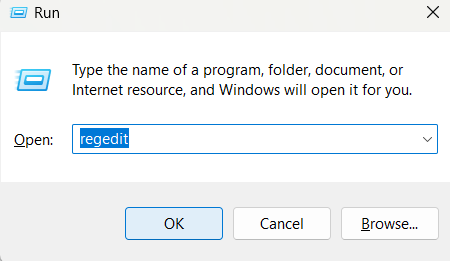
- Press the keys Win + R to open Run.
- Type Regedit and press OK. Select Yes in the UAC prompt.
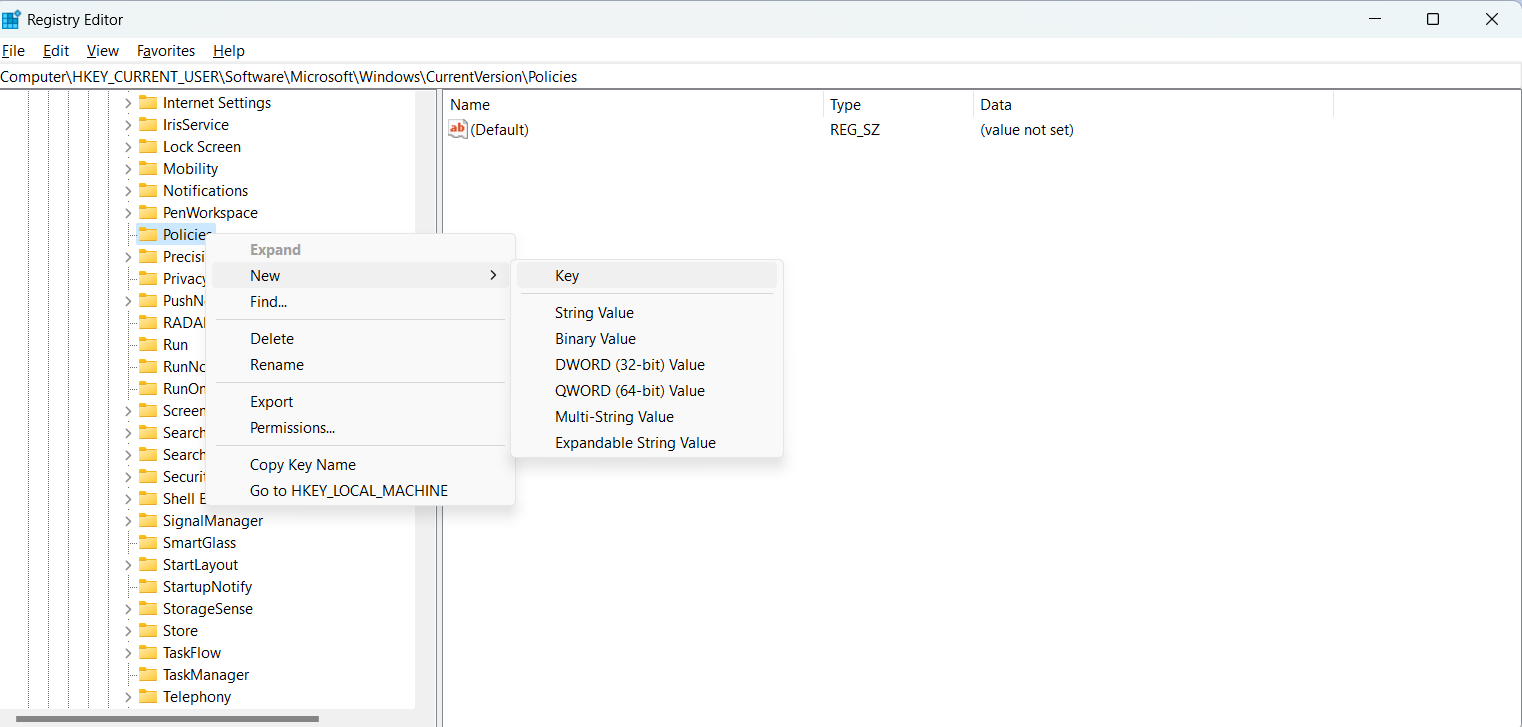
- Follow the path mentioned below in the Registry Editor.
HKEY_CURRENT_USER\Software\Microsoft\Windows\CurrentVersion\Policies\
- Right click on Policies and select New > Key.
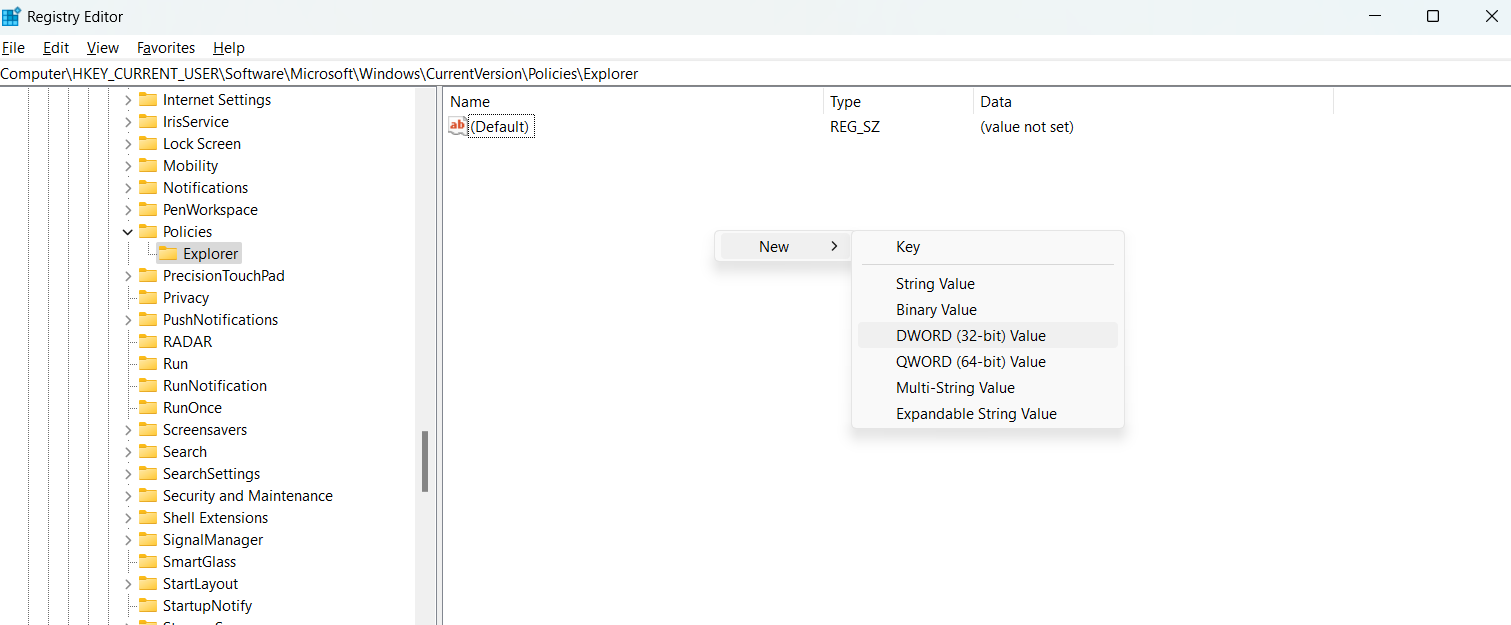
- Name this key ‘Explorer’. Now, in this key, right click on the blank space and select New > DWORD (32-bit) Value.
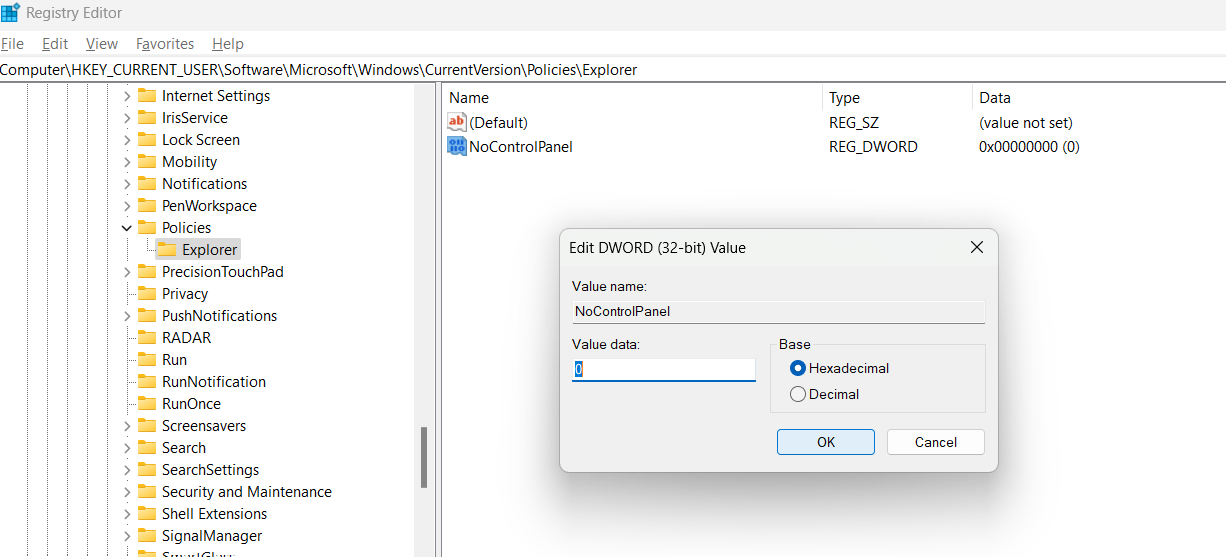
- Name this new value as NoControlPanel by right-clicking on it. Double click on this and set its value to 0.
Fix 2: Update Windows or roll back
One simple fix is to make sure that your system is running on the latest version of Windows 11. If not, update the Windows. The new updates come with bug fixes and patches that may solve your issue.
On the other hand, if you noticed that your Settings app incidentally stopped working after a certain update you installed in your computer, then the problem could be the new update. It may be wise in this case to roll back the update. To do this,
- Go to Windows update section in settings and select Update history. Here, check if the date of your update matches with the time settings app stopped working.
- If so, scroll down and select Uninstall updates.
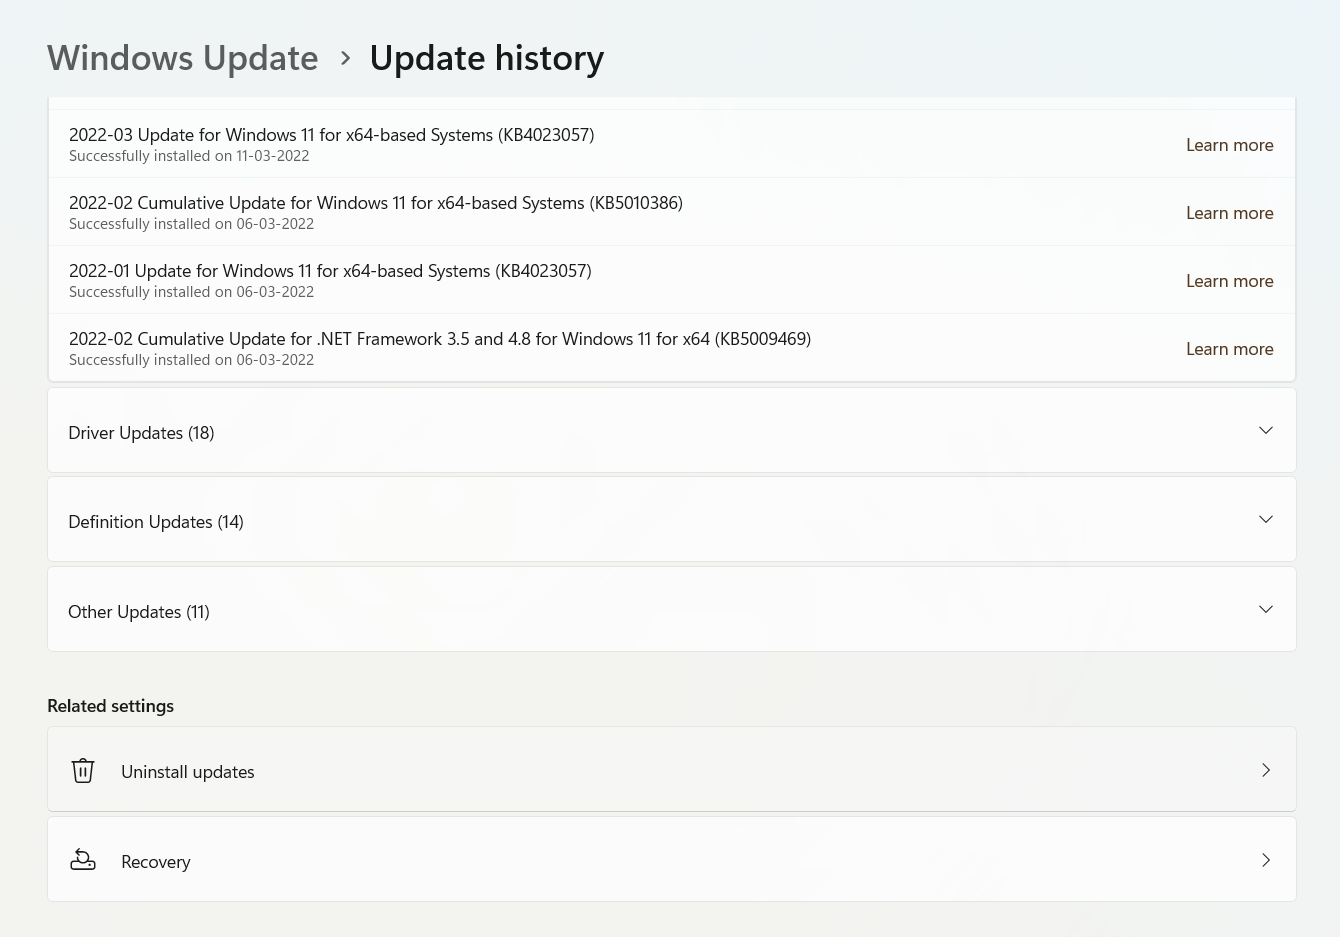
You can also do so via Control Panel by going to Programs and Features > View installed updates

- On the next screen, select the update you think started the issue and uninstall it.
Fix 3: Reset the Settings app
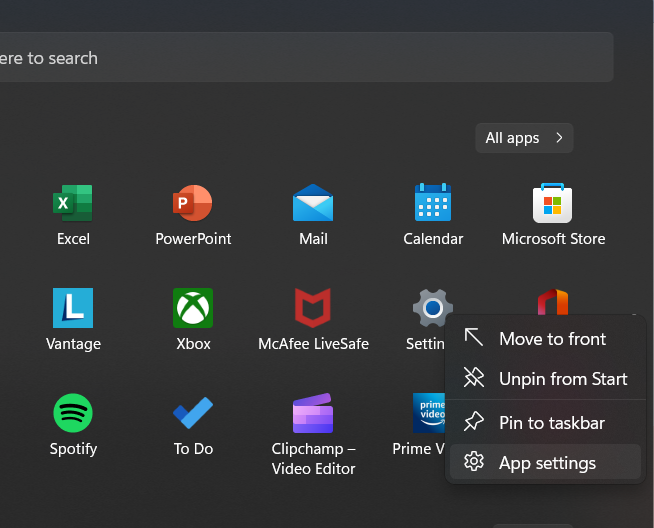
- Open the Windows menu and right click on the settings icon. Select App settings.
- Scroll down and click on the Reset button.
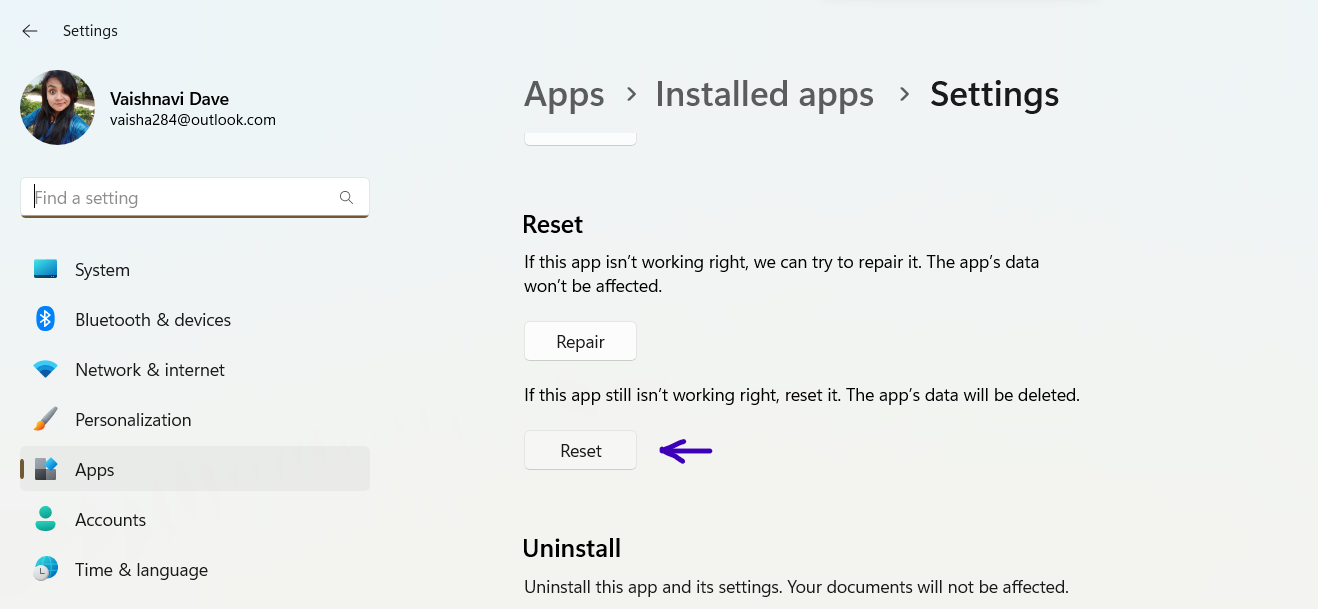
This simple solution could be your savior.
Fix 4: Open Settings from Other path
A simple fix could be that you try opening the Settings app from a different path. One way is the press the keyboard shortcut keys Win + I.
Alternatively, you can use the taskbar. Click on the system tray and you can open the app by clicking on the settings icon on the bottom right corner.

Fix 5: Run SFC scan
The SFC scan of the system will find errors in the hard drive and fix it. To do this,
- Search for Command Prompt in the Start Menu and open it.
- Now, type the following command.
sfc /scannow
Once the command is successfully run, you can now check if the issue is resolved.
Fix 6: Re-register Settings app
You can try this technical fix if the above options do not work. The idea is that settings is a Windows built-in app. So, re-registering it along with other Windows apps could solve the issue. Here is how you go about it.
- Open Windows Powershell by searching for it in the Start Menu and clicking on Run as administrator.
- In the black Window that opens, type the following command and press Enter.
Get-AppxPackage *windows.immersivecontrolpanel* | Reset-AppxPackage
Hopefully, this re-registering the app will fix this issue.
Fix 7: Create a new Windows user
If none of the above fixes work for you, one extreme solution is to create a whole new administrator account and shift to it with all your files and documents. You won’t be able to use your Settings app to carry this out. Other way around is using Microsoft Common Console Document. Here is how to do it in the Windows Home Edition.
- Search for Command Prompt in the start menu and select Run as Administrator.
- Type the following command with the new username and new password.
net user <newusername> <newpassword> /add
Replace <newusername> and <newpassword> with username and password, respectively.
Hit Enter and wait till you see The command completed successfully message on the screen.

- Now, Open Control Panel and go to User accounts > Manage another account. Here, select the new account you created which will appear as newusername beside your current account. Click on it.
- Go to Change the account type and select Administrator. Click on Change account type.

This new account is now administrator. Sign out of your current account and go to the new one. The settings app must be working in this new account now.
Now you need to transfer your files. To do it,
- Open file explorer in this new account and go to the system hard drive. Here, click on view > Show > Hidden items.

- Now, navigate to your old account in file explorer in C:/Users/(old account name) and double click on it.
- You will see a Prompt saying ‘You don’t currently have permission to access this folder’. Click on Continue.
- Enter your account password when asked for it.
- Simply copy all the files from here and paste them in your new account which will be at C:/Users/(new account name).
- Select Yes when asked if you want to merge the folders from your old user account to the new one.
And that is it.
Fix 8: Uninstall Clashing Apps
Lastly, sometimes there are apps which may be preventing Windows Settings app from working. Not to omit any possible cause for the issue at hand, you should consider researching a bit to see if any of your recently installed app are causing such issue. If so, uninstall them.
Thus, we have covered all the possible scenarios and how to fix them to resolve the issue when the Settings app not working in Windows 11.
Video fix
You can also checkout this video fix for live troubleshooting this issue:
Related: Settings app won’t open in Windows 11.
Also check Settings App Not Working In Windows 10.
![KapilArya.com is a Windows troubleshooting & how to tutorials blog from Kapil Arya [Microsoft MVP (Windows IT Pro)]. KapilArya.com](https://images.kapilarya.com/Logo1.svg)


Leave a Reply