Outlook data files such as Personal Storage Table (PST) store a copy of mail items on your system including attachments or Files. After sending and receiving emails, the PST file will grow larger with time and usage. This tutorial will help you to fix Outlook Data File has reached the maximum size.
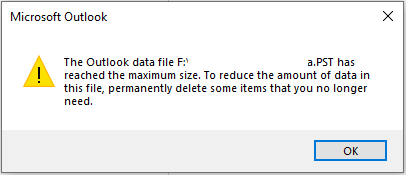
When PST exceeds the size limit, it cannot store more emails and Outlook will show you the error “Outlook Data File has reached the maximum size”. You can either increase the PST file size limit to store data or create space for new mail items.
Page Contents
Fix: Outlook Data File has reached the maximum size
Below we have four methods that will help you to resolve the error “Outlook Data File has reached the Maximum Size”:
Method 1: Compress PST File
Compressing the PST file removes the white space or space left by deleting the mail items and reduce the file size. Follow the steps to compress the PST file:
1. Open Outlook and navigate to File => Account settings.
2. Now, click on the “Data Files” and select the PST file associated with your email profile from the list.
3. Click on Settings and go to Advanced.

4. Now, click on “Outlook Data File Settings”.
5. Here, click on “Compact Now”.
Method 2: Archive old Mail items
Archiving will help you to save the old mail items in new local PST file with attachments. Follow the below steps to archive the old mail items:
1. Open Outlook and navigate to File => Info => Cleanup Tools => Archive.
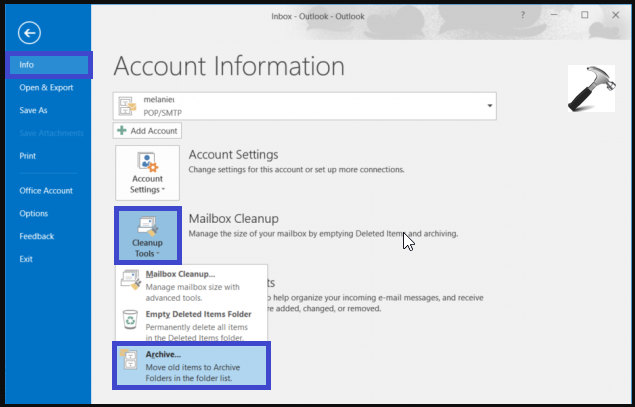
2. Here, choose the mail folder from where you want to archive old items.
3. After that, choose the date.
4. Click on “Browse..” to save the location where the mail items will be saved in a new PST file.

5. Click OK.
Method 3: Save Attachments in Different Folder
You find emails with attachments which contribute the size of a PST file. Save the attachments in local folder, external drive or cloud. After saving, you can delete them to reduce the PST file size to store more mail items. Follow the steps to save the attachments in different folder:
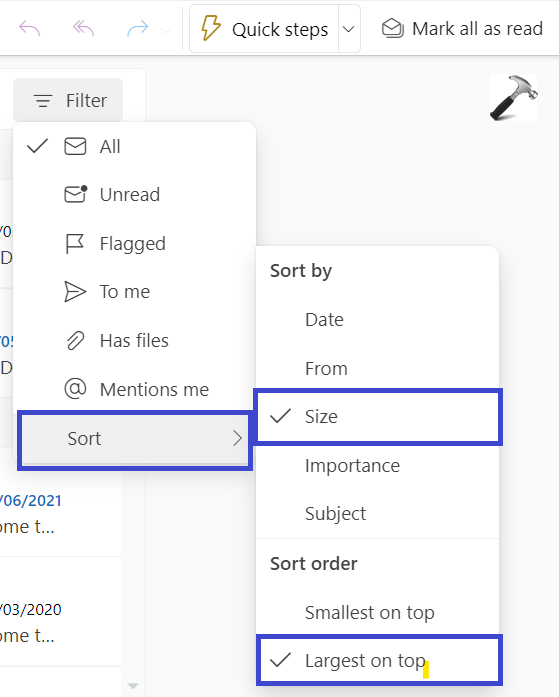
1. Open Outlook and click on “filter”.
2. Click on “Sort” and select “Size” to sort the emails based on their size.
3. Now, click on “Largest on Top”.
4. You can open emails one-by-one and save the attachment to local drive using the “Save all attachments” option.
5. Now, right-click on attachments and select “Remove Attachment”. This will delete the attachment from the email.
Else, you can delete the mail if you don’t need that mail anymore.
Method 4: Increase PST File Size Limit
You can also increase the PST File Size limit instead of reducing it. Using Registry Editor you can increase the PST File Size Limit. Follow the steps to do so:
1. Press the Windows key + R. Type regedit.exe and click OK.
2. Navigate the path:
Computer\HKEY_CURRENT_USER\Software\Microsoft\Office\16.0\Outlook\PST
3. Search the PST key. If there is no such key, you can create it.
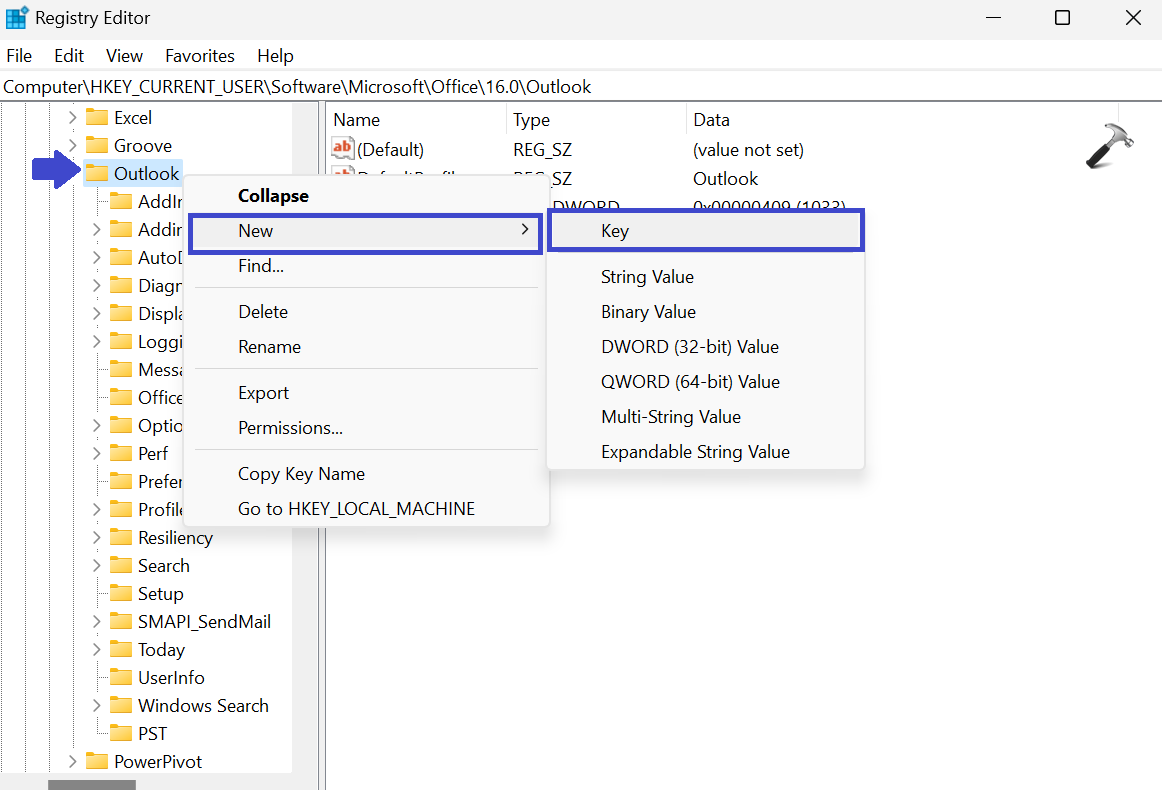
To create the key, right-click on “Outlook” and select New => Key. Type “PST” and click OK.
4. Now, create the registry key under the PST subkey.
To create the key, right-click on “PST” and select New => DWORD (32-bit) value. Type “MaxLargeFileSize” and click OK.
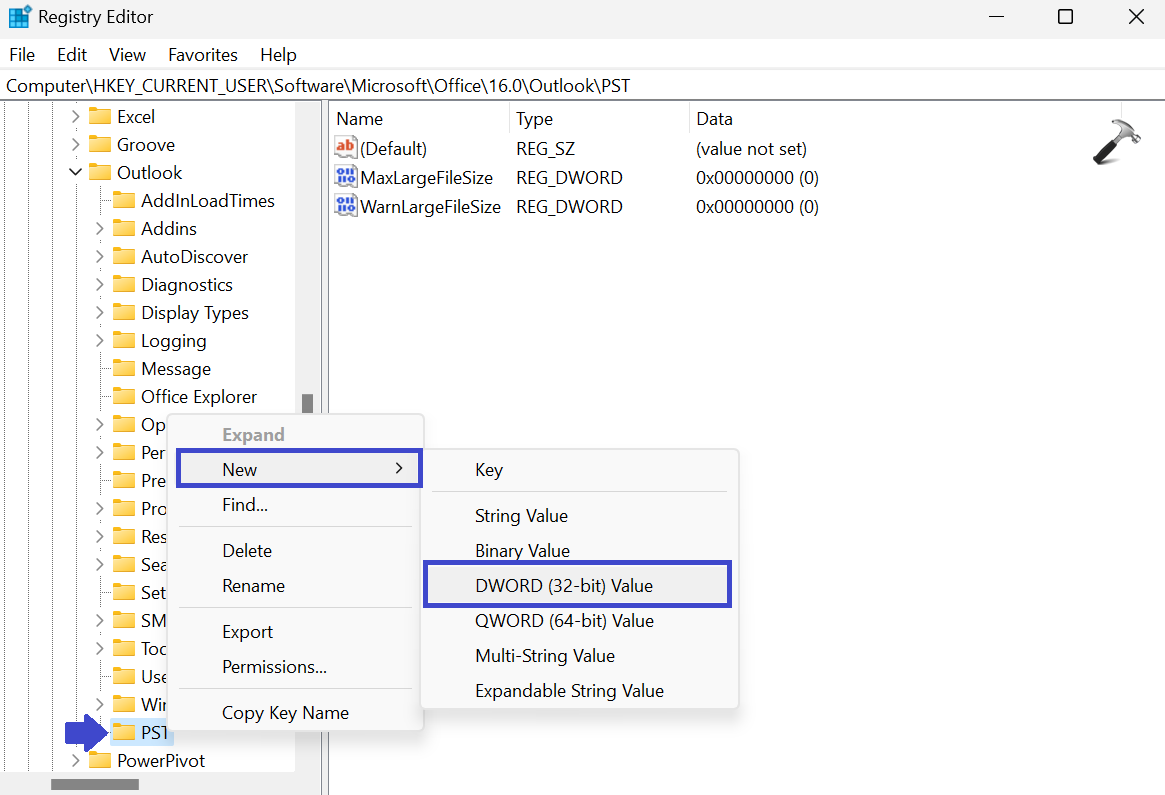
Create another key as “WarnLargeFileSize” using the above method.
5. Double-click on “MaxLargeFileSize” registry key.
Select the decimal value.
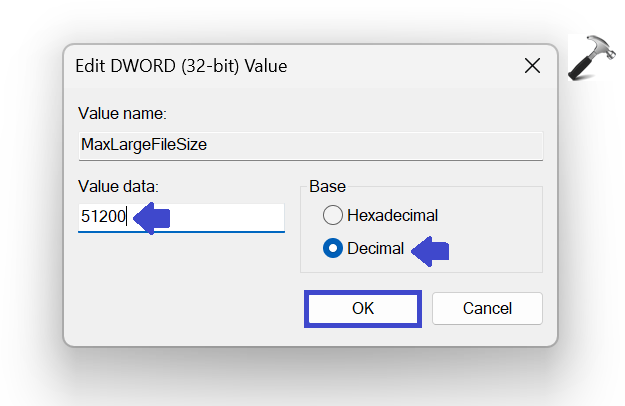
Set the value 51,200 for 50GB or 40,960 for 40GB. Here you have to covert the GB to MB and then enter the MB value.
Click OK
6. Now, double-click on “WarnLargeFileSize” registry key.
Select the Decimal value.
Set the value slightly lower than the “MaxLargeFileSize”. For example, you have entered 51,200 in “MaxLargeFileSize” registry key, then set the value 48,640 in “WarnLargeFileSize”.
Click OK.
7. Close the Registry Editor Windows and restart the PC to apply the settings.
Open the Outlook and the error “Outlook data file has reached the maximum size” should be gone.
That’s It!
![KapilArya.com is a Windows troubleshooting & how to tutorials blog from Kapil Arya [Microsoft MVP (Windows IT Pro)]. KapilArya.com](https://images.kapilarya.com/Logo1.svg)


![[Latest Windows 10 Update] What’s new in KB5055612? [Latest Windows 10 Update] What’s new in KB5055612?](https://www.kapilarya.com/assets/Windows10-Update.png)


Leave a Reply