If you’re using OneDrive in Windows 11/10 to backup your files, but it is not starting automatically after you login, this article is for you. Usually, when you setup OneDrive using your Microsoft account, Windows configures OneDrive to automatically start with the device, so that files start syncing.
But in some causes, due to updates, third-party software or corruption in registry database, the setting to allow OneDrive at startup may be disturbed. As a result, you need to start OneDrive manually after each boot. Here’s how you can fix this problem, so that OneDrive automatically starts as soon as you login.
Page Contents
Fix: OneDrive not starting automatically with Windows 11/10
Fix 1: Using OneDrive Settings
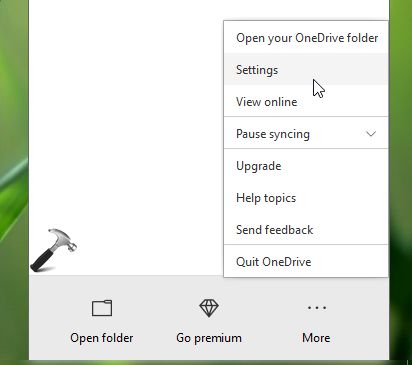
1. Right click on OneDrive icon on taskbar and click Settings.
2. In Microsoft OneDrive window, under Settings tab, you’ll find General heading. Under this, check Start OneDrive automatically when I sign in to Windows option to allow OneDrive to start with your Windows 10 device. Click OK.
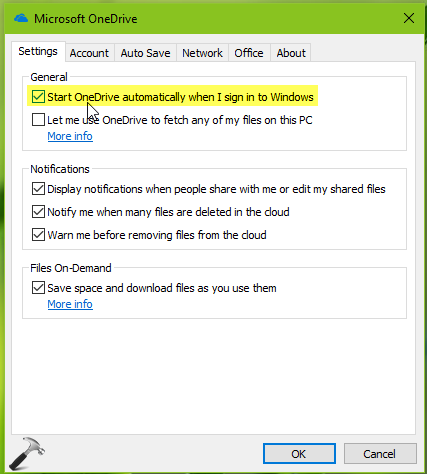
Reboot your machine now and see if OneDrive automatically starts with Windows 10.
If issue still persists, go ahead and try below mentioned registry fix.
Fix 2: Using Registry
Registry Disclaimer: The further steps will involve registry manipulation. Making mistakes while manipulating registry could affect your system adversely. So be careful while editing registry entries and create a System Restore point first.
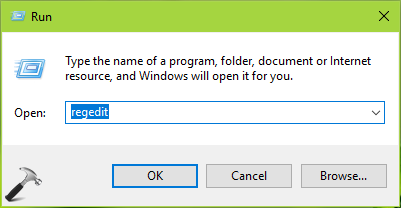
1. Press  + R and put
 regedit in Run dialog box to open Registry Editor (if you’re not familiar with Registry Editor, then click here). Click OK.
2. In left pane of Registry Editor window, navigate to following registry key:
HKEY_CURRENT_USER\SOFTWARE\Microsoft\Windows\CurrentVersion\Run
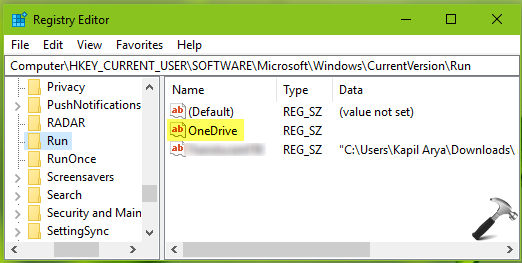
3. Now in the right pane of Run registry key, right click in blank space, select New > String Value. Name the newly created registry string (REG_SZ) as OneDrive. Double click on this registry string to modify its Value data:
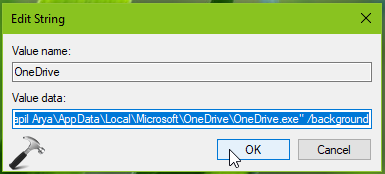
4. Finally, set the Value data to "C:\Users\<USERNAME>\AppData\Local\Microsoft\OneDrive\OneDrive.exe" /background. In this Value data, make sure you substitute C: with your system root drive and <USERNAME> with your actual user account name on the system. Click OK. Close Registry Editor and restart your system.
On next boot, you’ll find that OneDrive started automatically with Windows 11/10.
That’s it!
Edit history: Originally written on Feb 3, 2019. Last updated for Windows 11.
![KapilArya.com is a Windows troubleshooting & how to tutorials blog from Kapil Arya [Microsoft MVP (Windows IT Pro)]. KapilArya.com](https://images.kapilarya.com/Logo1.svg)





6 Comments
Add your comment
Excellent help to get OneDrive to start automatically. Appreciate it. :-)
^^ Happy to help 😎
Your instructions say to open: HKEY_LOCAL_MACHINE\SOFTWARE\Microsoft\Windows\CurrentVersion\Run
but your sample indicates:
HKEY_CURRENT_USER\SOFTWARE\Microsoft\Windows\CurrentVersion\Run
Which one is it? I suspect it should be the latter;
^^ Yes, it is HKEY_CURRENT_USER\SOFTWARE\Microsoft\Windows\CurrentVersion\Run and I’ve corrected now in the article. Thanks!
didn’t work for me. Registry already had that info in it.
Thanks. I found this post, it’s quite a long time ago though. But it didn’t work for me either. There seems another cause that doesn’t make OneDrive run automatically.