When your Windows 11 computer suddenly refuses to connect to the internet or exhibits erratic online behavior, it can be frustrating. Fortunately, you’ve come to the right place. This article is your guide to fix Internet not working on Windows 11.
Whether you’re encountering a complete lack of connectivity, slow speeds, or intermittent dropouts, we’ll walk you through the troubleshooting steps to get your internet back up and running smoothly.
Page Contents
Why it Occurs?
Internet connectivity issues on Windows 11 can have various underlying causes, making it essential to diagnose the specific problem accurately. Some common causes of internet-related problems on Windows 11 include:
- Incorrect settings like IP addresses or gateways.
- Faulty routers, modems, or cables.
- Outdated or incompatible network drivers.
- Third-party apps or security software.
- Updates may introduce bugs.
- Problems with your internet service provider.
- Malicious software can disrupt connections.
- Incorrect DNS server settings.
- Misclassification of network types.
- Incorrect proxy configurations.
- Hardware problems with network adapters.
Fix: Internet not working on Windows 11
Below is a comprehensive set of solutions to tackle the issue of internet not working on Windows 11. These step-by-step solutions will guide you through the troubleshooting process, helping you regain a stable and reliable internet connection on your Windows 11 computer.
Solution 1: Restart your PC
Restarting your PC is often the simplest and most effective solution for resolving various issues. However, before you proceed with a restart, ensure that your Wi-Fi is turned ON.
Solution 2: Try Windows 11 Troubleshooter
The network troubleshooter will test your internet connection and try to identify and fix any problems. If the troubleshooter is unable to fix the problem, it will provide you with a report that you can use to troubleshoot the problem further.
To troubleshoot internet problems on Windows 11, you can follow these steps:
1. Open the Settings App and go to “Troubleshoot“.
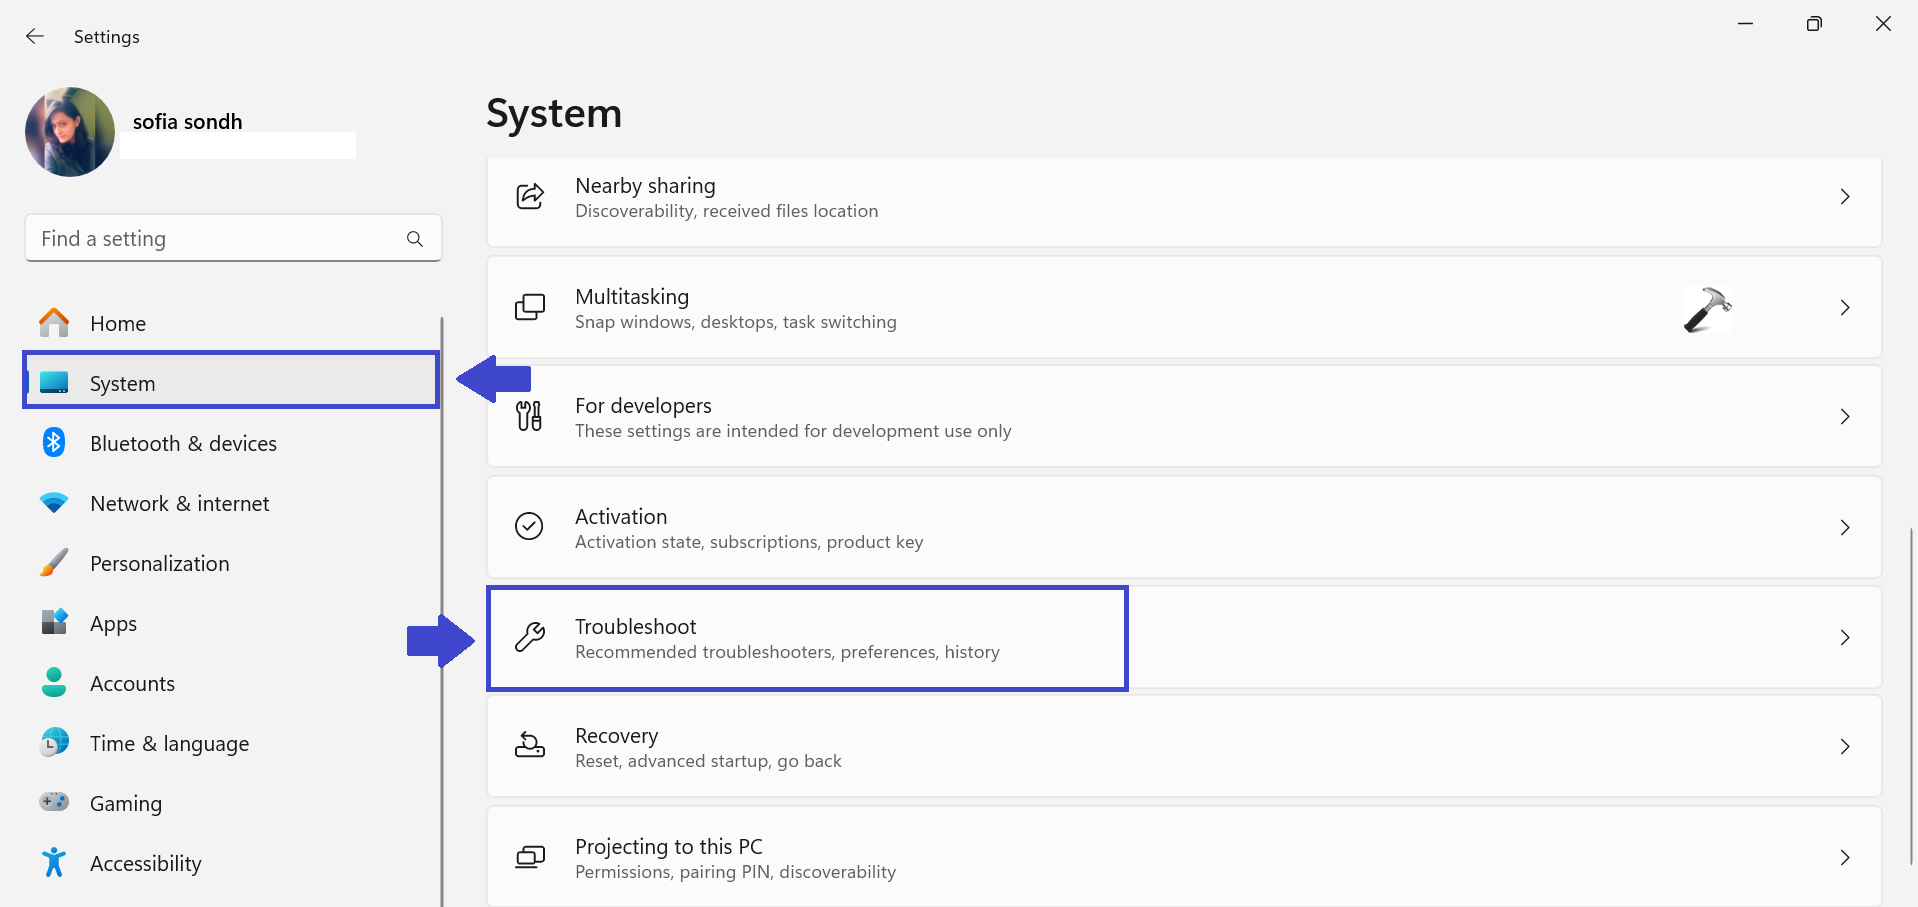
2. Now, select “Other troubleshooters“.

3. Next to the Internet and Internet, click on “Run“.
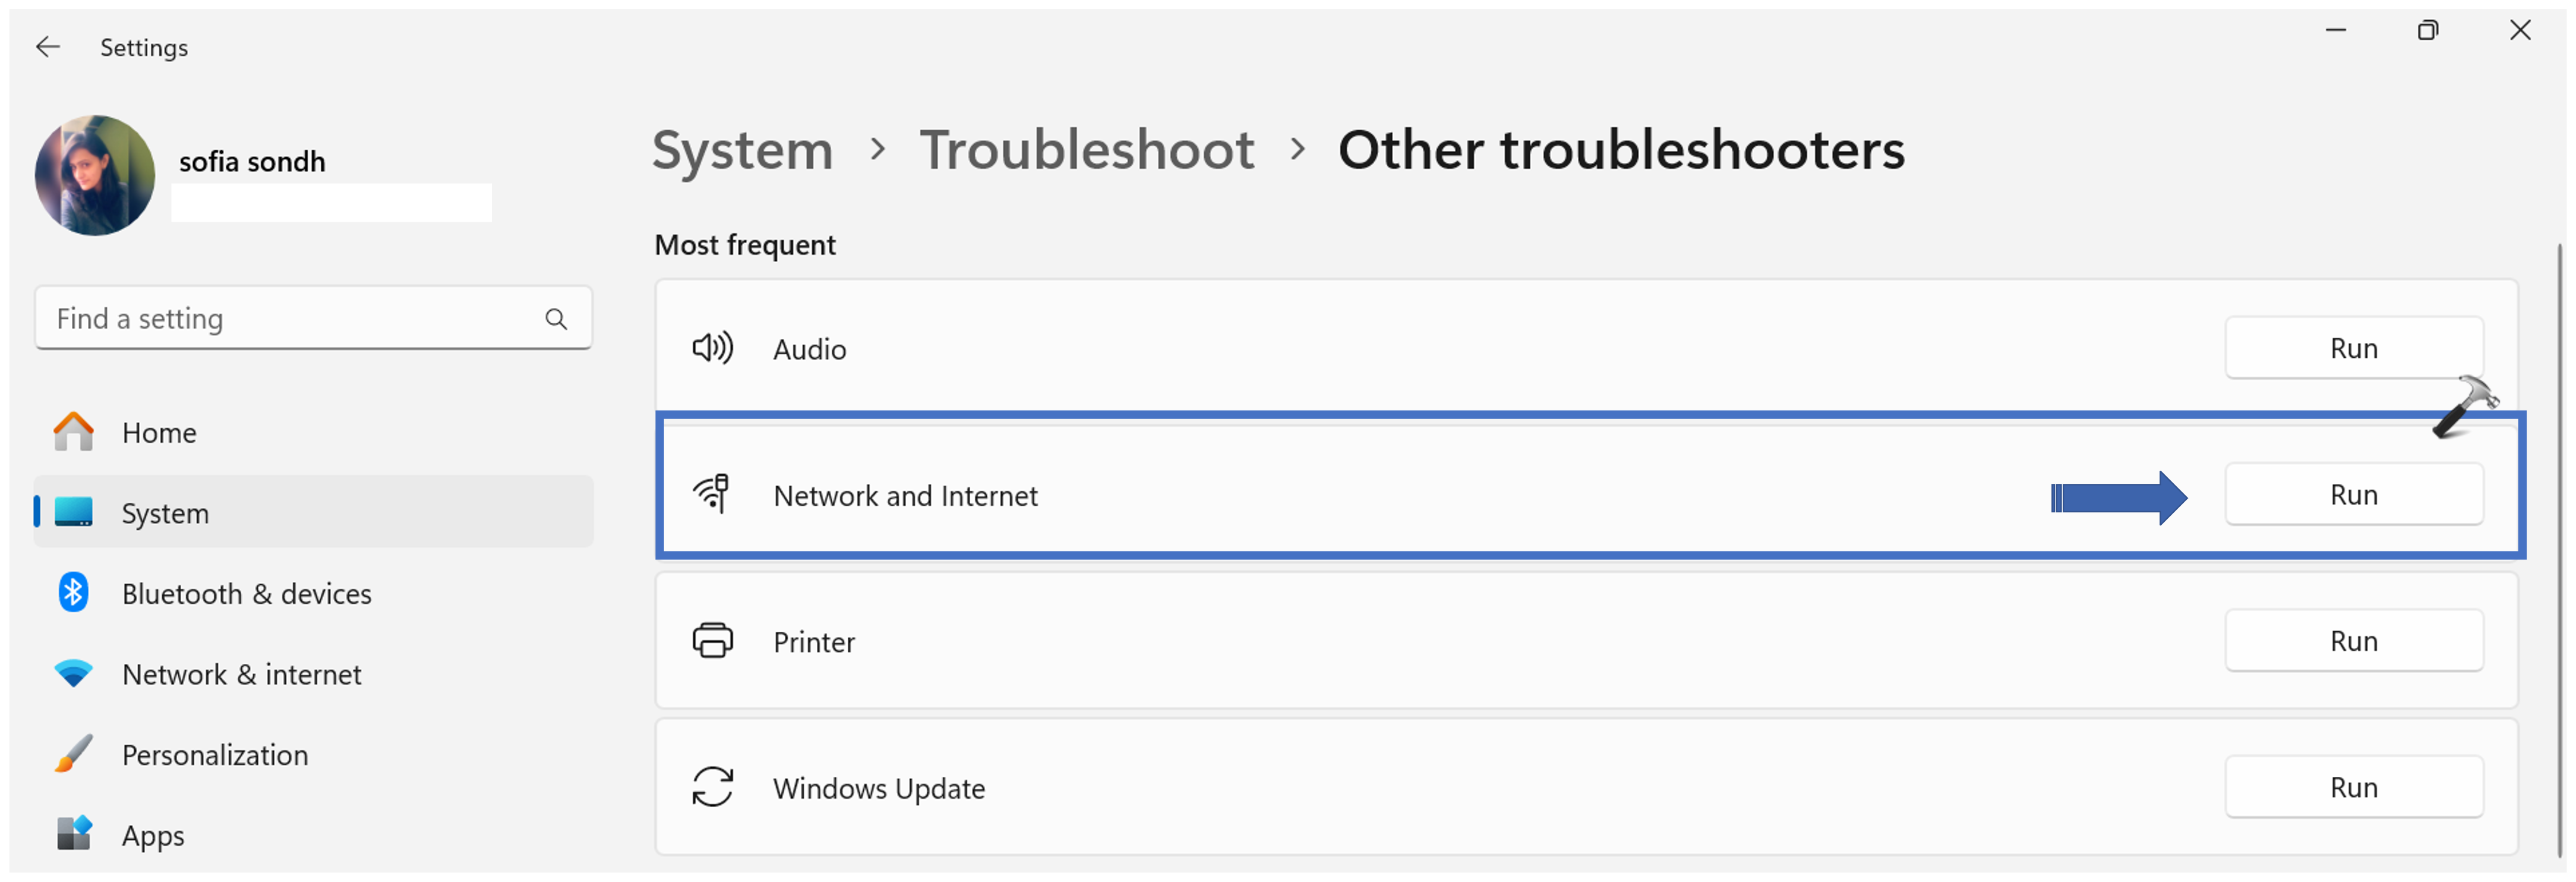
4. A prompt box will appear. Select the “Troubleshoot my connection to the Internet” option.
Solution 3: Perform Network Connection Test
To fix internet connection problems, you can perform a network connection test using the Command Prompt. This will help you to identify the source of the problem and take steps to resolve it.
To perform a network connection test using the Command Prompt, follow these steps:
1. Open the Command prompt and run as administrator.
2. Now, type the following command:
ipconfig

3. Under the “Wireless LAN adapter Wi-Fi“, copy the “Default Gateway” address.
4. Now, type “ping ROUTER-IP”.
Here, replace the ROUTER-IP with the address of the “Default Gateway” which you copied in the previous step.

Press Enter.
5. After that, you will see that 4 packets are sent and received.
Solution 4: Reset the Network
Resetting the network will remove and reinstall all network adapters and reset all network settings to their defaults. This can often fix a network problem.
1. Open the Settings App and go to “Network & Internet“.
2. Now, click on “Wi-Fi“.
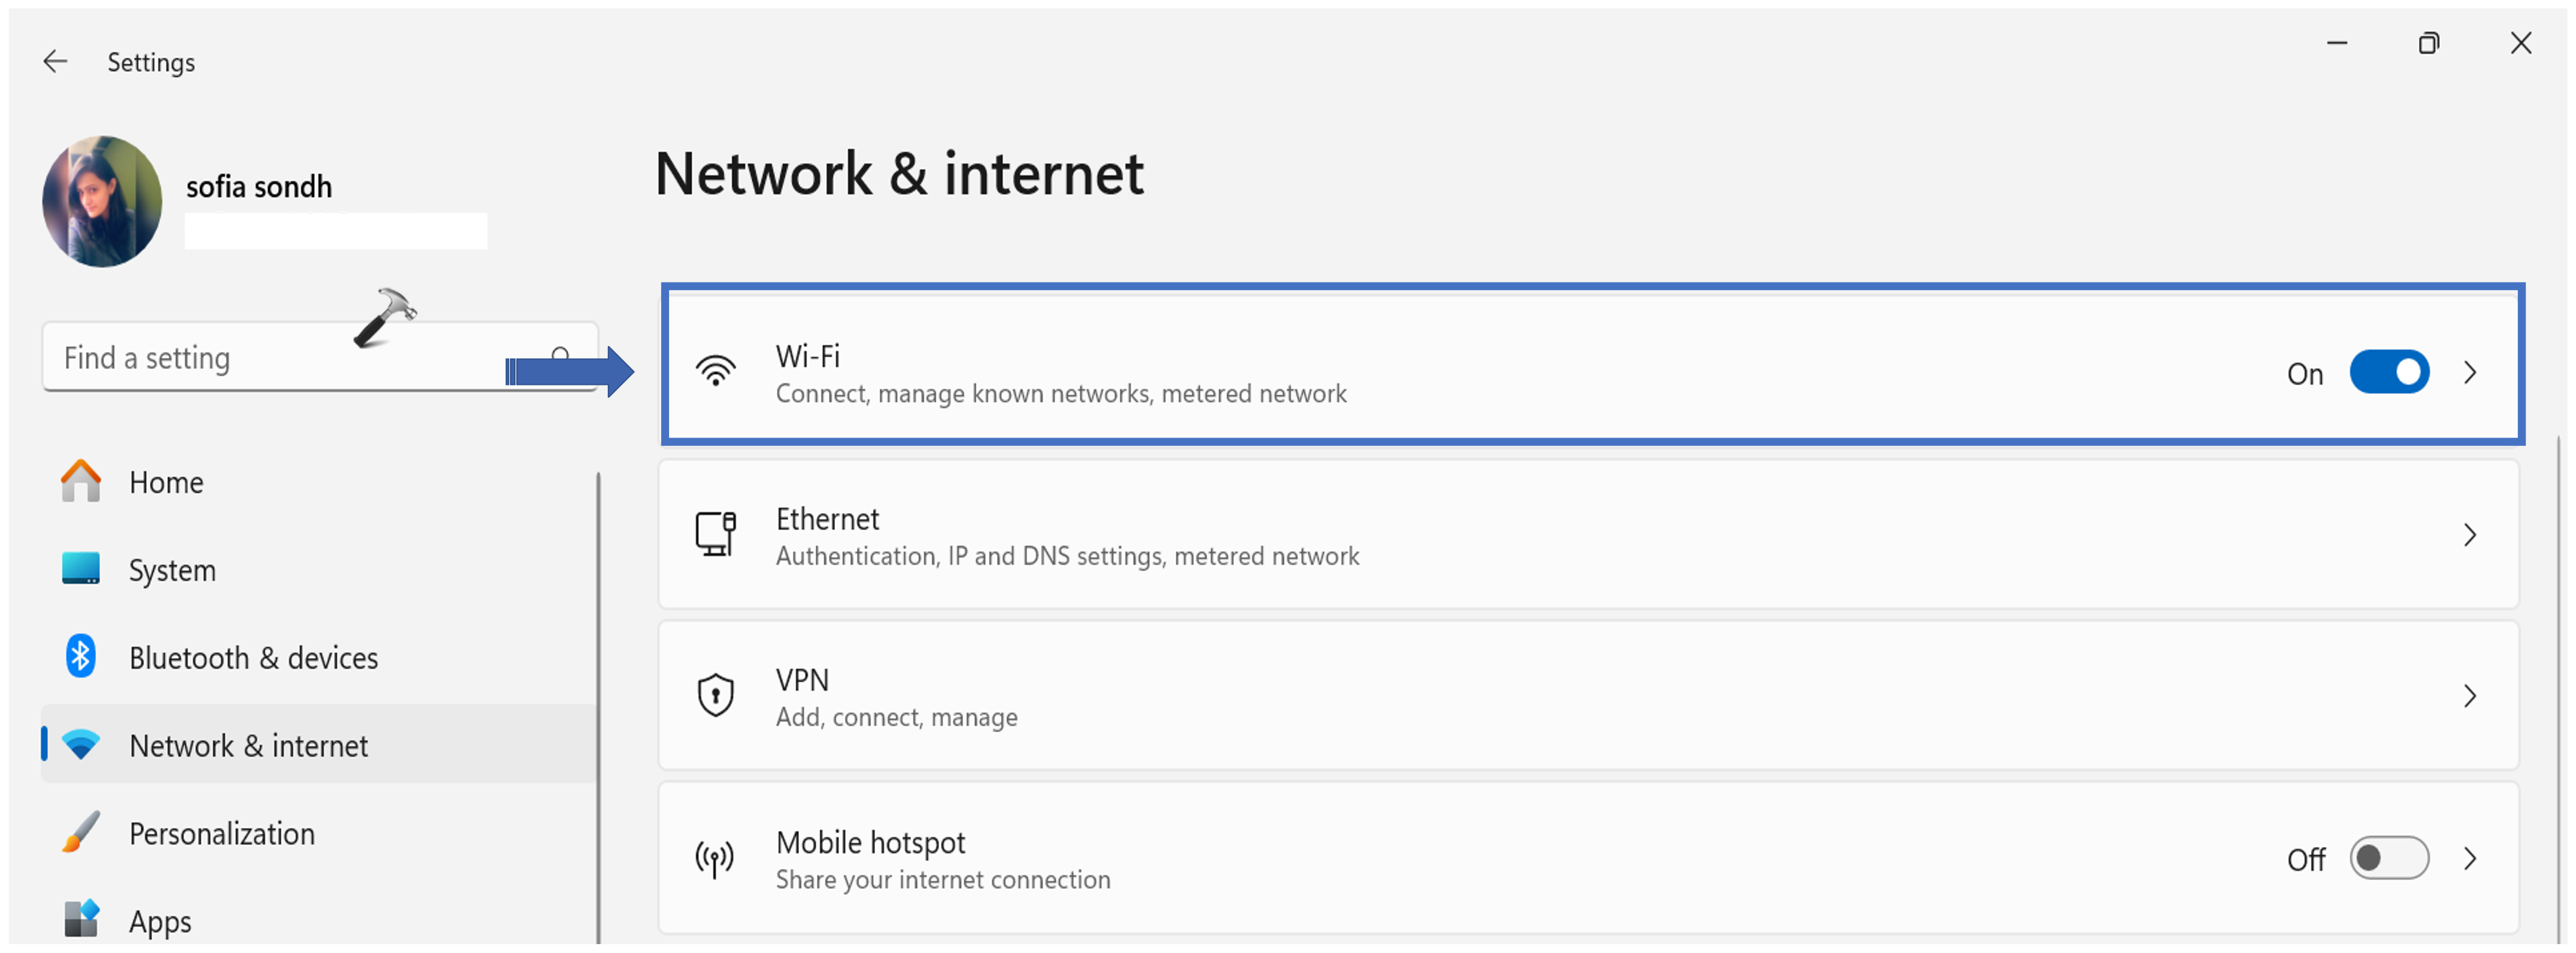
3. Here, select “Manage known networks“.
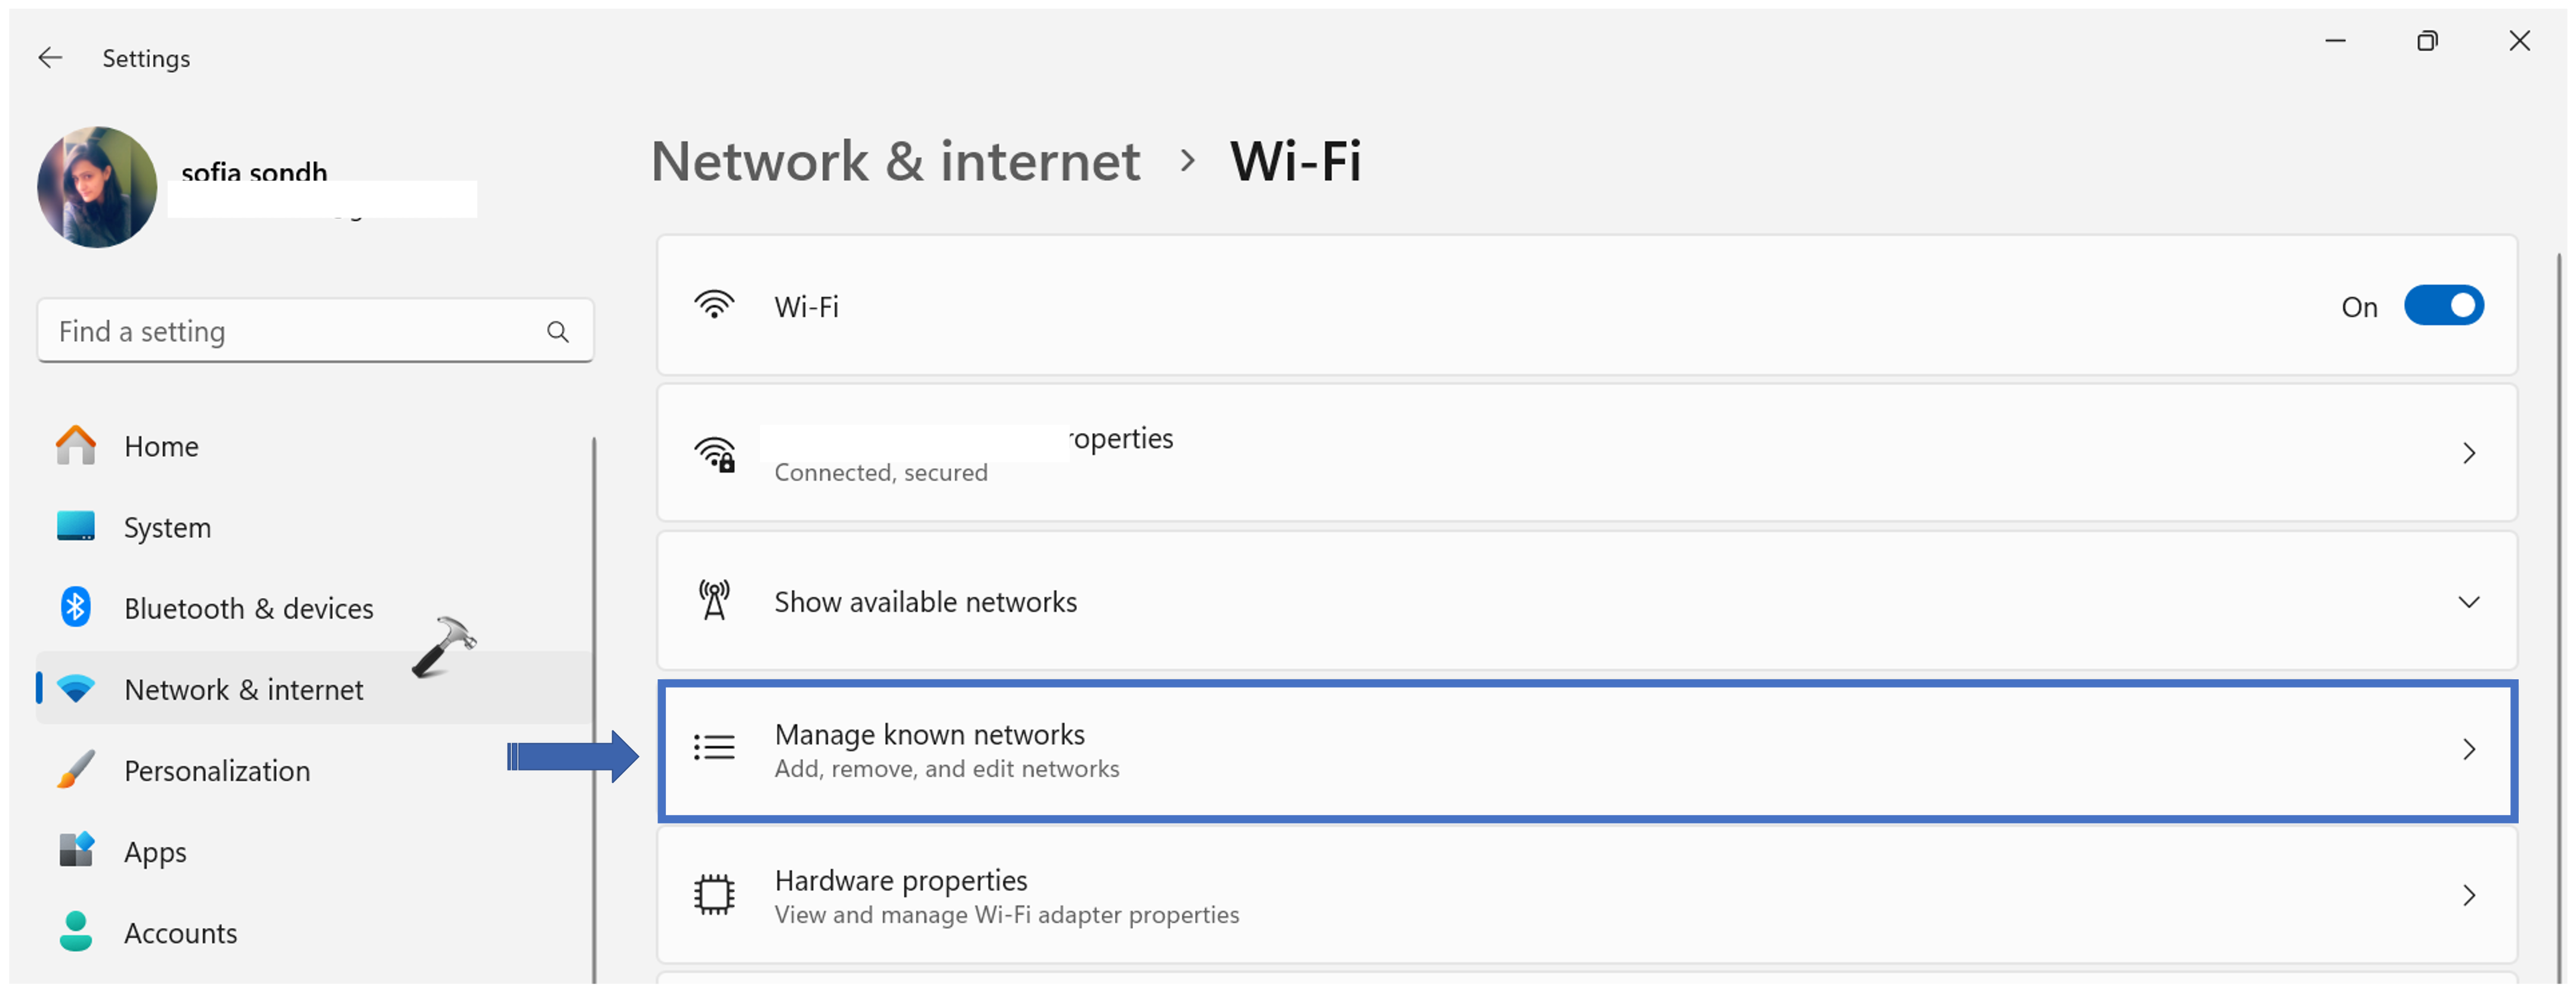
4. Click on “Forget” next to your Network.

5. Now, go back to the main Wi-Fi page. Click on the “Show available networks” option.
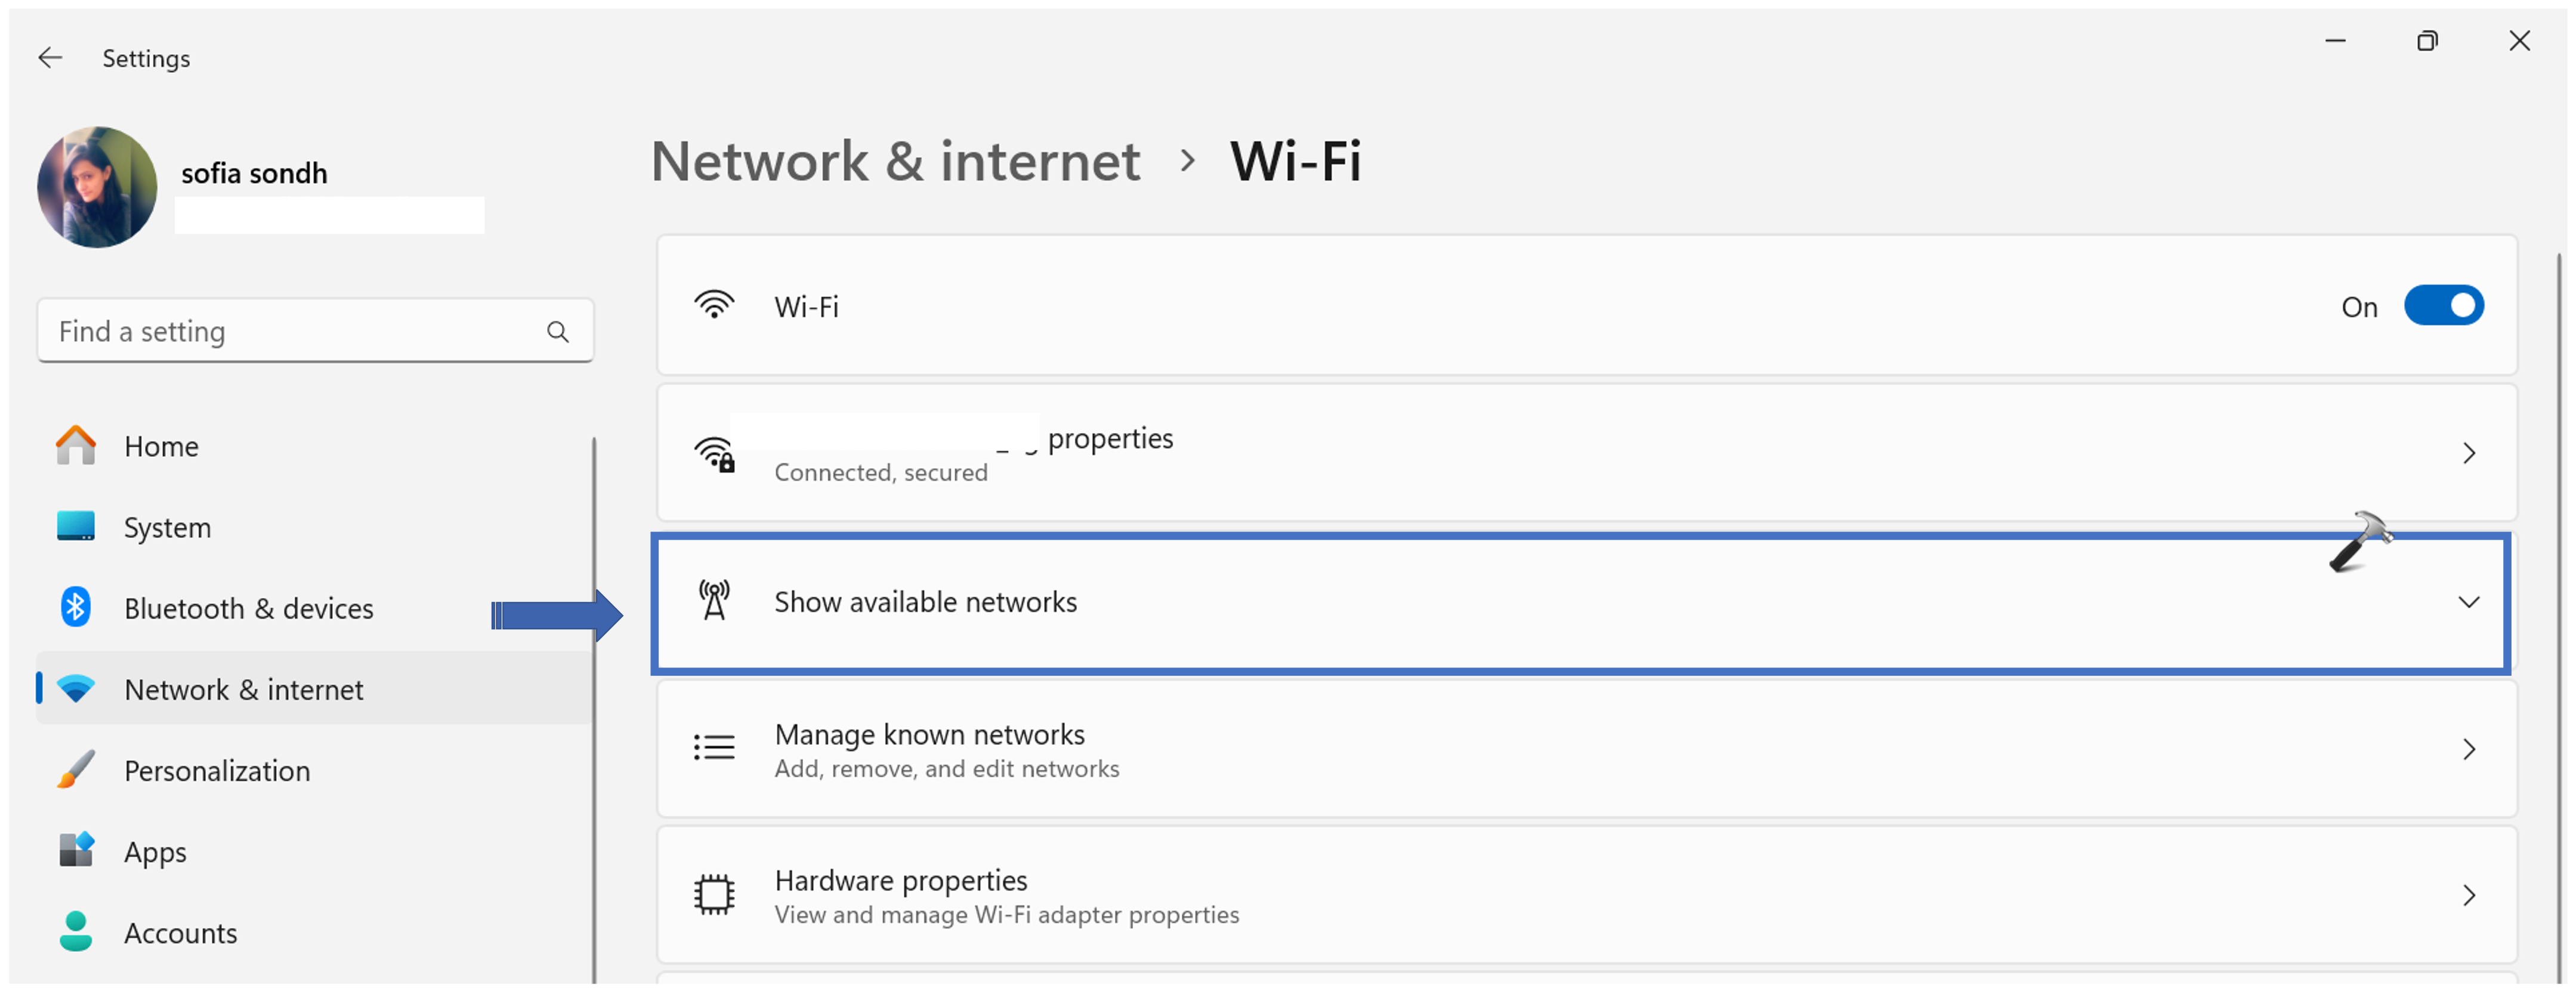
6. Select your Network and enter the username and password to reconnect back to your Network.
Solution 5: Disable and Re-enable Wi-Fi Adapter
Disabling and re-enabling the adapter can reset the adapter’s settings and clear any temporary files that may be causing the problem.
To disable and reenable the Wi-Fi adapter, follow these steps:
1. Open the Settings App and go to “Network & Internet“.
2. Now, go to “Advanced network settings“.

3. Next to your Wi-Fi Adapter, disable the network.
Wait for a few seconds. Again, enable the Wi-Fi.
Solution 6: Reset Networking Stack
The network stack is a set of software protocols that work together to allow your computer to communicate with other devices over a network. The network stack is responsible for tasks such as routing traffic, translating IP addresses, and managing network connections.
Resetting the network stack can fix a variety of network problems, including internet connection problems. When you reset the network stack, all of the network protocols are unloaded and reloaded. This can clear any corrupted or missing files and reset any incorrect settings.
Follow the below steps to reset the network stack:
1. Open the Command Prompt and run as administrator.
2. Copy and paste the below command. Press Enter after each command:
netsh winsock reset
netsh int ip reset
ipconfig /release
ipconfig /renew
ipconfig /flushdns
3. After executing all the above commands, restart your PC.
Solution 7: Update the Network Driver
An outdated or corrupted network driver can cause a variety of problems, including the internet not working.
To update your network driver, follow these steps:
1. Press the Windows Key + X. Select “Device Manager“.
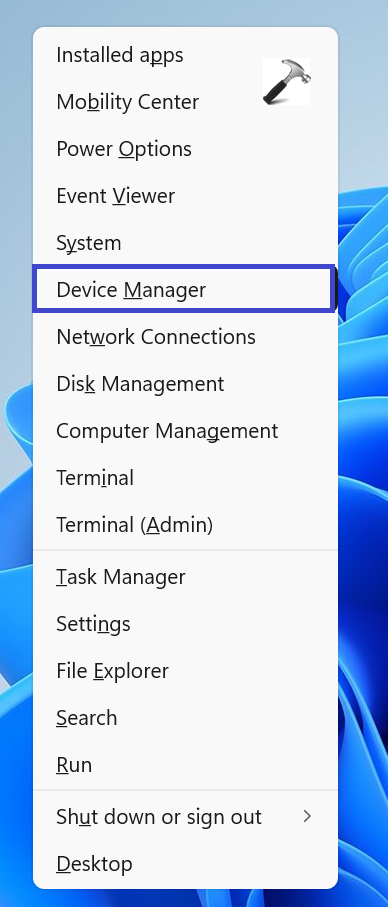
2. Expand the “Network adapter” option.
3. Right-click on your Wi-Fi adapter and click on “Update driver“.

4. Select the “Search automatically for drivers” option.

Solution 8: Temporarily Disable Antivirus
Antivirus software can sometimes interfere with your internet connection, especially if it is overzealously blocking websites or programs. To temporarily disable your antivirus software to see if that fixes your internet connection, follow these steps:
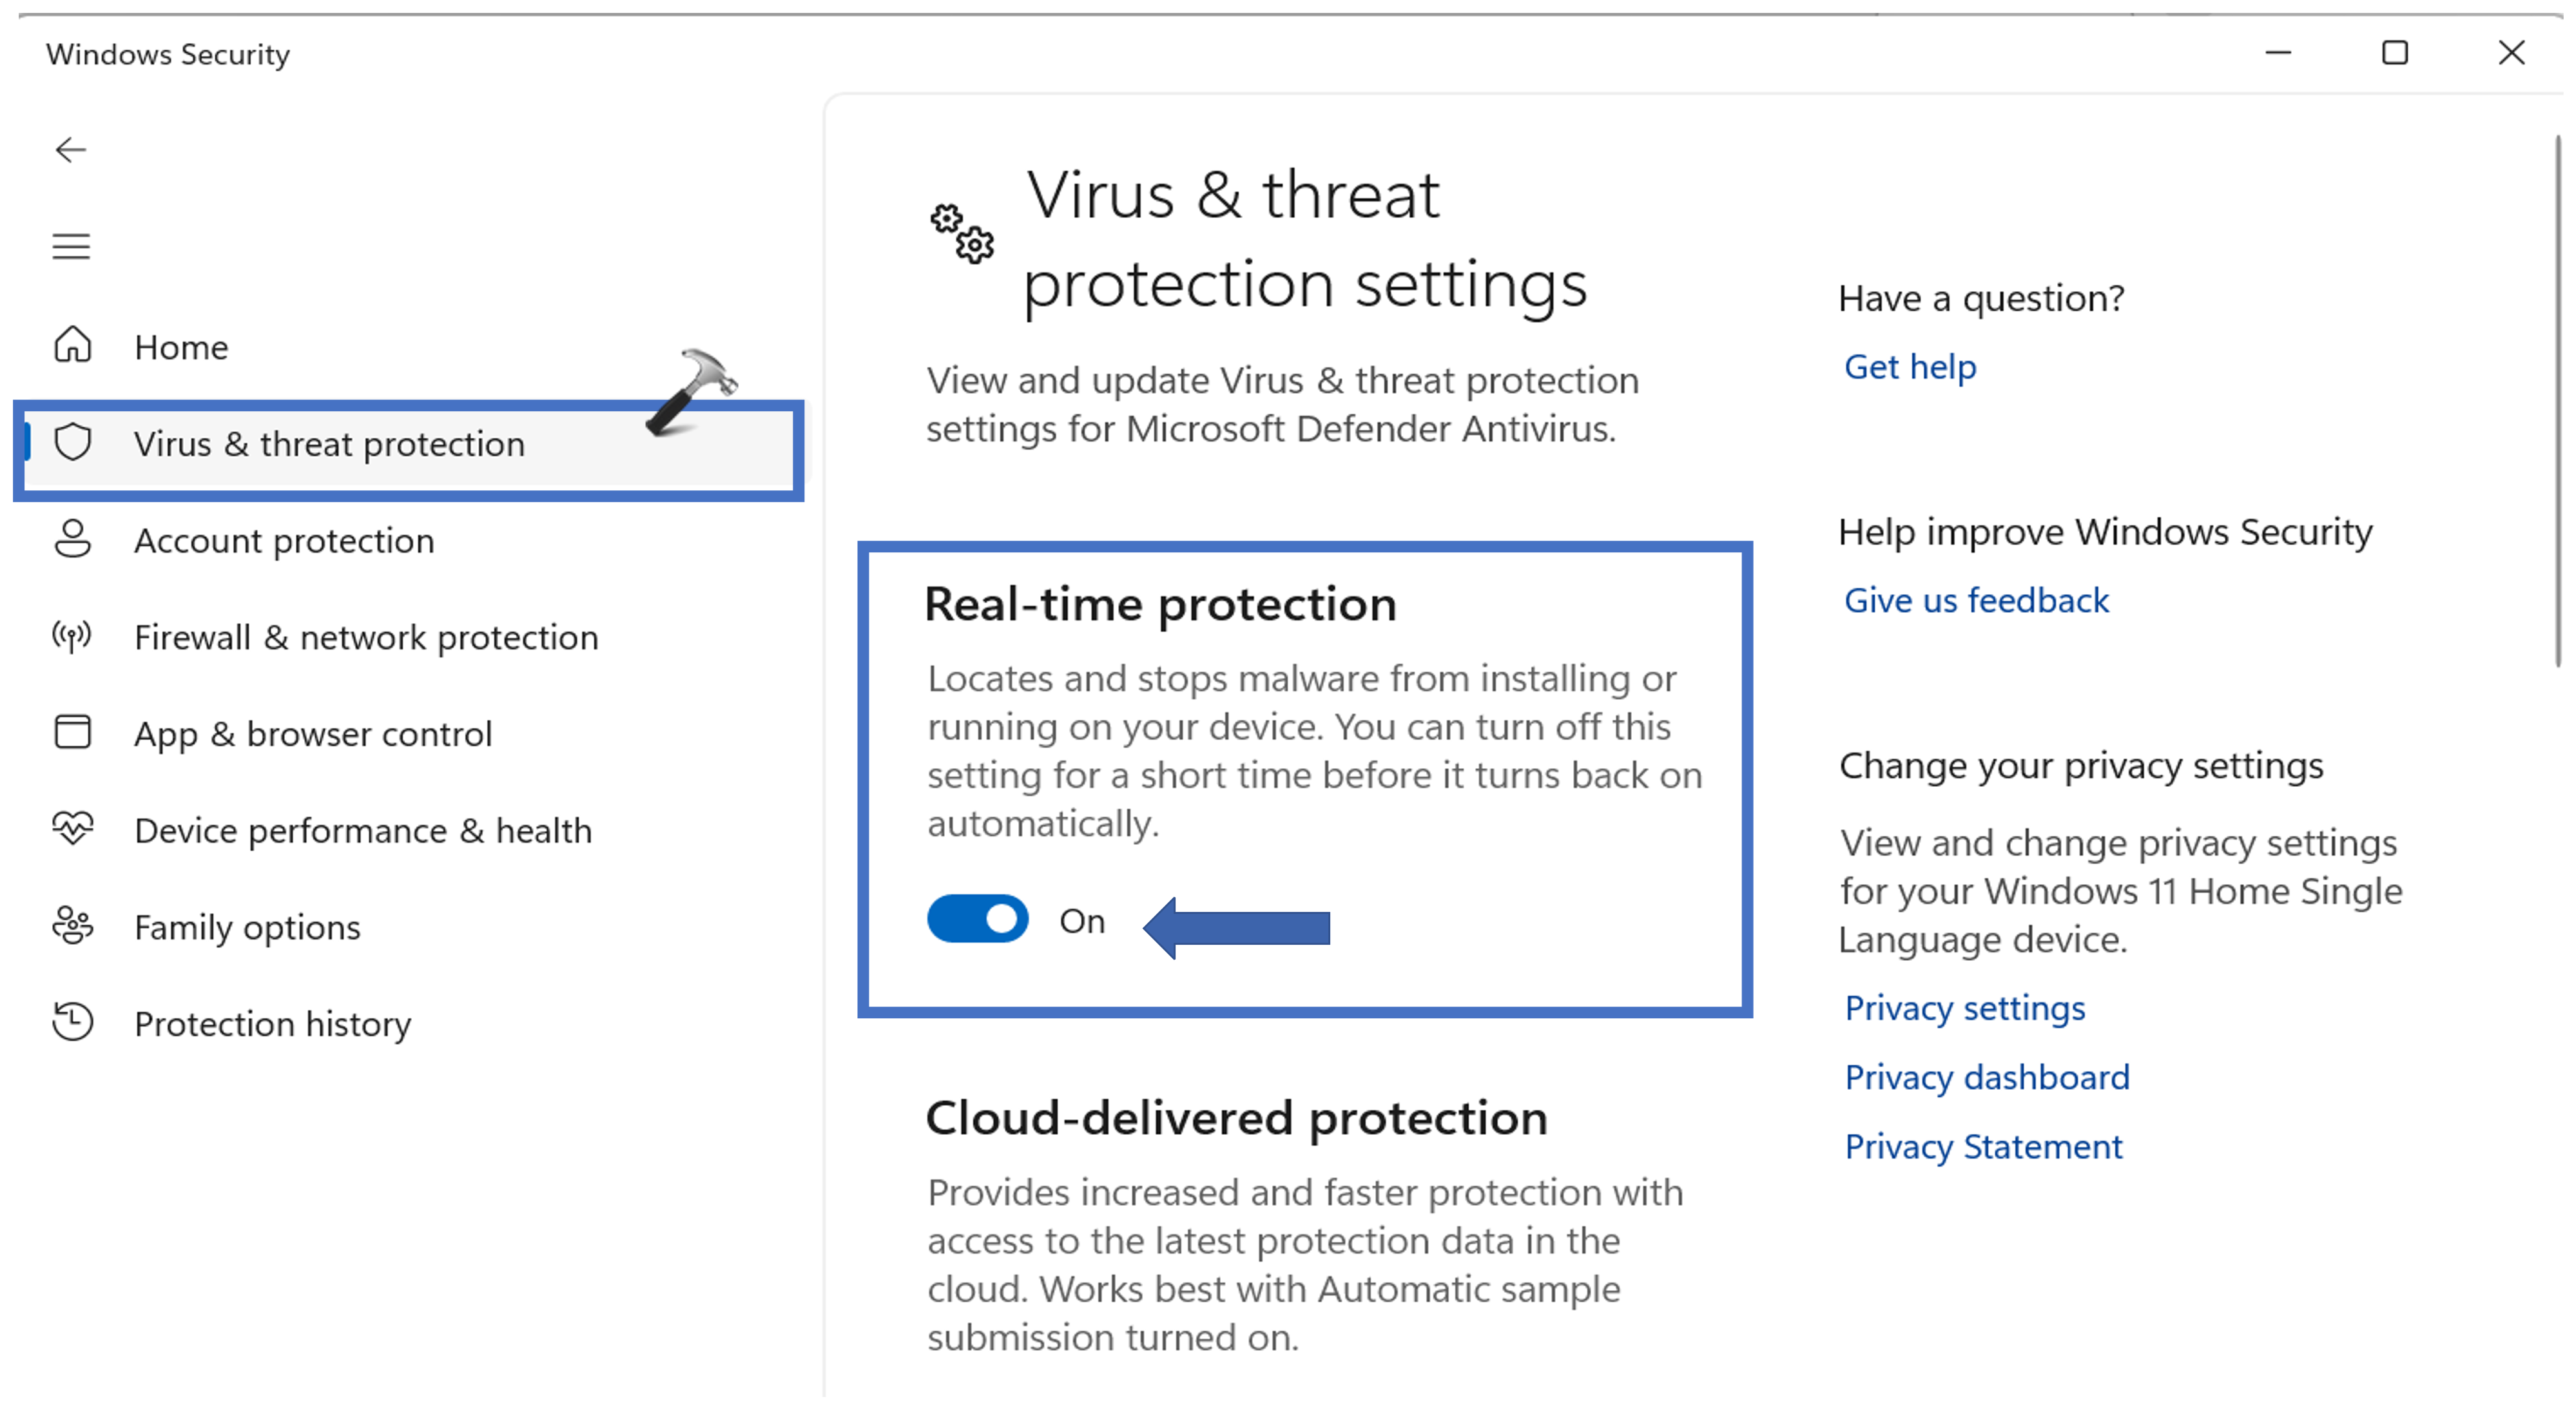
1. Open the search bar and type “Windows security”. Open the “Windows Security” app.
2. Now, click on “Virus & threat protection“.

3. Select “Manage settings“.
4. Here, turn off the “Real-time protection” option.
Solution 9: Reset the Entire Network
Resetting the entire network will remove and reinstall all network adapters and reset all network settings to their defaults.
To reset the entire network on Windows 11, follow these steps:
1. Open the Settings App.
2. Navigate to the following path:
Network & Internet => Advanced network settings => Network reset.

3. Now, click on “Rest now“.

Once the process is completed, your device will start automatically.
Solution 10: Un-install Recent Update
If you are having internet problems after installing a recent update, you can try uninstalling the update to see if that fixes the problem. To uninstall a recent update on Windows 11, follow these steps:
1. Open the Settings App and go to “Windows Update“.
2. Now, click on “Update history“.
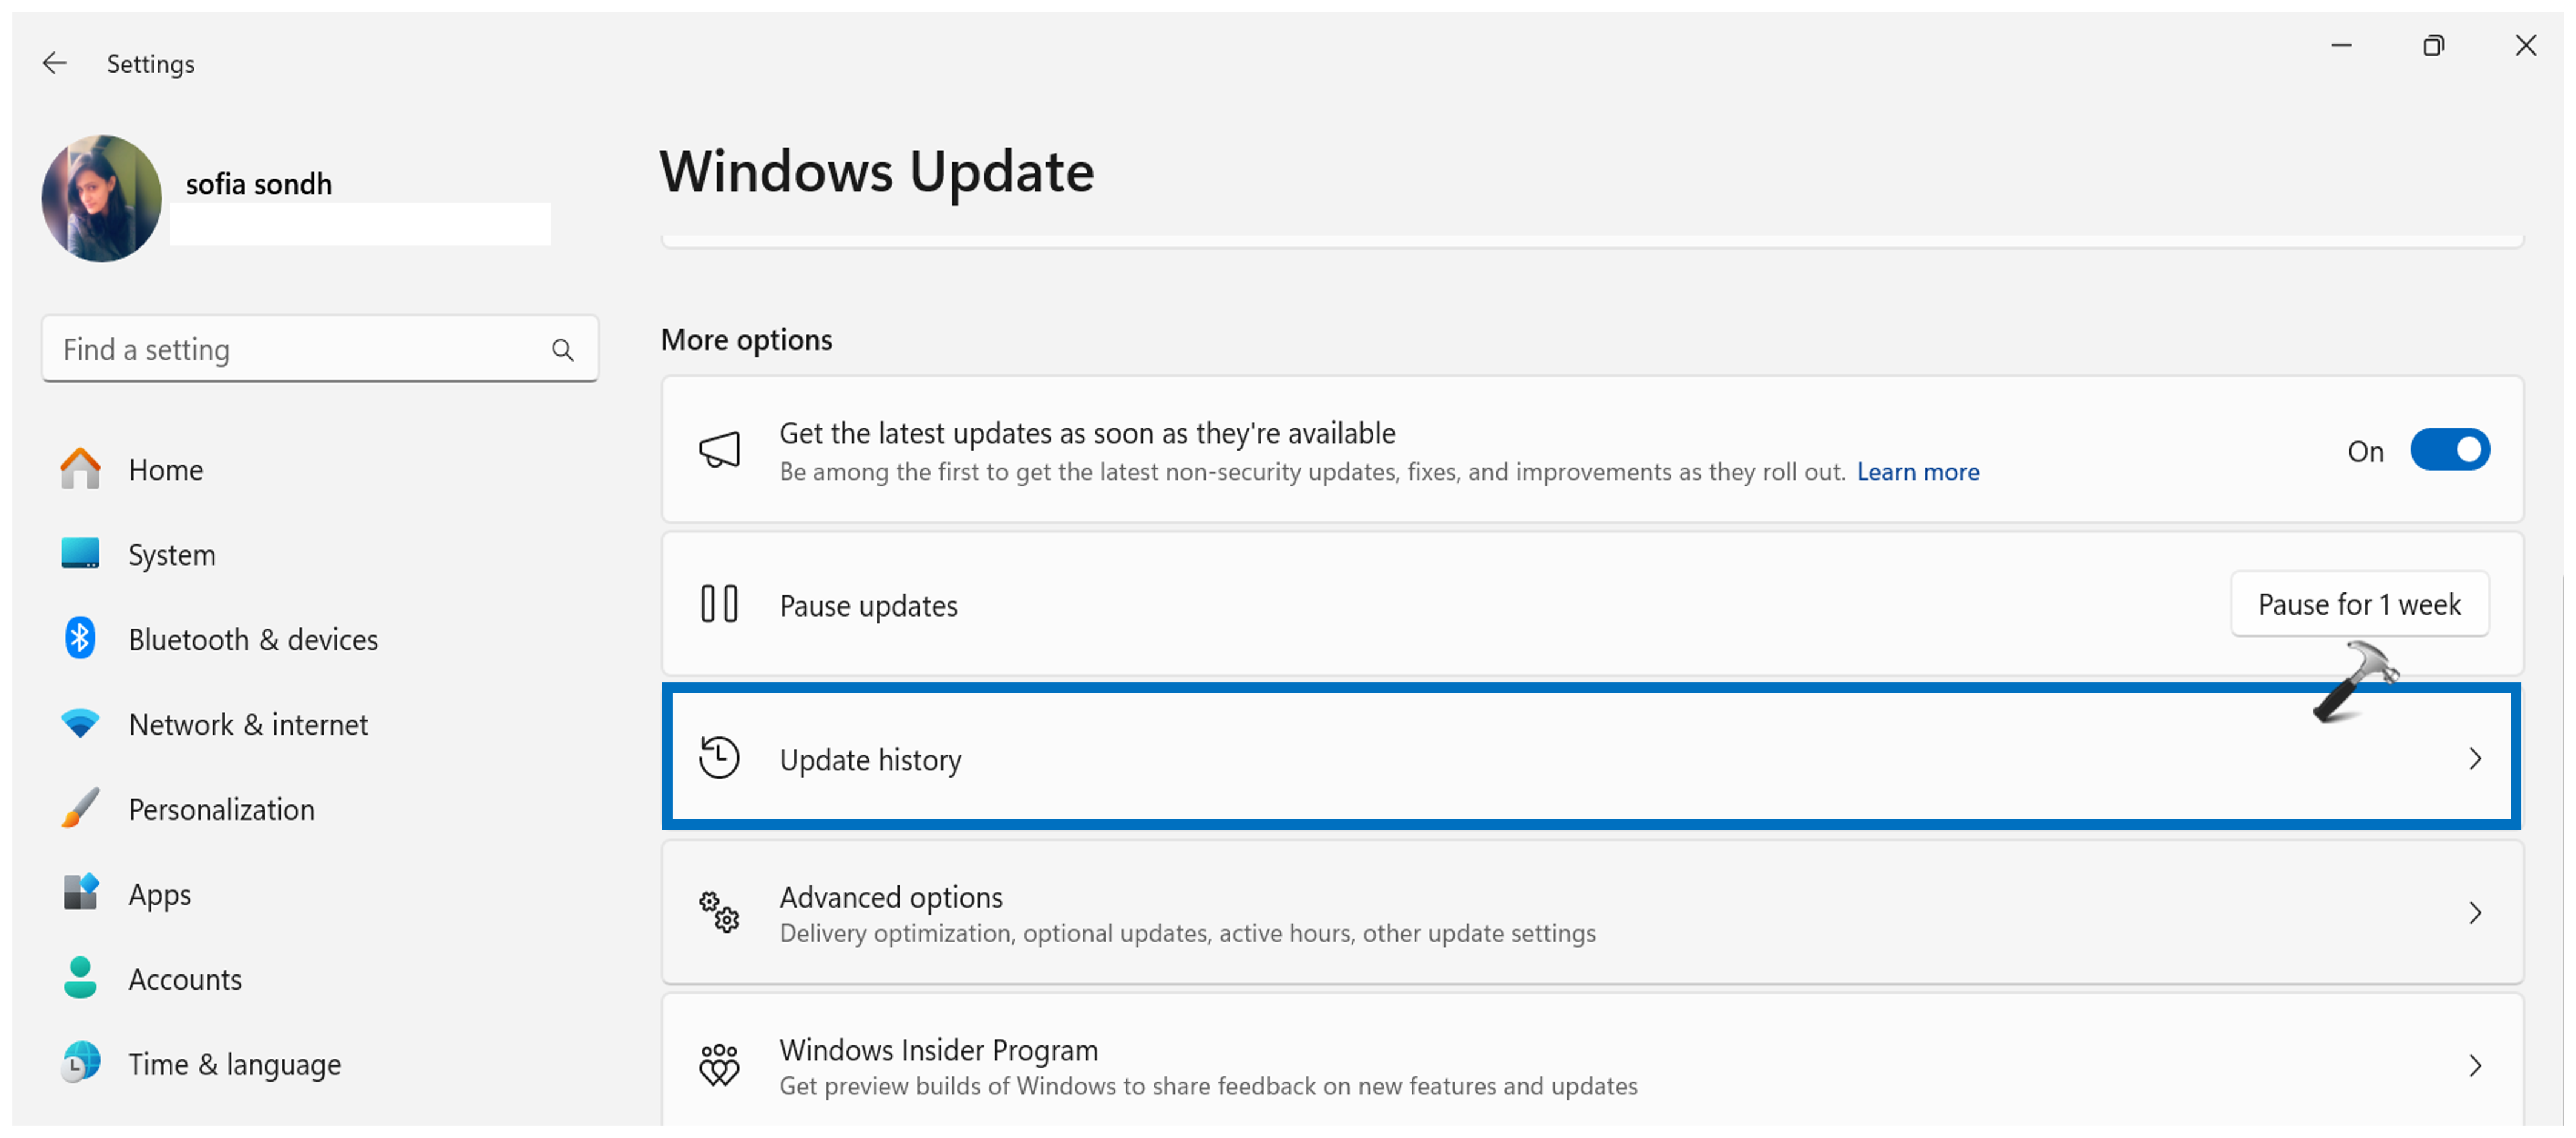
3. Now, click on “Uninstall updates“.

4. You will see the list of recently installed updates. Uninstall the most recent update.

Once the update has been uninstalled, restart your computer. Try to connect to the internet. If you are able to connect to the internet, then the problem was with the update. You can try reinstalling the update later, or you can wait for Microsoft to release a fix for the problem.
By following the solutions provided in this guide, you can effectively fix Internet not working on Windows 11 and enjoy uninterrupted connectivity on your system. Remember, a stable internet connection is key to maximizing the capabilities of your Windows 11 device.
That’s It!
![KapilArya.com is a Windows troubleshooting & how to tutorials blog from Kapil Arya [Microsoft MVP (Windows IT Pro)]. KapilArya.com](https://images.kapilarya.com/Logo1.svg)




Leave a Reply