If you’ve been a long time user of Windows XP, you can’t forget the shutdown sound. In Windows 8 or later, Microsoft disabled the shutdown sound by default to enhance user experience. However, the shutdown sound can still be played on latest Windows 10. In this article, we’ll see how you can enable shutdown sound in Windows 10.
For this, you’ll need to create a new task which will play shutdown sound for all users. Here are the steps you need to perform to make your Windows 10 to play sound at shutdown .
Enable Shutdown Sound In Windows 10
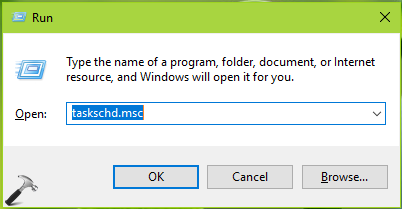
1. Press  + R and type taskschd.msc in the Run dialog box, hit Enter key to open Task Scheduler snap-in.

2. In Task Scheduler snap-in, click on Create Task.

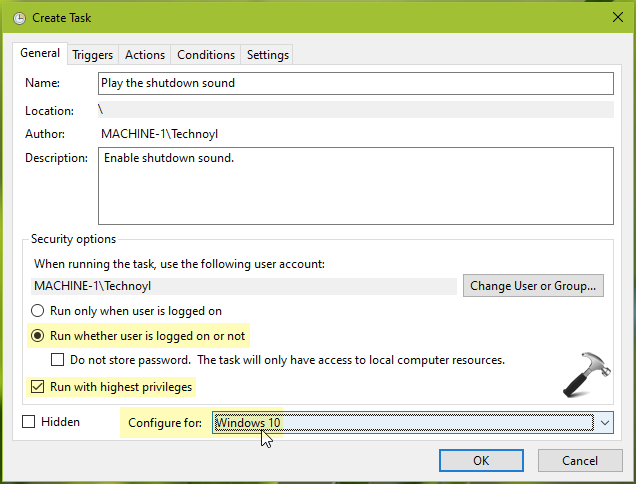
3. Under Create Task window, on the General tab, type name for this task. Give it a convenient name with which you can recognize this task later. Select Run whether user is logged on or not option. Also, check Run with highest privileges label. Configure this task for Windows 10.

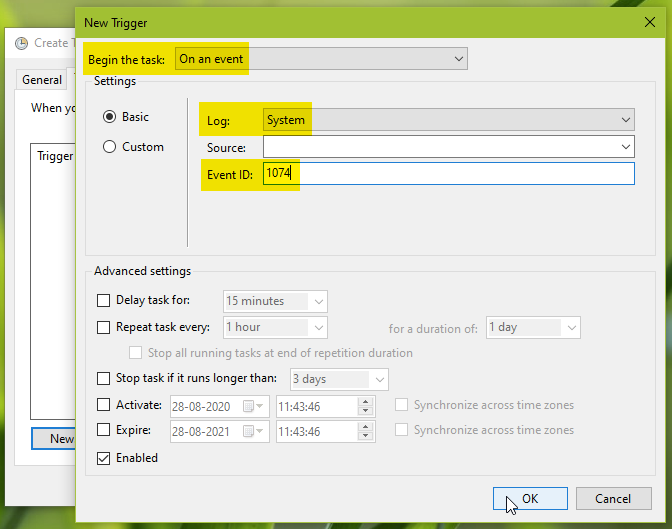
4. Now switch to Triggers tab, click New. Under New Trigger, select Being the task as On an event. Set Log to System and Event ID as 1074. Click OK.

5. Then switch to Actions tab, click New. In New Action, set Action as Start a program. Now set the Program/script as PowerShell. Under Add arguments, simply paste this value and click OK:
-c (New-Object Media.SoundPlayer 'C:\Windows\Media\Windows Shutdown.wav').PlaySync();
*If your Windows is installed to any other drive, replace C: with that drive in above argument.

6. On Conditions tab, uncheck Start the task only if the computer is on AC power label. Click OK.

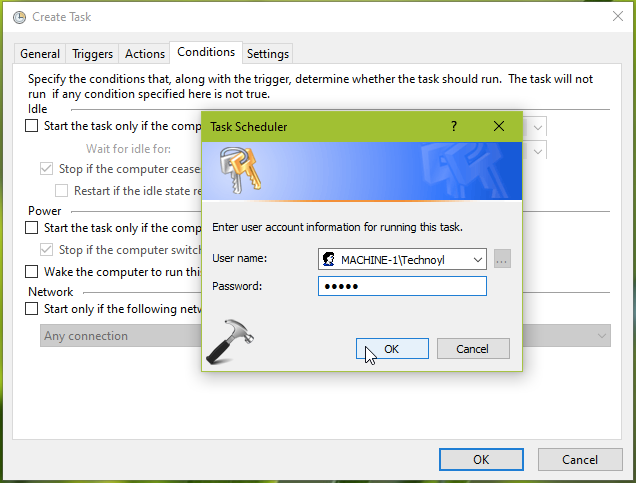
7. You’ll be asked for your currently signed in account password to finish adding this task, so provide it and click OK.

8. Finally, the task is created and Windows 10 is ready to play shutdown sound.

Reboot once, and check, you should be able to hear shutdown sound.
Check this video to illustrate above steps:
That’s it!
![KapilArya.com is a Windows troubleshooting & how to tutorials blog from Kapil Arya [Microsoft MVP (Windows IT Pro)]. KapilArya.com](https://images.kapilarya.com/Logo1.svg)


![[Latest Windows 10 Update] What’s new in KB5055612? [Latest Windows 10 Update] What’s new in KB5055612?](https://www.kapilarya.com/assets/Windows10-Update.png)


1 Comment
Add your comment
it doesn’t work