It is well known that data plans are costly these days and the only way to survive with these plans is to use your data efficiently. We have already seen how to conserve your data in Windows Phone and today we’re going to share a data saving tip for PC users. If you’re on Windows 8 or later running operating system, the Store app on your machine is somehow responsible for extra data consumption.
Actually, the Store app shipped with Windows is configured by default to automatically updates the apps installed on system. Thus it keeps running in background and make your apps stay remain updated. But in case if you’ve lots of apps and if Store keeps updating 1-2 apps daily on an average, your data pack is going to be vanished soon. Especially, if you’re on an Metered Connection, this may result in higher billing of data consumption.

Hence from the above discussion, it’s quite clear that you should disable automatic app updates and instead manually check for updates and then update accordingly. Here is the two ways to turn off automatic app updates:
Page Contents
How To Disable Automatic Updates For Store Apps In Windows 10
Method 1 – Via Store Apps Settings
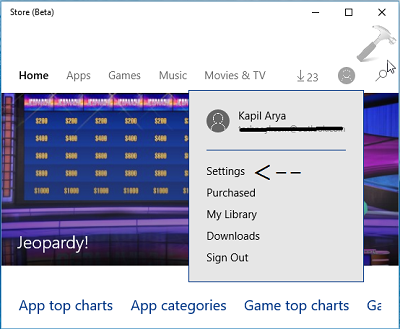
1. Open Store app and click on your account picture. From the drop down menu, pick Settings option. You can alternatively press  + I and then choose Settings option.

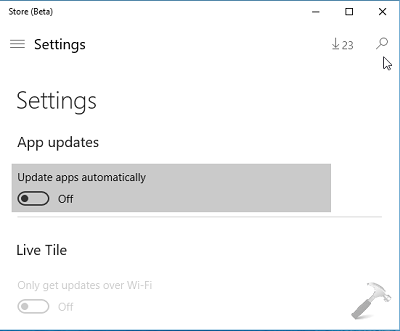
2. In the Settings screen, under App updates, disable or turn off the Update apps automatically option.

In case if you want to turn on automatic updates in future again to restore default settings, simply enable the above mentioned option.
Method 2 – Using Registry Editor
Registry Disclaimer: The further steps will involve registry manipulation. Making mistakes while manipulating registry could affect your system adversely. So be careful while editing registry entries and create a System Restore point first.
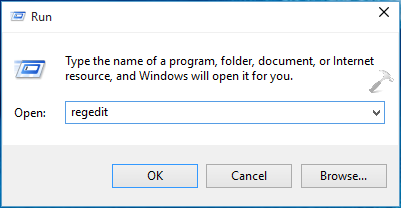
1. Press  + R and put regedit in Run dialog box to open Registry Editor (if you’re not familiar with Registry Editor, then click here). Click OK.

2. Navigate here:
HKEY_LOCAL_MACHINE\SOFTWARE\Policies\Microsoft

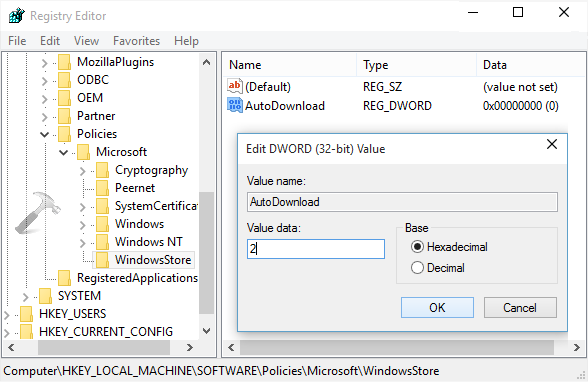
3. In the left of pane of above mentioned registry key, right click on Microsoft key and select New -> Key. Name the newly created sub-key as WindowsStore. Highlight WindowsStore key and come to its corresponding right pane. Right click in the blank space and opt for New -> DWORD Value. Name the DWORD so created as AutoDownload. Double click on the same DWORD to modify its Data. In the Edit DWORD Value box, put the Value data as 2. Click OK.
Close the Registry Editor and reboot the machine to make changes effective. After restarting Windows, Store would no longer be updating apps automatically.
That’s it! Also read how to enable or disable syncing settings in Windows 10.
![KapilArya.com is a Windows troubleshooting & how to tutorials blog from Kapil Arya [Microsoft MVP (Windows IT Pro)]. KapilArya.com](https://images.kapilarya.com/Logo1.svg)


3 Comments
Add your comment
Thanks….really helpful trick.
^^ Glad you find it useful!
No matter what I tried I am currently watching it auto update. 😭