Even after disconnecting a printer from your computer, the device and its drivers will remain installed. While this usually doesn’t cause problems, keeping unused printer drivers can potentially lead to driver conflicts or other issues. Completely uninstalling and reinstalling a printer driver can sometimes fix many printer-related problems. If you wish to uninstall unused or problematic printers in your Windows 11/10 PC, there are 8 ways to do it.
Page Contents
Delete/Uninstall a Printer in Windows 11/10
Method 1: Uninstall a Printer using a Control Panel
1. Press Windows + R to open the Run command and type the following command. Then, hit Enter.
shell:::{A8A91A66-3A7D-4424-8D24-04E180695C7A}

2. When the Devices and Printers window opens, right-click the printer you want to remove and select “Remove device“.
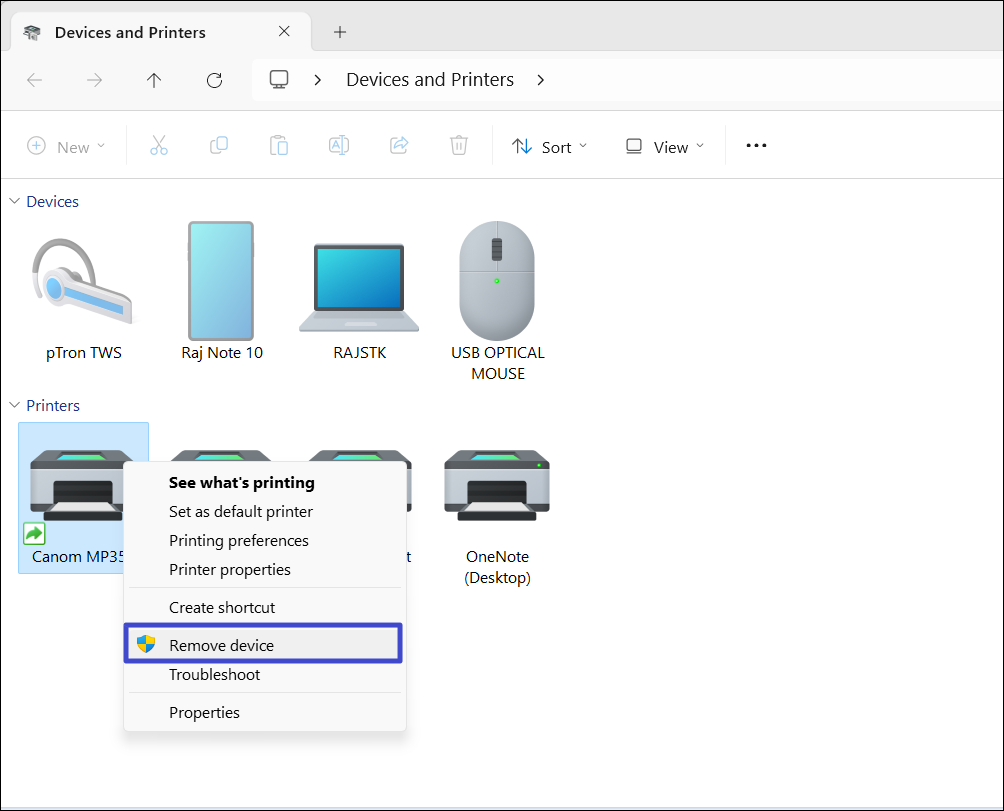
3. Then, click “Yes” to confirm.

Method 2: Uninstall Printers from Windows Settings
1. Right-click the Start menu and select “Settings“.
2. Go to “Bluetooth & devices” and select “Printer & scanners“.
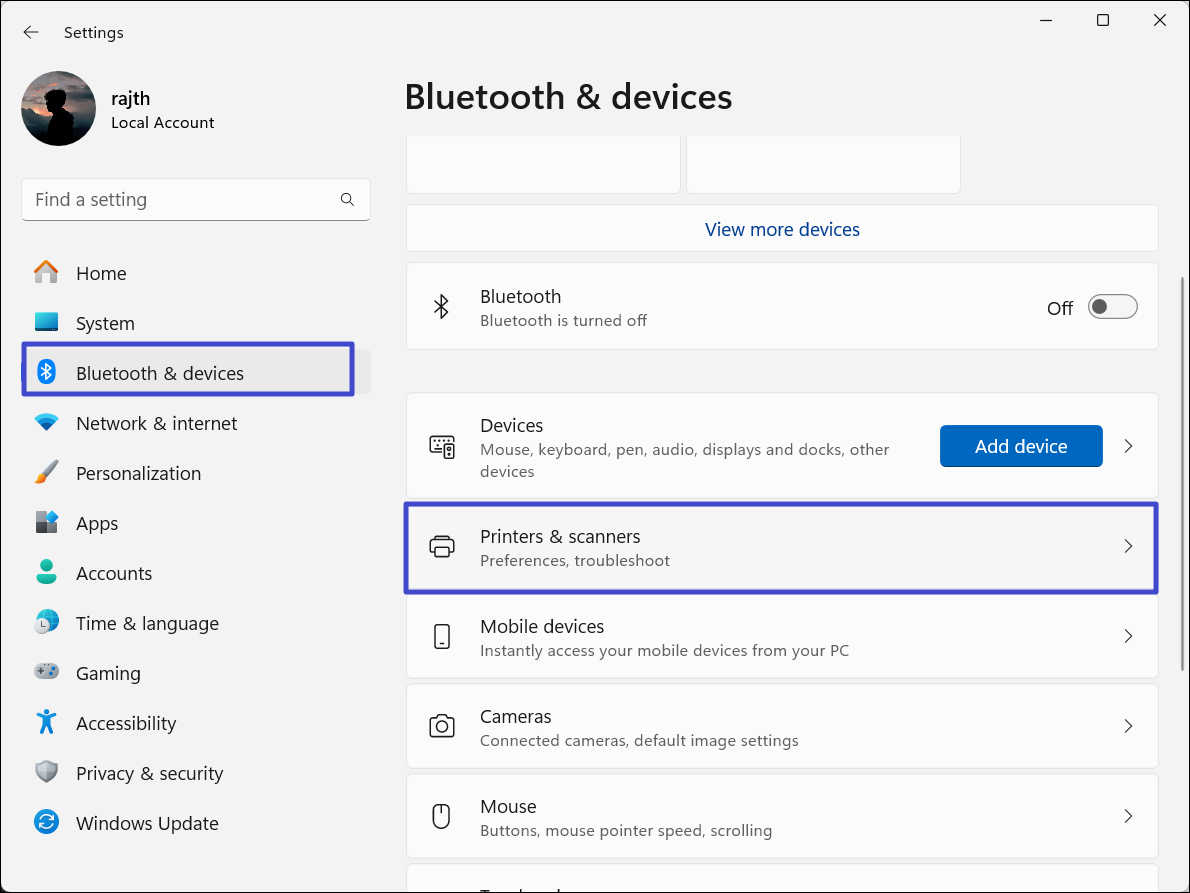
3. Here, you will see the list of all the printers added to your computer. Click on the printer you want to delete.

4. Click the “Remove” button at the top right corner and then, click “Yes” to confirm.

How to Stop the Printer Spooler Service
If you’re having trouble removing a printer or encountering an error message, try stopping the Print Spooler service temporarily. This may help resolve the issue. Here’s how you can do this:
1. Open the Run Command, type “Services.msc“, and press Enter to open the Services console.

2. Find the “Printer Spooler” service in the Services window.
3. Then, right-click the “Printer Spooler” service and select “Stop“.

4. Next, go back to the Windows settings and navigate to Bluetooth & devices > Printers and Scanners. Then, try to remove the printer.
5. After uninstalling the printer, go back to the Services window.
6. Right-click the Printer Spooler service and select “Start” to restart the service.

Method 3: Remove the Printer Using Windows Printer Server Properties
1. Open Windows Settings and navigate to “Bluetooth & devices” > “Devices“.
2. Scroll down and click on “More devices and printer settings” under Related Settings.

3. Select any of the printers and click “Printer server properties” on the menu bar.

4. In the Printer Server Properties dialog, move to the “Drivers” tab.
5. Choose the printer driver you want to delete and click “Remove” below.

6. In the small pop-up window that appears, select “Remove driver and driver package.” and click “OK” to confirm.

7. Then, reboot your PC.
Method 4: Uninstall a Printer Using the Command Prompt
1. Open Command Prompt as administrator.
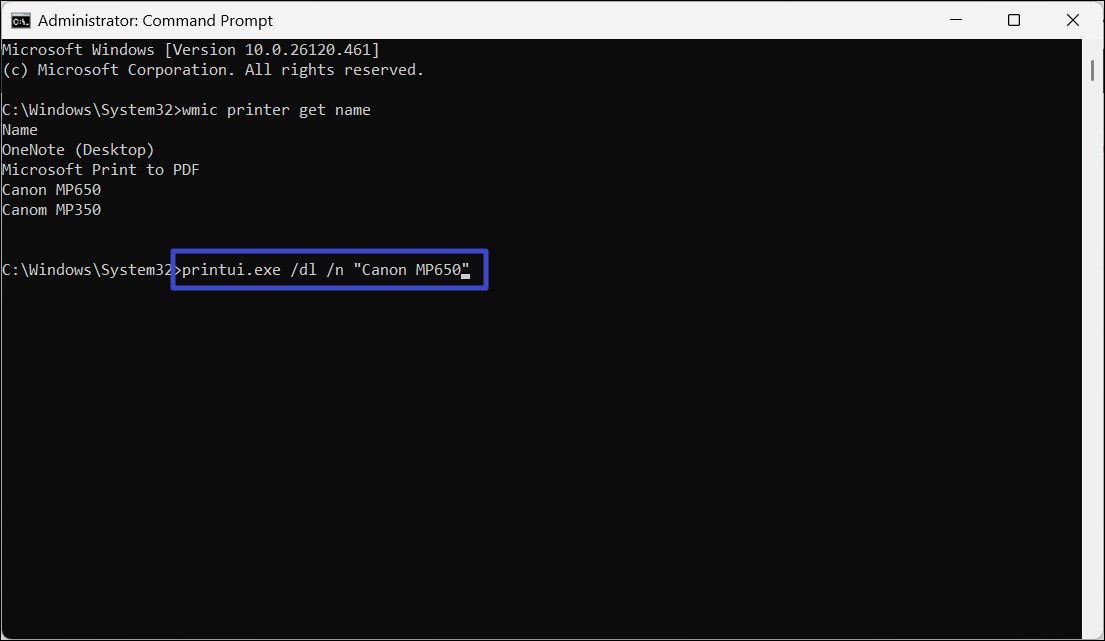
2. In the Command Prompt window, type the below command, and press Enter to list all the connected printers:
wmic printer get name

3. To remove the printer, run the below command:
printui.exe /dl /n "Your_Printer_Name"
4. Make sure to replace “Your_Printer_name” with your actual printer name.
Method 5: Remove the Printer using PowerShell
1. Press the Window key, type “PowerShell“, and select “Run as Administrator” for the top result.
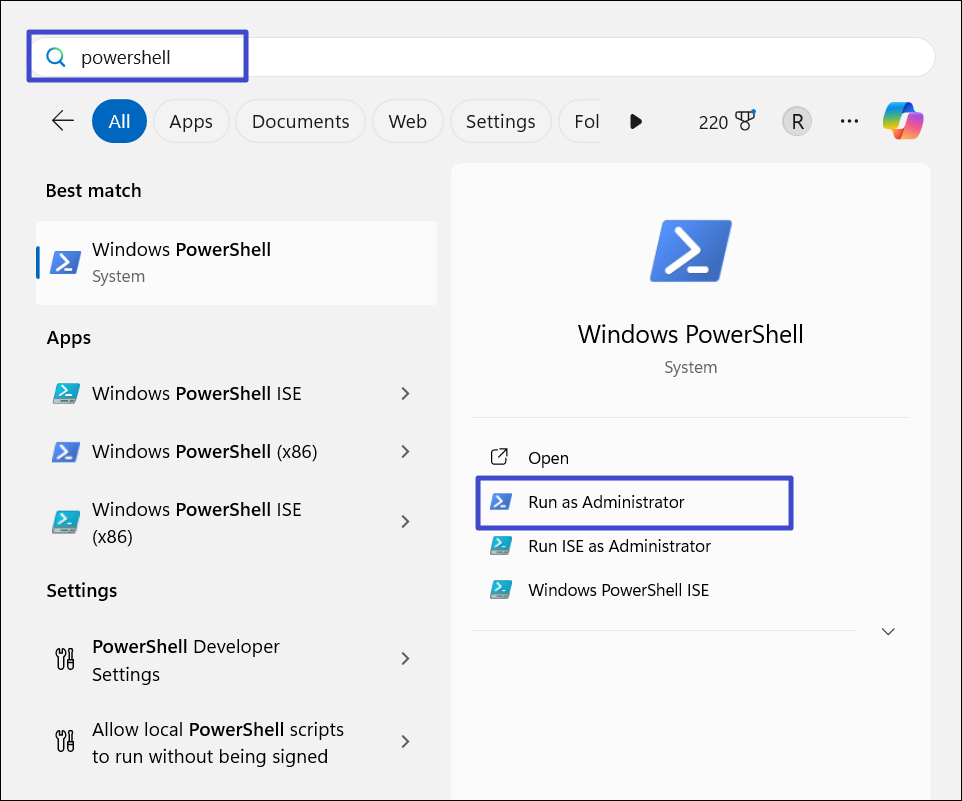
2. In the PowerShell window, type the following command and press Enter to view the list of available printers:
Get-PrinterDriver | Format-List Name

3. After you find the printer you want to remove from the list, run the below command. Replace the ‘Printer-Name’ with the printer name you want to remove.
Remove-PrinterDriver -Name "Printer-Name"

Method 6: Uninstall the Printer Software to Delete Printer
1. Open Windows Settings.
2. Select “Apps” on the left panel and click on “Installed apps“.

3. Under the Installed apps, scroll through the list and find the printer software.
4. Click the three dots next to the app and select “Uninstall“.

5. Then, click “Uninstall” again to confirm.

Method 7: Uninstall the Printer using Device Manager
1. Right-click the Start menu or press Windows + X and select “Device Manager“.

2. In the Device Manager, click on “View“, and select “Show hidden devices“.

3. Expand the “Printers” or “Print queues” category to see all your installed printers.

4. Right-click the printer you want to remove and select “Uninstall device“.

5. Then, click “Uninstall” again in the confirmation dialog.

Method 8: Delete Printer using Print Management
1. Open the Run Command box, type “printmanagement.msc”, and press Enter to open Print Management.

2. In the left panel, expand the “Print Servers” and then expand your local printer server (same as your device name).

3. Next, click on “Printers” to view all the printers.
4. Right-click the printer you want to delete in the right pane and select “Delete“.

That’s it.
![KapilArya.com is a Windows troubleshooting & how to tutorials blog from Kapil Arya [Microsoft MVP (Windows IT Pro)]. KapilArya.com](https://images.kapilarya.com/Logo1.svg)




Leave a Reply