In Windows 10, Action Center helps you to track activity of apps and system features. You will be notified in the real-time about the new alerts via notifications. For example, if the system needs to be set at default location, you will be notified. If the battery saver is on due to low battery, you will be notified. In the bottom of Action Center, there are some quick actions to control system features on the go. In this article, we will see how you can customize quick actions in Action Center.

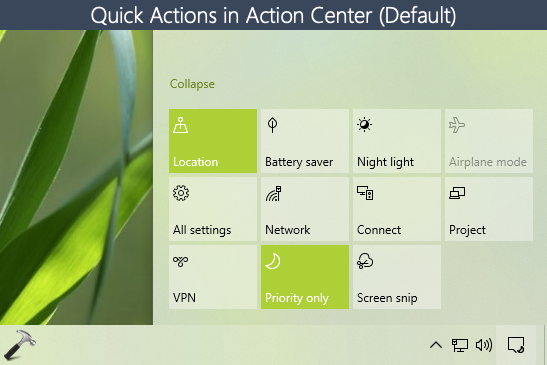
So by default, all of the possible quick actions are shown in the Action Center. Some of the quick actions may not appear on a system, if the related feature is not supported. If some of these quick actions are not relevant, you can remove them. In this way, you can keep only those quick actions which are actually useful for you. So let us see, how you can customize the quick actions in your Action Center.
Customize quick actions in Action Center for Windows 10
Follow these steps to customize quick actions:
1. Right click Start Button or press  + X keys and select Settings.
2. In the Settings app, navigate to System > Notifications & actions.
3. In right pane of Notifications & actions, under Quick actions, click on Edit your quick actions link.

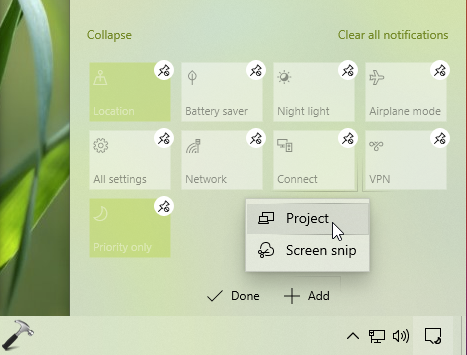
4. This will open Action Center and all of the quick actions have a remove or unpin icon. You can click on that icon over a quick action to quickly remove it from Action Center. Once you’re done removing quick actions you don’t need, click Done. Notice that in default condition, Add button will be greyed out.

5. Now as you’ve removed some quick actions, Add button should be enabled. So later, if you want to re-add those quick actions, click on Add.

6. A pop-up will now appear above Add, and you can click on the quick actions you want to re-add.

So this is how you can customize the quick actions in your Action Center.
That’s it for now!
Read next: Action Center not working in Windows 10.
![KapilArya.com is a Windows troubleshooting & how to tutorials blog from Kapil Arya [Microsoft MVP (Windows IT Pro)]. KapilArya.com](https://images.kapilarya.com/Logo1.svg)


Leave a Reply