Windows 10 currently follows Semi-Annual Channel (SAC) releases which is governed by the Modern Lifecycle Policy. Under SAC, feature updates are released twice a year. Whenever a feature update is released, Microsoft puts a safeguard hold for some of the devices not compatible for the update. For this, the company uses quality and compatibility data to identify issues that might cause a Windows 10 feature update to fail or roll back. If you’re an IT Pro and want to have some control on safeguard holds, this article is for you. In this post, we’ll see how to configure safeguard holds for feature updates in Windows 10.
In simple words, a safeguard hold should help a device to save from an incompatible feature update. Microsoft continuously evaluates compatibility of their feature updates, along with various tech giants and partners. If they identify an issue that could make severe impact to user machines, they put a safeguard hold. You can read more about safeguard holds in this official documentation.
When a safeguard hold is applied on a client machine using Windows Update, you’ll see a message saying the feature update is on its way. In this case, the feature update is not offered. When a known issue with update is resolved by Microsoft, the safeguard hold should be removed and update will be automatically offered on the machine.

Microsoft allows IT Pros to opt out of safeguard holds for validation purposes, if it is required. Here’s how you can do that.
Page Contents
Configure safeguard holds for feature updates in Windows 10
Configure Safeguard Holds for Feature Updates using registry
1. Run regedit command to open Registry Editor.
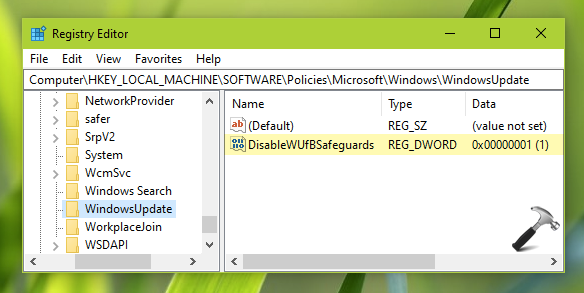
2. In left pane of Registry Editor window, go to HKEY_LOCAL_MACHINE\SOFTWARE\Policies\Microsoft\Windows\WindowsUpdate.

3. Now in the right pane of Windows Update registry key, create DisableWUfBSafeguards named registry DWORD (REG_DWORD). Set the DWORD to 1 to enable deploying without blocking on safeguard holds.
In order to deploy above mentioned registry manipulation using Group Policy, refer this guide. You can also apply this setting via Group Policy itself, mentioned next.
Configure Safeguard Holds for Feature Updates using Group Policy
1. Open GPO Editor.
2. Next, in the GPO Editor window, navigate here:
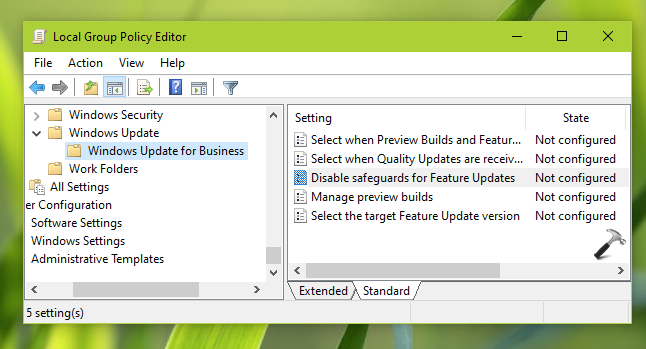
Computer Configuration > Administrative Templates > Windows Components > Windows Update > Windows Update for Business

3. In the right pane of Windows Update for Business folder, locate the policy named Disable safeguards for Feature Updates. Double click on it to modify.

4. When you set the policy setting to Enabled, you should be able to deploy feature updates without blocking on any safeguard holds. Click Apply, OK.
Close GPO editor and update GP engine to make changes effective.
To revert to default state later, simply delete DisableWUfBSafeguards DWORD or revert Disable safeguards for Feature Updates to Not Configured.
That’s it!
Read next: Select The Target Feature Update Version In Windows 10.
![KapilArya.com is a Windows troubleshooting & how to tutorials blog from Kapil Arya [Microsoft MVP (Windows IT Pro)]. KapilArya.com](https://images.kapilarya.com/Logo1.svg)


![[Latest Windows 11 Update] What’s new in KB5058411? [Latest Windows 11 Update] What’s new in KB5058411?](https://www.kapilarya.com/assets/Windows11-Update.png)
![[Latest Windows 10 Update] What’s new in KB5058379? [Latest Windows 10 Update] What’s new in KB5058379?](https://www.kapilarya.com/assets/Windows10-Update.png)


Leave a Reply