Assuming default settings, whenever we delete something on a Windows system, it directly goes to Recycle Bin. The importance of Recycle Bin is that, you can restore back your deleted files whenever you need them. Imagine a condition, if Recycle Bin is not present on your system. So if by mistake you deleted a file, you’ve no ways to recover it unless you deploy third-party solutions to recover.
Usually, we don’t configure Recycle Bin settings. If we configure them we can adjust the storage size for the Recycle Bin, which we’ll show you in this article. So the Recycle Bin storage works logically. When you keep deleting your files, the Recycle Bin accepts those files until the maximum storage defined is reached. Once the maximum size is occupied, it will automatically delete older files to make room for newer files.
According to Microsoft, “Recycle Bin calculations are always based on the disk quota and not on the disk size”. This means size of Recycle Bin is calculated as ten percent of first 40GB of disk quota and five percent above 40GB of disk quota (if any). This calculation is valid for Windows 10, 8.1/8, 7 and Vista. This clearly shows that Recycle Bin doesn’t have a fixed size on the different machines and its size purely depends upon disk quota. However, you can set an absolute or custom maximum size for Recycle Bin on your system. Here’s how.
Configure Maximum Size For Recycle Bin In Windows 10/8.1/8/7/Vista
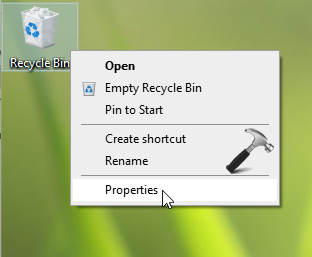
1. Right click on the Recycle Bin icon present on Desktop and select Properties. If the Recycle Bin icon is missing, checkout this fix.

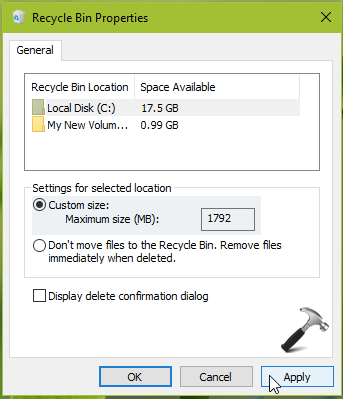
2. In the Recycle Bin Properties window, under Custom size, type in the desired Maximum size value in MB. Click Apply, OK.

This should immediately set the Recycle Bin maximum size to your custom value.
That’s it!
![KapilArya.com is a Windows troubleshooting & how to tutorials blog from Kapil Arya [Microsoft MVP (Windows IT Pro)]. KapilArya.com](https://images.kapilarya.com/Logo1.svg)


![[Latest Windows 10 Update] What’s new in KB5055612? [Latest Windows 10 Update] What’s new in KB5055612?](https://www.kapilarya.com/assets/Windows10-Update.png)


Leave a Reply