With Windows 8 or later, we’ve Secure Boot available in most of the systems. Secure Boot protects the boot process against security attacks from malicious code like malware and ransomware. Secure Boot is firmware-dependent and requires that the computer BIOS is set to UEFI mode.
According to Microsoft, Secure Boot is a security standard developed by members of the PC industry to help make sure that a device boots using only software that is trusted by the Original Equipment Manufacturer (OEM). When the PC starts, the firmware checks the signature of each piece of boot software, including UEFI firmware drivers (also known as Option ROMs), EFI applications, and the operating system. If the signatures are valid, the PC boots, and the firmware gives control to the operating system.
Windows 11 being the most modern operating system of Windows family only works with Secure Boot. If you’ve legacy boot or CSM enabled, you might not able to upgrade to Windows 11 or make its clean install.
To check if Secure Boot is enabled on your system, you can try following steps:
Page Contents
Check if Secure Boot is enabled in Windows
Method 1 – Using System Information
1. Press  + R and type
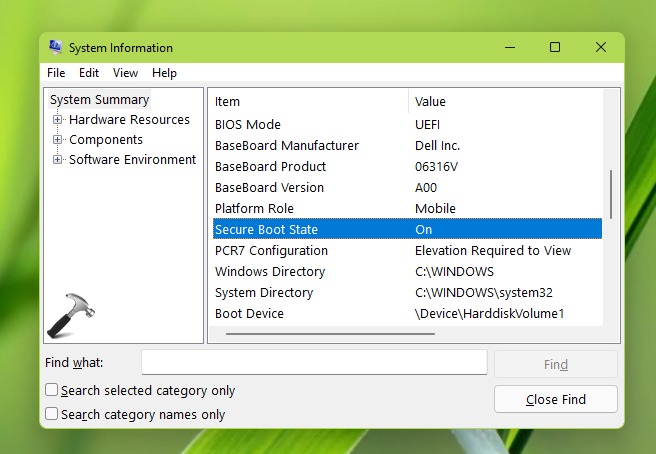
 msinfo32 in Run dialog box to open System Information.
2. In System Information, go to System Summary. In the right pane, you’ll be able to locate Secure Boot State entry. If it says On, this means secure boot is enabled. Additionally, you can see if it enabled, then BIOS Mode should be set to UEFI.

Above steps should work for Windows 11/10/8.1/8 operating systems.
Method 2 – Using Windows Security
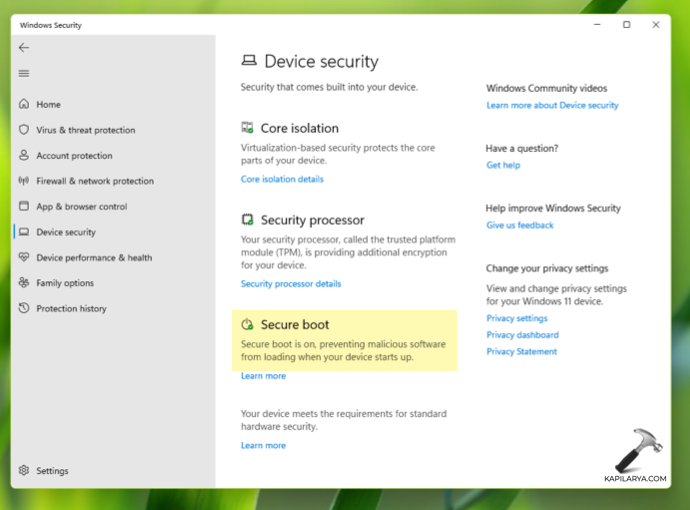
In Windows 10 and 11, you can also check if Secure Boot is enabled, using Windows Security aka Microsoft Defender AV.
1. Open Windows Security using Search or Cortana.
2. In Windows Security, go to Device Security.

3. If Secure Boot is enabled, you should be able to spot Secure boot in the middle pane (refer above screenshot).
That’s it!
Related: Fix: Computer won’t boot after enabling Secure Boot.
![KapilArya.com is a Windows troubleshooting & how to tutorials blog from Kapil Arya [Microsoft MVP (Windows IT Pro)]. KapilArya.com](https://images.kapilarya.com/Logo1.svg)


Leave a Reply