The Remote Server Administration Tools (RSATs) are very helpful package for system administrators to manage other systems at their workplace. We have already shared you the download links for RSATs for Windows 10 and Windows 8.1 in past. The same article also shares you the way to install the package, read about it here:
Download and install Remote Server Administration Tools (RSAT) in Windows 8.1 and 10
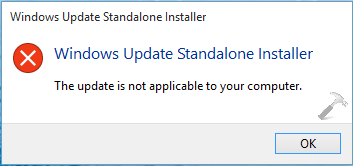
Well, few days ago we tried to install RSATs on a Windows 10 running machine, using same procedure as mentioned in above article. But for an anonymous reason, the installation of RSATs on Windows 10 failed. Here, the Windows Update Standalone Installer given us following error:
Page Contents
The update is not applicable to your computer.

Actually we received this error, because we tried to install a non-English (US) package downloaded from MSDN Subscription. Although, atm we received this error, only English (US) package has to work on Windows 10. So in case if you’re facing this issue, you just need to download English (US) package only and it would install without any problem.
However, if you still want to install the package currently giving you error, use this workaround:
FIX : Cannot Install Remote Server Administration Tools (RSATs) In Windows 10
1. Copy the downloaded WindowsTH-KB2693643-x64.msu (64-bit edition) or WindowsTH-KB2693643-x86.msu (32-bit edition) file to C:\Temp.
2. Open administrative or elevated Command Prompt.
3. Type following commands one-by-one and hit Enter key after each command:
For 32-bit editions:
cd C:\Temp
WUSA WindowsTH-KB2693643-x86.msu /extract:c:\temp
Dism.exe /Online /Add-Package /PackagePath:C:\Temp\WindowsTH-KB2693643-x86.cab
For 64-bit editions:
cd C:\Temp
WUSA WindowsTH-KB2693643-x64.msu /extract:c:\temp
Dism.exe /Online /Add-Package /PackagePath:C:\Temp\WindowsTH-KB2693643-x64.cab

Now wait for few moments to execute the command operation successfully. Once completed, you’ll be notified with The operation completed successfully message.
You can now go to Turn Windows Features On or Off window (search for it in Windows to get into it) and verify that the Remote Server Administration Tools (RSATs) tools are installed and can be located there. You can avail the package services by navigating to Control Panel -> Administrative Tools -> Remote Desktop Services.
Hope this helps! Go here to learn how to show or hide administrative tools in Windows.
![KapilArya.com is a Windows troubleshooting & how to tutorials blog from Kapil Arya [Microsoft MVP (Windows IT Pro)]. KapilArya.com](https://images.kapilarya.com/Logo1.svg)


20 Comments
Add your comment
This method no longer works.
When trying to extract the cab you are presented with a message that /extract is no longer supported by WUSA.
I extracted the cab using Winrar and tried the DISM command and still receive the “The specified package is not applicable to this image” error.
^^ Is it English (US) edition? If yes, this method is not applicable to that :)
I too have the same problem as Denver and Yes it is the us English version as you also stated in the beginning of this post … “Although, atm we received this error, only English (US) package has to work on Windows 10. So in case if you’re facing this issue, you just need to download English (US) package only and it would install without any problem.”
now you seam to imply this will not work with the US English version – which clearly is correct but this article is confusing and a waste of time and should be clearly updated as to what is needed to work and what versions will and will not work.
The extract parameter is no longer supported. Shame because again the current (latest) download of RSAT does not install on Windows 10 preview build 10547. You get a success message but nothing is there, and not in add/remove features either (it ends too quickly so obviously didn’t copy anything).
Got the same error as above about the /extract no longer supported. Used 7-zip, right-clicked on the file, performed Extract to Here in the C:\Temp folder, then executed Dism.exe /Online /Add-Package /PackagePath:C:\Temp\WindowsTH-KB2693643-x64.cab.
Worked fine! Thanks so much for this post.
^^ Glad we could help :)
I have a resolution, for all your problems. Nah. just the /expand problem.
1. For Both x64 & x86:
cd C:\Temp
If that doesn’t exist, do as follows:
mkdir C:\Temp
cd C:\Temp
2. For x64 do as follows:
copy \WindowsTH-KB2693643-x64.msu *
expand WindowsTH-KB2693643-x64.msu -f:* C:\Temp
Dism.exe /Online /Add-Package /PackagePath:C:\Temp\WindowsTH-KB2693643-x64.msu
For x86 do as follows:
copy \WindowsTH-KB2693643-x86.msu *
expand WindowsTH-KB2693643-x86.msu -f:* C:\Temp
Dism.exe /Online /Add-Package /PackagePath:C:\Temp\WindowsTH-KB2693643-x86.cab
3. You have it, problem solved.
Author of this article, please modify this article so they don’t miss the correction.
^^ Hey Nathaniel, I do appreciate your efforts on this! I’ll surely update this article if someone else verifies this. Thanks a ton for your feedback :D
THANK YOU!!!!!!!! I could kiss you! After days of trying to figure it out, even seeing the DISm thing, your step by step clear instructions worked for me. I successfully installed to Win 8.1, just substituted name. You are an absolute lifesaver! THANK YOU SO SO VERY MUCH!
^^ Glad it helped! :)
Thank you for this, I couldn’t find a solution anywhere else!
^^ Thanks for your feedback 😊
Hi Kapil, thanks for sharing this. I tried the same commands, after the last one I can see the following message, and no progress. Any suggestion?
Deployment Image Servicing and Management tool
Version: 10.0.14393.0
Image Version: 10.0.14393.0
Processing 1 of 1 –
^^ Wait for some time and check if it gives results.
The extract command seems deprecated in Win 10.
To extract CAB use this:
expand -F:* update.msu C:
The rest works very well. Thank you very much for the information!
^^ Awesome 😎
Dear Kapil
Thank you very much for the article.. helped alot.
^^ Happy to help 😎
Kapil – This totally worked on the Windows 10 upgrade pushed down on us (the only method that worked) thanks!
^^ Glad it helped 😊