Microphone is one the essential requirement for apps that works using your voice. For example, Cortana requires Microphone access so that she can respond to your commands. Other apps such as Skype, voice recording apps etc. majorly rely on Microphone for their operations.
This article will show you how you can allow or deny apps access to Microphone in your Windows 10. You can configure these settings using Settings app, registry manipulation or using GPO method, as per your convenience.
Page Contents
How To Allow/Prevent Apps Access To Microphone In Windows 10
Method 1 – Via Settings App
1. Right click Start Button or press  + X keys and select Settings.
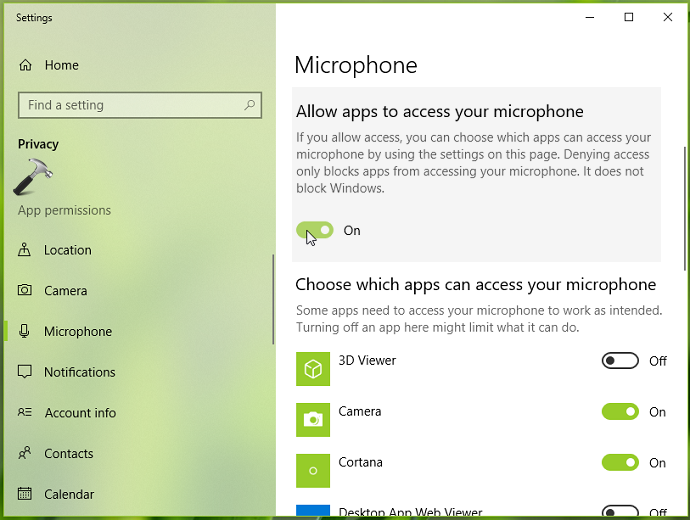
2. In the Settings app, navigate to Privacy > Microphone.
3. Now in right pane of Microphone, under Allow apps to access your microphone, toggle the option On or Off to allow or block apps access to Microphone, respectively.

4. On the same page, under Choose which apps can access your microphone heading, you can individually select the apps that can use Microphone. Toggle the respective options app-wise to On or Off as per your requirement.
These options states are saved automatically and changes are applied immediately. You can then close Settings app and return to Desktop, if you like.
Method 2 – Via Registry
Registry Disclaimer: The further steps will involve registry manipulation. Making mistakes while manipulating registry could affect your system adversely. So be careful while editing registry entries and create a System Restore point first.
1. Press  + R and put
 regedit in Run dialog box to open Registry Editor (if you’re not familiar with Registry Editor, then click here). Click OK.

2. In left pane of Registry Editor window, navigate to following registry key:
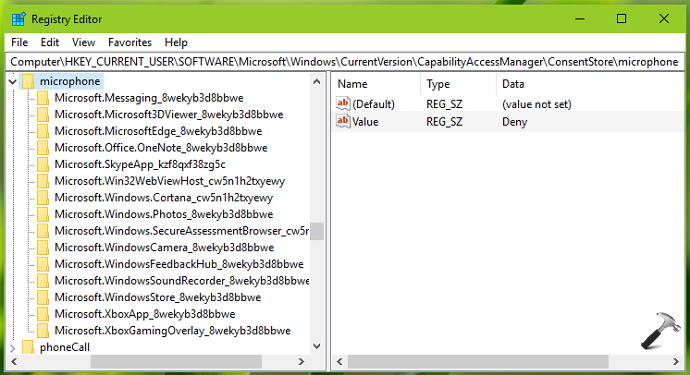
HKEY_CURRENT_USER\Software\Microsoft\Windows\CurrentVersion\CapabilityAccessManager\ConsentStore\microphone

3. Under microphone registry key, in the corresponding right pane, you’ll find Value named registry string (REG_SZ). Double click on it to modify its Value data.

4. Set the Value data to Allow to enable apps access to Microphone. Or you can set Value data to Deny to block apps access to Microphone. Click OK.
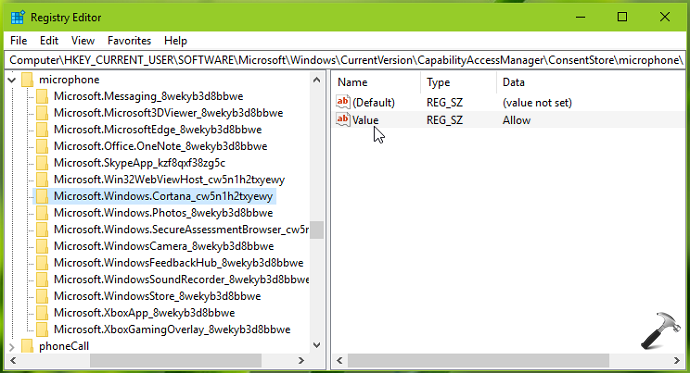
5. When you expand microphone registry key i.e. HKEY_CURRENT_USER\Software\Microsoft\Windows\CurrentVersion\CapabilityAccessManager\ConsentStore\microphone, then you’ll be able to registry sub-keys for individual apps. So you can configure Microphone access for specific apps using these registry sub-keys.
6. For each registry sub-key, in the corresponding right pane, set the Value named registry string (REG_SZ) to Allow or Deny to let the related app access or block Microphone.

Close Registry Editor and reboot the machine to make changes effective.
That’s it!
Related: Microphone not working in Windows 10/8/7.
![KapilArya.com is a Windows troubleshooting & how to tutorials blog from Kapil Arya [Microsoft MVP (Windows IT Pro)]. KapilArya.com](https://images.kapilarya.com/Logo1.svg)


2 Comments
Add your comment
This has been invaluable to me. Just wanted to point out something interesting:
While the registry settings DO work, there’s a discrepancy between how Windows processes the GUI (In Privacy Settings/Microphone) and the registry settings.
If you use the GUI, the changes are immediate. That means, say you have Skype open and your microphone is set to enabled. Skype’s use of the microphone is allowed and you can see that in Skype’s “Audio Device” settings dialog.
If you use regedit to import the key and set the value to “Deny”, SKYPE WILL CONTINUE TO ACCESS the mic. If you then SHUT DOWN (kill task) Skype and restart it, the microphone access will be disabled.
This is an important distinction. I, for one, would like to know what Windows is doing when the user uses the GUI as opposed to using the registry. It’s doing “something” different.
^^ Thanks for adding this!