When you install an operating system (OS) on a parallel hard drive of an existing operating system installation, the resultant is dual boot machine. This means, you’ve two operating systems installed on your system and you have the choice to select and use one of them as per your use. Users can install Windows 10 and any previous Windows edition such as Windows 7, 8 or 8.1 to create dual boot environment. You can even install non-Windows OS on parallel drive to Windows 10.
When you install the another OS on parallel drive to Windows 10, an entry for new OS should be added to the boot manager, automatically. This will help you to select which OS you want to use, each time when you start your system. But in some cases, the boot entry for OS might not be added and you’ve to add it manually. There are many third-party tools already available in market to do this. But if you want to add new OS entry manually, this article is for you.
Here’s how you can add parallel OS boot entry to boot manager in Windows 10:
How To Add Parallel OS Boot Entry To Boot Manager In Windows 10/8/7
In this example, we’re assuming you have stable version of Windows 10 installed on C: drive. Then you installed preview build of Windows 10 on parallel drive i.e. D: drive. Now the problem is that boot entry for preview build of Windows 10 on D: drive is not added to boot manager. So when you start machine, you’re directly booted to stable version of Windows 10 installed on C: drive. Now let us fix this by adding the boot entry.
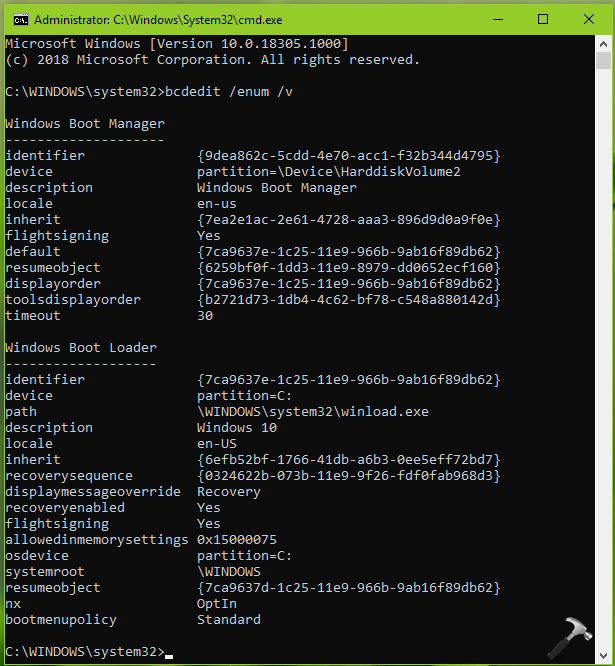
First of all, you need to verify the boot entries existing in boot manager. Open administrative Command Prompt and run bcdedit /enum /v command. The output should be similar to below shown window. We can clearly see that only C: drive installed Windows 10 is present in boot manager.
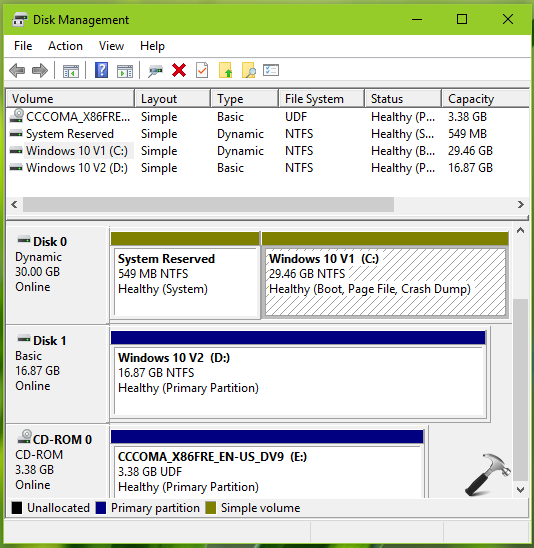
Now identify the drive letter for parallel installed OS, in case if you do not know what it is. Open Disk Management and note the drive letter. In this example, we’ve D: as the parallel drive letter.
Now back in administrative Command Prompt, type bcdboot D:\Windows and press Enter key. Replace D: with drive letter applicable in your case. Press Enter key and you should receive ‘Boot files successfully created‘ message. This means boot entry is now added to boot manager.

Close Command Prompt and reboot the machine. After you restart the machine, you’ll be presented with following screen, where you can simply select which OS you want to use.

Once you select your desired OS, you can continue to login screen then. If you do not select any option here, you’ll be automatically booted default OS, which is always the OS whose boot entry we added later for example, OS installed on D: drive in this example.
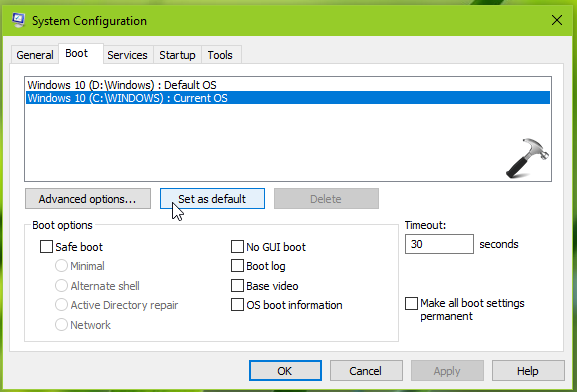
You can change the default OS any time in System Configuration utility. Run msconfig command and switch to Boot tab. Select the OS you want set default and click on Set as default. Then click Apply, followed by OK.
In this way, you can added parallel OS boot entry to boot manager for Windows 10.
That’s it!
Related: Add/remove Safe Mode option to Boot Manager in Windows.
![KapilArya.com is a Windows troubleshooting & how to tutorials blog from Kapil Arya [Microsoft MVP (Windows IT Pro)]. KapilArya.com](https://images.kapilarya.com/Logo1.svg)




![[Latest Windows 10 Update] What’s new in KB5055612? [Latest Windows 10 Update] What’s new in KB5055612?](https://www.kapilarya.com/assets/Windows10-Update.png)


Leave a Reply