Windows has a lot of tools to repair itself when it got in technical issues. Windows 8 or 8.1 in addition to those repairing tools, introduces us with a new kind of tool, named as Refresh. This Refresh feature is something close to like what doing a repair install in Windows 7 and Vista was for, but made a lot easier, faster, and safer to do now in Windows 8.
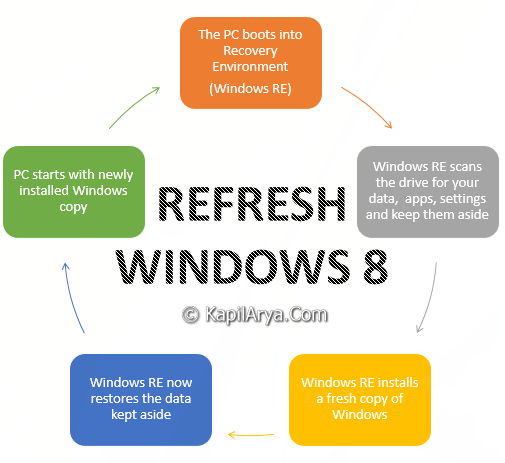
Using Refresh, you can keep all personal data, Modern style apps, and important settings from the PC, and foremost reinstall Windows. This is how refreshing works in Windows 8:
Now here is the how to part, but before proceeding some important things you must be aware of, here are they:
Page Contents
Settings That Will Remain Unaffected
- All user accounts
- Files in your user C:Users(user name) folders. (ex: Desktop, My Documents, My Music, etc…)
- Wireless network connections
- Apps from the Windows Store will be kept
- Mobile broadband connections
- BitLocker and BitLocker To Go settings
- Drive letter assignments
- Personalization settings such as lock screen background and desktop wallpaper
- Choices you made during Windows Welcome, such as computer name and user accounts, will not change
- Network, Libraries, and Windows Update settings will not change
- Customer Experience Improvement Program settings will not change
- Windows Error Reporting settings will not change
- Some drivers may or may not be removed
Settings That Won’t Be Preserved
- File type associations
- Display settings
- Windows Firewall settings
- Metro Apps settings
- All installed 3rd party desktop programs (not Store apps). A list of removed apps will be saved on your desktop after the refresh is finished to let you know which programs were removed
- You PC settings will be changed back to their defaults
- Installed Windows Updates will be removed
- Some drivers may or may not be removed
So, without wasting your time anymore, lets see how to part:
Refresh Windows 8.1 Within Windows 8.1
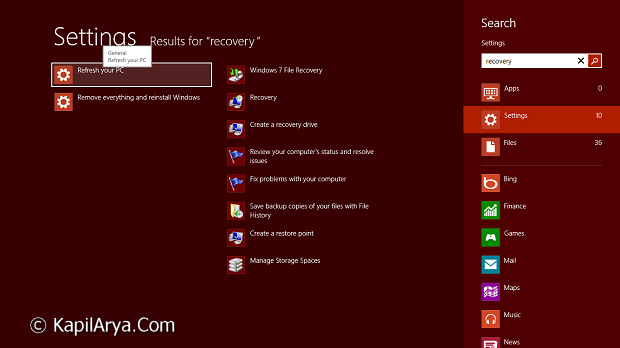
1. Press  + W and type recovery or refresh in the search box. From the search results, pick Refresh your PC.
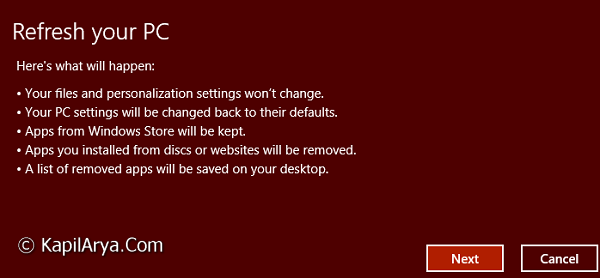
2. Now you’ll see following window, click Next.
![KapilArya.com is a Windows troubleshooting & how to tutorials blog from Kapil Arya [Microsoft MVP (Windows IT Pro)]. KapilArya.com](https://images.kapilarya.com/Logo1.svg)


