Few days back, Microsoft officially rolled out Windows 10 V1803 aka April 2018 Update. See this post, if you can’t get this update on your Windows 10 device. However, after upgrading to V1803, some users have commonly reported a bug which we will discuss in this article.
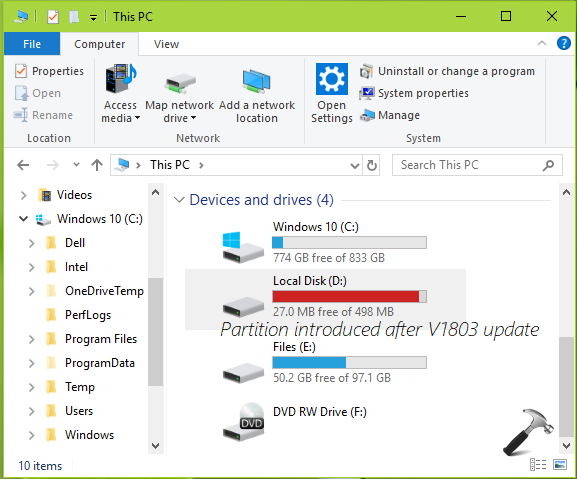
Actually, after upgrade, users may found an extra disk partition that is visible in File Explorer, under This PC. This partition appears just after V1803 update is installed. The partition is also visible in Disk Management and DISKPART.

After researching a bit on this, we found that the newly introduced partition is actually the recovery partition. As we all know that recovery partition is hidden by default. But V1803 update may have assigned a drive letter to this partition and thus it become visible in File Explorer and other disk related snap-ins. This problem may be faced by the users who upgraded, rather than making clean install of V1803.
Recommended: Understanding different disk partitions in Windows 10.
There is no need to worry about new partition but if its annoying to you, remove its drive letter and it will become hidden again. It is advisable that you should not delete this extra partition or modify it, otherwise it may affect your system.
Below mentioned steps will show you how to remove the drive letter from this partition.
FIX: Windows 10 April 2018 Update Results In Extra Disk Partition
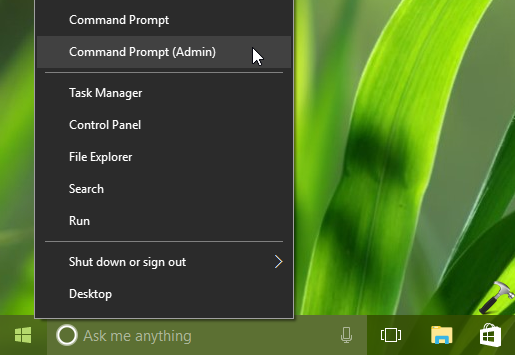
1. Right click on Start Button and select Command Prompt (Admin).

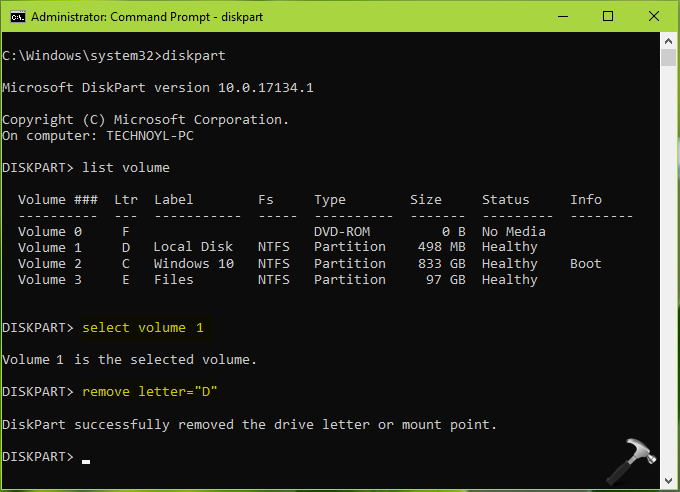
2. In the Command Prompt window, type the commands mentioned in bold one-by-one and press Enter key after each:
diskpart
list volume
select volume # Replace # with the newly appeared partition number
remove letter="X" Replace X with the newly appeared partition drive letter

3. Close Command Prompt and reboot your machine. After restarting your system, the extra disk partition i.e. recovery partition will no longer visible in File Explorer.
Hope this helps!
![KapilArya.com is a Windows troubleshooting & how to tutorials blog from Kapil Arya [Microsoft MVP (Windows IT Pro)]. KapilArya.com](https://images.kapilarya.com/Logo1.svg)


![[Latest Windows 10 Update] What’s new in KB5055612? [Latest Windows 10 Update] What’s new in KB5055612?](https://www.kapilarya.com/assets/Windows10-Update.png)


42 Comments
Add your comment
Thank you Kapil! Solved the problem for me.
^^ Glad we could help 😎
TY
^^ Welcome!
Thank you. The problem is now resolved.
Can you assign this letter to another drive after you remove it? Thank you!
^^ I can’t see any benefit of doing so! Because the recovery partition is of no use for us.
Maybe I didn’t make the right question. So, I’ll try again. I had letter ‘F’ assigned to an external drive. Adobe Lightroom “remembers” that I have photos in that F: drive. After the update, which I did without that F: drive attached. After the update, Win10 assigned the ‘F’ letter to the “new” partition so now F: is a 450MB. I need to reassign the ‘F’ letter to that external drive again. I cannot do it(not allowed) with Disk Management. I want to try your solution. So what I am asking is if the ‘F’ letter will be available(to assign to my external drive) after this fix. I hope I am making sense and thanks for your time.
^^ I believe it should be available, you can give it a try and let me know how it goes.
Got access denied.
^^ Make sure you’re admin and running Command Prompt as administrator.
You actually are a lifesaver.
All the different tutorials I saw never shown pictures so I didn’t know if I was doing it correctly as well as many people kept saying volume 1, 2, 3 using the partition they had instead of telling us that ours might be a different volume number than theirs. Thanks heaps, the annoying space notification is gone!
^^ Glad to help Alex 😎
Many thanks for a very clear fix instructions and explanation of what was causing the problem.
^^ Glad you find it useful 😊
Thanks for your easy solution. My (incorrect) low disk space problem on my E drive is solved. No more error notification.
^^ Happy to help Charlie 😊
What a annoying result to a forced Windows update. Thanks for the resolution.
^^ Glad to help CC!
What happens if we just leave it alone as is?
^^ Nothing happens 😊 However if the partition has very less free space, it will trigger low disk space notification, which is frequent and annoying.
My Command Hangs After DISKPART so I can’t do the next few steps. Any ideas?
^^ You may then try this solution via recovery mode Command Prompt.
This worked for me Kapil. Thanks a lot :-)
^^ Thanks for your feedback!
THANKS, that “E” drive was making me crazy (er)
Thank you so much for your help, problem solved.
^^ Glad to help 😊
Thanks so much, Kapil. I followed your procedure to the letter and it worked 100%, but I missed a detail: before I was able to hide the recovery partition, I was getting the message that it is full, and I didn’t clean it up. Now I’m trying to do a system backup and cannot complete it because of this issue, and I can’t make space because the dive is hidden. I will have to revert the process (assign a letter to the drive, clean it up, and hide it again). Can you please help me with this? I’ll really appreciate it.
^^ You do not need to cleanup the space on that partition. Infact you can’t cleanup the partition because it is system protected. So as you’ve already make it hidden, you do not need further actions. You’re good to go 😊
Thanks for your advice. I’ll give it another try and if it doesn’t work, I’ll try to contact you for your always helpful comments!!
^^ Sure, we’re always here to help you 😊
Sorry, Kapil, but I tried again and keep getting the same error message. It looks like I’ll need to expand that drive a little. Any suggestions?
thanks that WORKED for me
^^ Thanks for your feedback!
Awesome Thanks!!!
^^ Glad to help Shaaron 😊
Hello, I followed most of this process, however when I got to the screen where all the volumes are listed. How do I know which on to select?..
Thanks so very much for any help
^^ Select the volume with drive letter, which appeared after the update.
Help! My laptop is running so slow! I have tried all the usual clean ups and start up programmes, however still no luck, I found that the D drive seems to be full and is showing “recovery”? Can you possibly help? Thanks so much in advance.
When I right click on “Start”, I do not have “Command Prompt (Admin)”. My computer displays “Windows PowerShell (Admin)”.
^^ Refer: https://www.kapilarya.com/replace-windows-powershell-with-command-prompt-on-start-button-context-menu-windows-10.