High CPU usage is one of the most common and persistent issues in all Windows versions, especially Windows 11. It can be caused by various factors, including outdated or corrupted graphics drivers, GPU power management issues, unnecessary background programs, auto-scaling settings, and malware. In this guide, we’ll show you how to fix high GPU usage on Windows 11.
Page Contents
Solution 1: Run CHKDSK, DISM, and SFC Commands
Running DISM and SFC will repair any missing or damaged Windows files, while the CHKDSK command will fix any bad sectors on your hard drive. Running all these commands can sometimes resolve high CPU usage issues on your PC.
1. Press the Windows key, type “CMD”, and then right-click and select “Run as administrator“.

2. In the Command Prompt, run these commands one by one:
DISM /Online /Cleanup-Image /RestoreHealth
SFC /scannow
chkdsk /f

3. After running all the commands, restart your computer.
Solution 2: Disable Third-Party Antivirus and Scan for Malware
Sometimes a third-party antivirus software can lead to high GPU usage issues. So, make sure to disable or uninstall the third-party antivirus program and use the built-in antivirus program, Windows Security to run a malware scan.
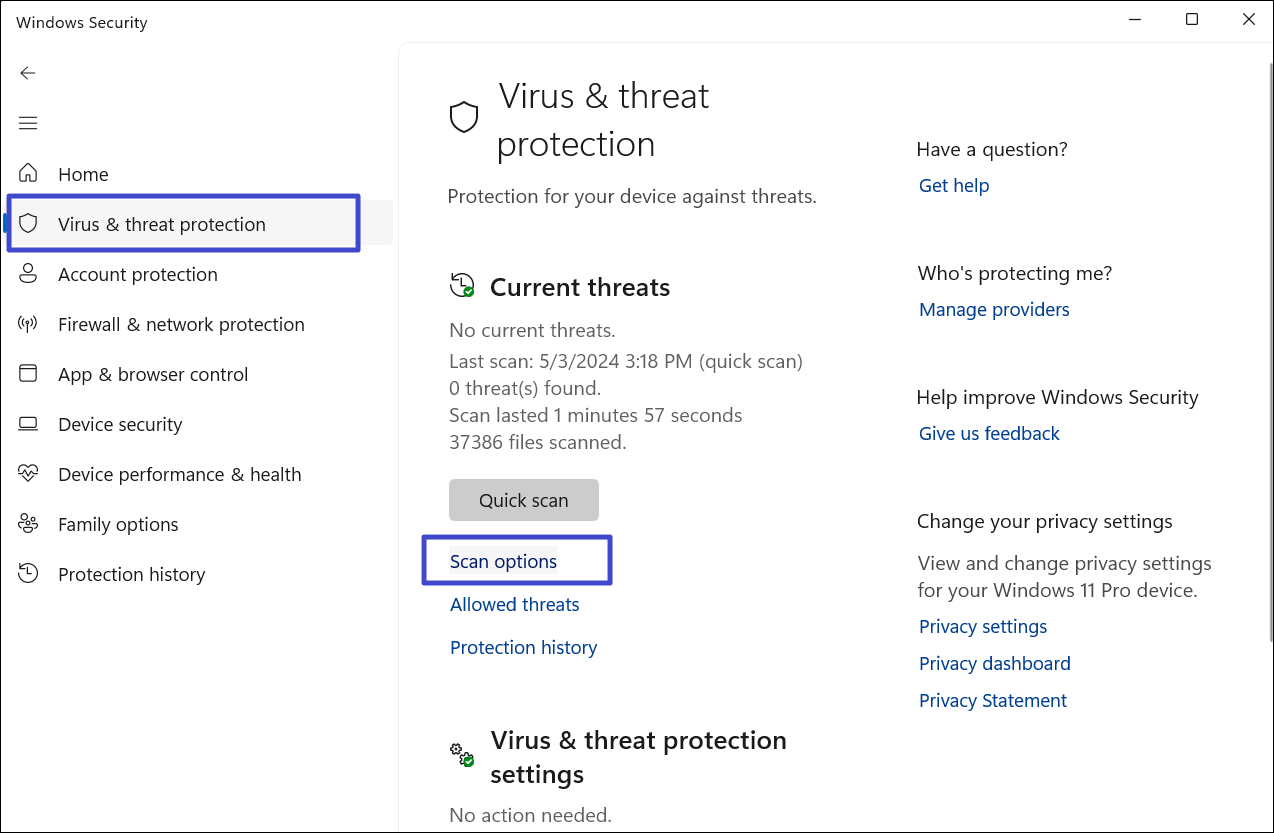
1. Open the System tray and click the Windows Security icon.
2. Go to the “Virus & threat protection” tab and select the “Scan options“.

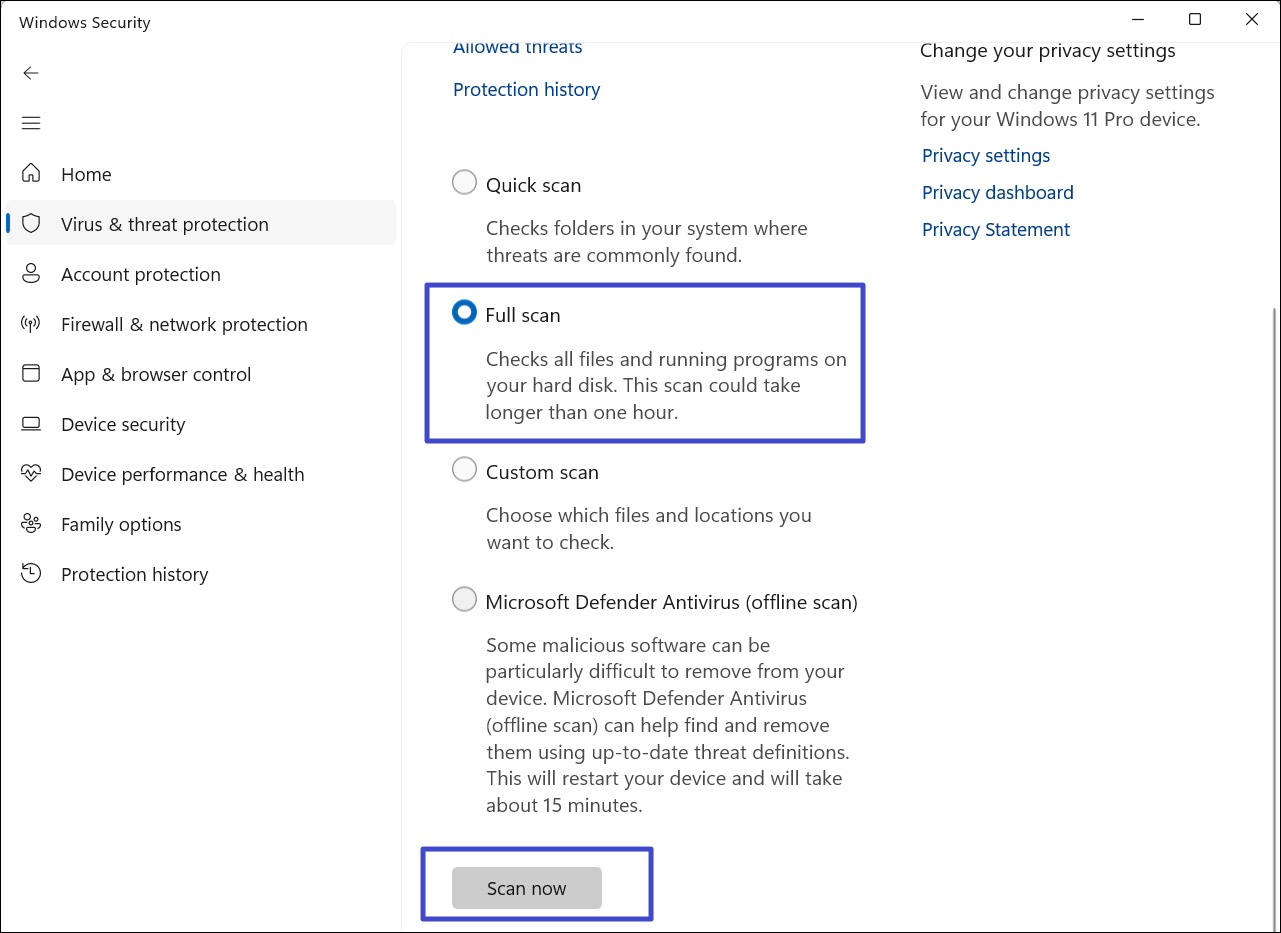
3. Select “Full scan” and click “Scan now“.

Solution 3: Disable Unnecessary Startup Apps
1. Right-click the taskbar and select “Task Manager“.
2. In the Task Manager, go to the “Startup apps” section and disable all the unnecessary apps that take up resources when you start your PC.

Solution 4: Turn Off HDR
1. Open Windows Settings and navigate to “System > Display“.
2. Select the “HDR” settings.

3. Then, turn off the “Use HDR” option.
Solution 5: Update Windows
1. Open Windows Settings, head to “Windows Update“ from the left sidebar and click on “Check for Updates” in the right pane.

2. Wait for Windows to download and install the pending updates
3. Then, reboot your computer.
Solution 6: Turn Off Hardware Acceleration
1. Right-click on the desktop and select “Display settings“.

2. Scroll down to the bottom of the Display settings and select “Graphics” under Related settings.

3. Expand the “Advanced graphics settings” and disable the “Hardware-accelerated GPU scheduling” toggle.

Solution 7: Turn Off Fast Start-up
1. Type “Power plan” in the Start menu and select “Edit power plan“.

2. Click on “Choose what the power buttons do“.

3. Then, click on “Change settings that are currently unavailable“.

4. Disable “Turn on fast startup (recommended)” and click “Save changes“.

Solution 8: Use Recommended Resolution & Scaling Settings
1. Right-click the desktop and select “Display settings“.
2. Under Scale & layout, set both “Scale” and “Display resolution” options to the Recommended settings.

Solution 9: Update your Graphics Card
If your GPU drivers don’t update automatically, you should manually update them to ensure your graphics card functions properly and Windows runs optimally. You can manually update your GPU drivers by downloading and installing the latest driver from your manufacturer’s website or using the GPU driver software. For instance, here’s how you can update the driver in the NVIDIA app.
1. Open the NVIDIA app or NVIDIA Experience app on your computer.
2. Go to the Drivers tab and click the “Check for updates” (refresh) button.

Solution 10: Set Desktop Window Manager to Power Saving Mode
Programs integrated with the Windows Explorer process can sometimes trigger high CPU usage in the Desktop Window Manager (DWM). By setting, resource-intensive apps like video games to “High-Performance Mode” to use the dedicated GPU, and less demanding programs like the Desktop Window Manager to “Power Saving Mode” to rely on the integrated GPU, you can reduce the load on your high-performance GPU. Follow these steps:
1. Right-click the desktop and select “Display settings“.
2. Select “Graphics” under Related settings.

3. Under Custom settings for applications, click the “Add desktop app” button.

4. Navigate to C:/Windows/System32 and select “dwm” (.exe). Then, click “Add“.

5. Then, expand “Desktop Window Manager“.

6. Next, set GPU preference to “Power Saving” mode.

Solution 11: Change the Power Mode in the Nvidia Control Panel
1. Right-click on your desktop, select “Show more options,” and then choose “Nvidia Control Panel.”

2. Go to “Manage 3D Settings,” find “Power management mode” under Global Settings, and set it to “Prefer Maximum Performance.”
3. Then, click “Apply“.

4. Next, open Windows 11 Settings and go to “System” > “Power & Battery”
5. Set the Power mode to “Best Performance” (for both On battery and plugged in if applicable). This can help prevent your GPU from being limited by Windows power settings.

Solution 12: Adjust Visual Effects Settings
1. Press Windows + I to open the Settings app. Navigate to “System > About” and click on “Advanced System Settings.”

2. In the pop-up window, go to the “Advanced” tab. Under the Performance section, click “Settings”.

3. Select “Adjust for best performance” in the Visual Effects tab. Click “OK” to save the changes.

Solution 13: Set Only One GPU Active
If you’re experiencing high GPU usage on your PC or laptop with dual GPUs (integrated and dedicated graphics), try these solutions:
For Desktop users
Make sure your monitor’s display cable (HDMI, DisplayPort, etc.) is connected directly to your dedicated GPU, not the motherboard.
For Laptop users
Open the manufacturer’s control center (e.g., MSI Center) and set the GPU to dedicated/discrete graphics card instead of hybrid mode. To save battery, you can choose the integrated GPU mode, but avoid the hybrid setting if it causes high GPU usage.

Solution 14: Restore or Reset Windows
1. Press Windows + I to open Windows Settings. Under System, scroll down and click on “Recovery”.
2. In the Recovery menu, click “Reset PC” to begin. Follow the on-screen instructions to complete the process and reset your Windows 11 pc.
3. If you prefer to use System Restore, click “Restart now” under Advanced Startup. Once your PC restarts, follow the steps to restore your system using restore points.

That’s it.
![KapilArya.com is a Windows troubleshooting & how to tutorials blog from Kapil Arya [Microsoft MVP (Windows IT Pro)]. KapilArya.com](https://images.kapilarya.com/Logo1.svg)


Leave a Reply