By default, Windows 11 features built-in OneDrive. Using OneDrive, users can sync files between the cloud and their system. This allows you to access your files from anywhere, be it your mobile device, your computer, or the website of OneDrive. When you edit, delete, or add a file or folder to the OneDrive folder, the same gets reflected on the official website and vice versa. So, how to start OneDrive automatically when you login to Windows 11?
By default, OneDrive is set to launch automatically when you login to Windows 11. If this feature is disabled on your system, then you can enable OneDrive on your own. In this post, we are going to cover two different methods to launch OneDrive automatically when you login.
Page Contents
Start OneDrive automatically when you login to Windows 11
Method 1: Start OneDrive Automatically Through OneDrive Settings
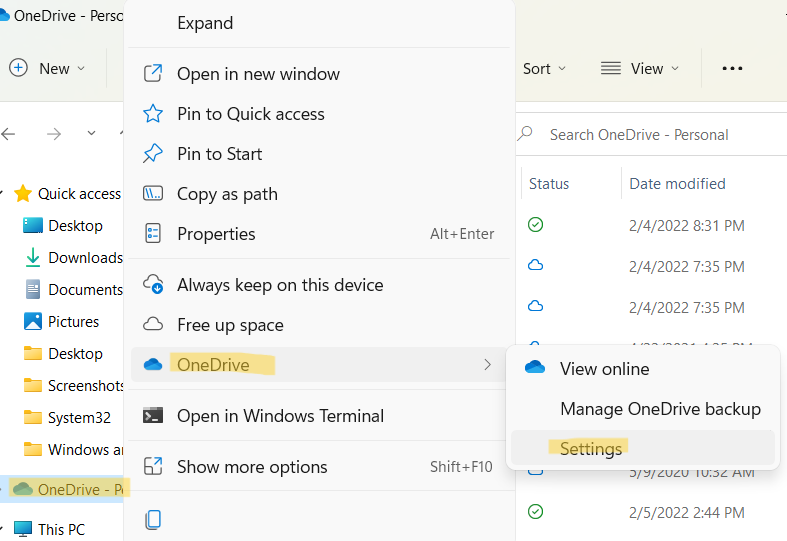
1. In the first place, open OneDrive through File Explorer.
2. After right-clicking on it, you need to click on the Settings tab.

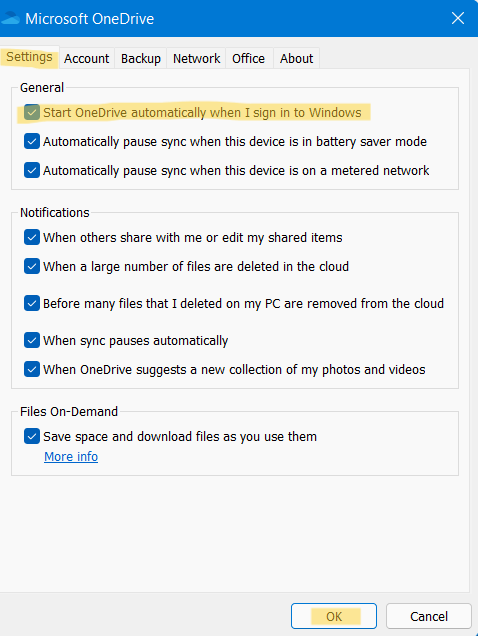
3. Under Settings, check the box present next to Start OneDrive automatically when I sign in to Windows in the General window. Lastly, press OK.

Now, OneDrive will launch automatically every time you login to Windows 11. If this method does not work for you, then try out the next method through Registry Editor
Method 2: Start OneDrive Automatically Through Registry Editor
1. Initially, open Registry Editor by typing regedit in the Run dialog box. In order to open the Run dialog box, press the Windows + R tabs together on your keyboard.

2. Now, go to the following location:
HKEY_CURRENT_USER\Software\Microsoft\Windows\CurrentVersion\Run
3. Once there, double-click on OneDrive and put its value data as “C:\Users\LENOVO\AppData\Local\Microsoft\OneDrive\OneDrive.exe” /background

4. Now, exit Registry Editor and reboot your Windows system.
Now, you will be able to launch OneDrive automatically when you login to Windows 11. So, these are a few ways to start it automatically on your Windows 11 system.
![KapilArya.com is a Windows troubleshooting & how to tutorials blog from Kapil Arya [Microsoft MVP (Windows IT Pro)]. KapilArya.com](https://images.kapilarya.com/Logo1.svg)


![[Latest Windows 10 Update] What’s new in KB5055612? [Latest Windows 10 Update] What’s new in KB5055612?](https://www.kapilarya.com/assets/Windows10-Update.png)

Leave a Reply