If you are using same Microsoft account on all of your Windows devices, you might want sharing to be easy one. Keeping this in mind, Windows 11 provides more flexible options for how you want to share your content across devices. It helps you to start working on something on one of your system, and finish working on it later from a different device. In this article, we will see how to configure Windows 11 to share content across your devices.
For sharing to work seamlessly, it is important that you use Microsoft account and not the local account on your system. Also, you’ve to use same Microsoft account on all of your devices. Once you ensure these things, here’s how you can configure sharing settings.
Page Contents
Configure Windows 11 to share content across your devices
Method 1 – Using Settings app
1. Press  + I keys to open Settings app.
2. In the Settings app, select Apps & features.

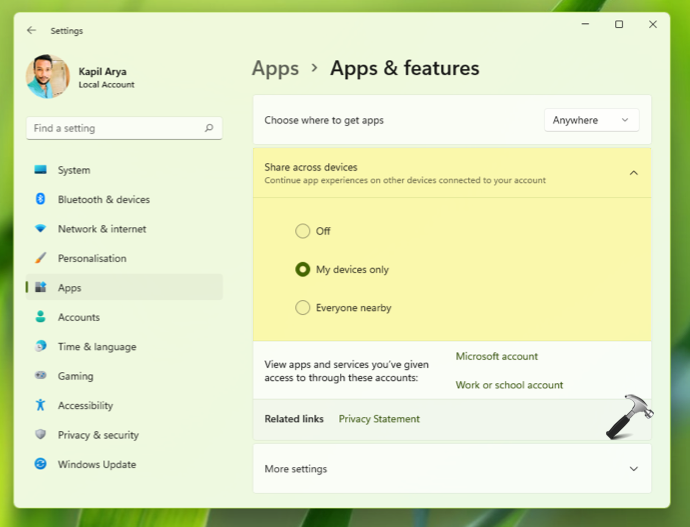
3. Under Apps & features, expand Share across devices. Here, you’ll find following three options:
- Off – Select this option to turn off sharing across your devices.
- My devices only – Choose this option to allow sharing across your devices only.
- Everyone nearby – Pick up this option to allow sharing across all devices nearby.

4. After selecting your desired option, can you close Settings app.
Method 2 – Using Registry
1. Run regedit command to open Registry Editor.
2. In left pane of Registry Editor window, navigate to:
HKEY_CURRENT_USER\Software\Microsoft\Windows\CurrentVersion\CDP
3. In right pane, set following DWORD values for the setting you want:
| Setting | Values |
|---|---|
| Off | CdpSessionUserAuthzPolicy – 0
RomeSdkChannelUserAuthzPolicy – 0 |
| My devices only | CdpSessionUserAuthzPolicy – 1
RomeSdkChannelUserAuthzPolicy – 1 |
| Everyone nearby | CdpSessionUserAuthzPolicy – 2
RomeSdkChannelUserAuthzPolicy – 2 |

4. Then go to this registry key:
HKEY_CURRENT_USER\Software\Microsoft\Windows\CurrentVersion\CDP\SettingsPage
5. Set RomeSdkChannelUserAuthzPolicy to 1, if you want sharing for your devices only. Or set it 2, for sharing with everyone nearby. For no sharing, simply delete this DWORD.

6. To apply above changes, close Registry Editor then sign out and sign-in back to your account.
That’s it!
Read next: How to rename your Windows 11 PC.
![KapilArya.com is a Windows troubleshooting & how to tutorials blog from Kapil Arya [Microsoft MVP (Windows IT Pro)]. KapilArya.com](https://images.kapilarya.com/Logo1.svg)


Leave a Reply