In modern computing devices, touchpad becomes the common feature that comes in. Your system may have precision or non-precision touchpad, depending on software and hardware combination present. The touchpad is usually designed by third-party vendor and shipped with your device. It is basically available to improve gestures and accessibility on your device.
If you encounter issues with touchpad, this may be driver problem and you need to update the driver to latest version to rectify the issue.
In absence of working drivers, touchpad will not be able to provide its benefits. If the touchpad on your system is interrupting you while typing while using internal keyboard, you may want to disable touchpad. Microsoft now provides you the native options to disable touchpad in single click. It is also possible to automatically disable touchpad, when you connect mouse.
Below mentioned methods will show you how to disable touchpad in your Windows 10.
Page Contents
How To Disable Touchpad In Windows 10
Method 1 – Via Settings App
1. Right click Start Button or press  + X keys and select Settings.
2. In the Settings app, navigate to Devices > Touchpad.
3. Now in right pane of Touchpad, turn Off the option for Touchpad to disable it. If you want to disable touchpad automatically when you connect mouse, simply uncheck Leave touchpad on when a mouse is connected option.
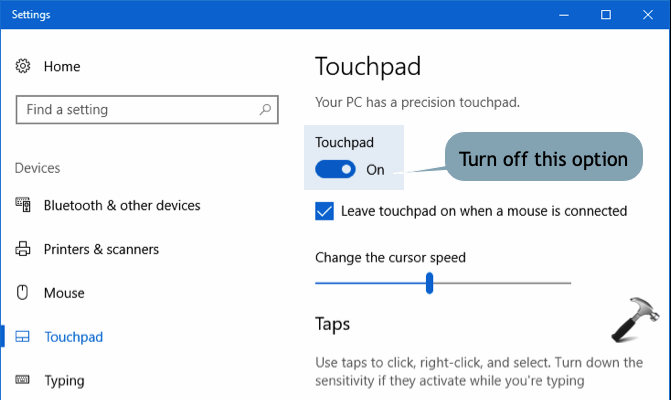
Your setting will be saved and immediately applied.
If you can’t open Settings app or this method doesn’t works for you, try Method 2 mentioned below.
Method 2 – Via Device Manager
1. Press  + R and type
 devmgmt.msc in the Run, hit Enter key to open Device Manager snap-in.

2. In the Device Manager window, under Mice and other pointing devices, right click on your touchpad device and select Disable device.
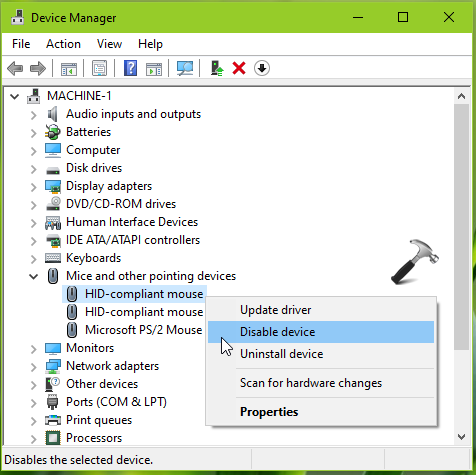
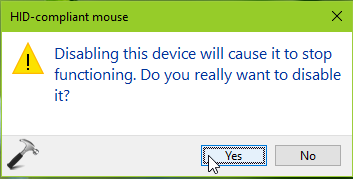
3. Next, in the confirmation prompt, select Yes and this will finally disable touchpad on your system.
That’s it!
You may also like:
1. How To Change Computer Name In Windows 10
![KapilArya.com is a Windows troubleshooting & how to tutorials blog from Kapil Arya [Microsoft MVP (Windows IT Pro)]. KapilArya.com](https://images.kapilarya.com/Logo1.svg)








Leave a Reply